background image

❏ 

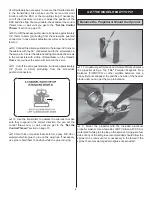
7. Glue in the fi n with the same glue used for the stab–do 

not clog the receiver antenna tube that comes out of the 
fuselage by the left side of the fi n. View the fi n from behind 
the model to make sure it is vertical.

Set Up the Pushrods. Install the

Battery & Receiver

❏ 

1. Connect an aileron servo extension wire to the receiver 

so you will be able to connect the aileron servo when 
mounting the wing. Guide the receiver antenna up through 
the antenna tube. If it’s diffi cult to get the antenna up through 
the tube, a few drops of household oil added to the antenna 
will help. 

❏ 

2. Connect the rudder and elevator servos and the ESC 

to the receiver. Turn on the transmitter. With the propeller 
removed,
 connect a charged motor battery to the ESC and 
operate the controls to make sure the servos and ESC are 
connected to the receiver correctly. 

❏ 

3. Use the included hook-and-loop material (or optional 

double-sided foam mounting tape–not included) to mount 
the receiver where desired. The location shown is preferable 
because all the wires can easily reach and the receiver will 
be raised off the cabin fl oor, making it less likely to get wet if 
any water leaks in. 

❏ 

4. Mount the motor battery as far forward as possible in 

the fuselage with one strip of the included hook-and-loop 
material on the battery and the opposing strip in the bottom 
of the fuselage.

❏ 

5. Install the elevator pushrod wire into the middle hole of 

the elevator control horn. Secure it with the nylon Faslink. 

❏ 

6. With the system “on,” center the elevator and tighten 

the retaining screw on the screw-lock pushrod connector 
with a drop of threadlocker.

❏ 

7. Connect the rudder pushrod the same way–don’t forget 

to use threadlocker on the retaining screw in the screw-lock 
pushrod connector and don’t forget to install the screw that 
holds on the servo arm.

❏ 

8. Operate the controls on the transmitter to make sure the 

elevator, rudder and motor respond in the correct direction. 

8

8

Содержание SEAWIND RP RX-R

Страница 1: ...final user assembled product By the act of using the user assembled product the user accepts all resulting liability If the buyer is not prepared to accept the liability associated with the use of thi...

Страница 2: ...on or changes an Important TECH NOTICE box will appear in the upper left corner of the page Click on the Tech Notice box to read the info AMA We urge you to join the AMA Academy of Model Aeronautics a...

Страница 3: ...be the right kind With the exception of slow drying glue such as epoxy or waterproof white glue which should be used for the horizontal stabilizer so there will be time for alignment the rest of the m...

Страница 4: ...also be ordered directly from Hobby Services by calling 217 398 0007 or via facsimile at 217 398 7721 but full retail prices and shipping and handling charges will apply Illinois and Nevada residents...

Страница 5: ...ontents list Great Planes Product Support 3002 N Apollo Drive Suite 1 Champaign IL 61822 Telephone 217 398 8970 ext 5 Fax 217 398 7721 E mail airsupport greatplanes com Kit Contents 1 Fuselage with Gr...

Страница 6: ...let does not remain locked use a small drop of CA on the collet to hold it to the propeller shaft Then lock it down again 5 Insert a pin into the motor pod 1 2 13mm behind the middle of the wood block...

Страница 7: ...on lead weight you will be using to balance the model later This is how much weight will have to be used when actually gluing the stab into the fuselage Note It s best to glue the horizontal stabiliz...

Страница 8: ...loop material or optional double sided foam mounting tape not included to mount the receiver where desired The location shown is preferable because all the wires can easily reach and the receiver will...

Страница 9: ...1 4 5mm to 6mm protruding from the screw lock pushrod connectors 12 Use the transmitter to operate the ailerons to make sure they respond in the correct direction You can set the control throws now or...

Страница 10: ...es not have dual rates we recommend setting the throws at the high rate setting Note The throws are measured at the widest part of the rudder at the bottom These are the recommended high and low rate...

Страница 11: ...ause it to become too difficult to control In any case start at the recommended balance point and do not at any time balance the model outside the specified range 3 If the tail drops the model is tail...

Страница 12: ...tteries may not reach their full capacity and you may be flying with batteries that are only partially charged Range Check When you get to your flying site ground check the operational range of the ra...

Страница 13: ...r spectators Only personnel involved with flying the aircraft are allowed at or in the front of the flight line Intentional flying behind the flight line is prohibited 4 I will operate my model using...

Страница 14: ...the motor won t quit unexpectedly and you will have enough battery to land under power Takeoff The Seawind is a joy to fly from water but there are a few techniques that should be used to insure succe...

Страница 15: ...awind touches down The most important thing about landing on water whether you are coming in a little hot or too slow is to get the model to flare keeping the nose up out of the water Taking Off From...

Страница 16: ...lass The built up wing and tail section are made of balsa and factory covered in Top Flite MonoKote The wing simply plugs into an aluminum joiner and is secured with nylon bolts no tools needed The un...

Отзывы: