6
NO
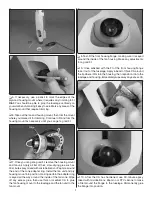
FAN ROTOR
ADAPTER
(BRASS)
MOTOR
SHAFT
The adapter is
not all the way on.
The adapter is
all the way
down onto the
motor shaft up
to the threads.
FLA
T SPOT
YES
FLA
T
S
P
O
T
OT
❏
5. Retrieve the brass
fan rotor adapter
that was packaged
with the HyperFlow fan unit. Fit the adapter onto the motor
shaft with one of the set-screw holes in the adapter aligned
with the fl at spot on the shaft and make sure the adapter goes
all the way on up to the threads. If you can’t get the adapter
to go on all the way just by pressing it on, use a hobby torch
to heat the adapter fi rst.
❏
6. Test-fi t both set screws into the brass adapter on the
shaft—the screw you fi led down goes into the hole that is not
over the fl at spot. Make sure the end of that screw is fl ush (or
slightly below) the surface of the adapter. If necessary, fi le
down the screw a little more.
❏
7. Take out the set screws and
lightly
wet the threads with
threadlocker. Then tighten them back into the adapter locking
it onto the shaft.
❏
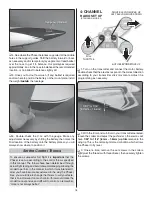
8. Use a felt-tip pen and/or drill a small dimple on top surface
of the base of the adapter where shown. If necessary, this
will be used as an alignment cue for balancing the fan later.
❏
9. Temporarily fi t the fan onto the adapter and the cone
onto the fan. Use a 1/16" [1.6mm] twist drill, in a pin vise or
held in your fi ngers, to
lightly
dimple the side of the fan and
cone that align with the side of the adapter that also has the
dimple. Make sure all three dimples are in alignment. These
will all serve as temporary reference marks.
Enlarge to Fit
3 mm Screws
❏
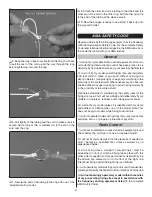
10. Remove the cone and fan from the motor. Use a hobby
knife to slightly enlarge the slots in the fan housing as shown
to accommodate the motor screws.


