8
Installation
Mounting a microphone
Mounting a microphone
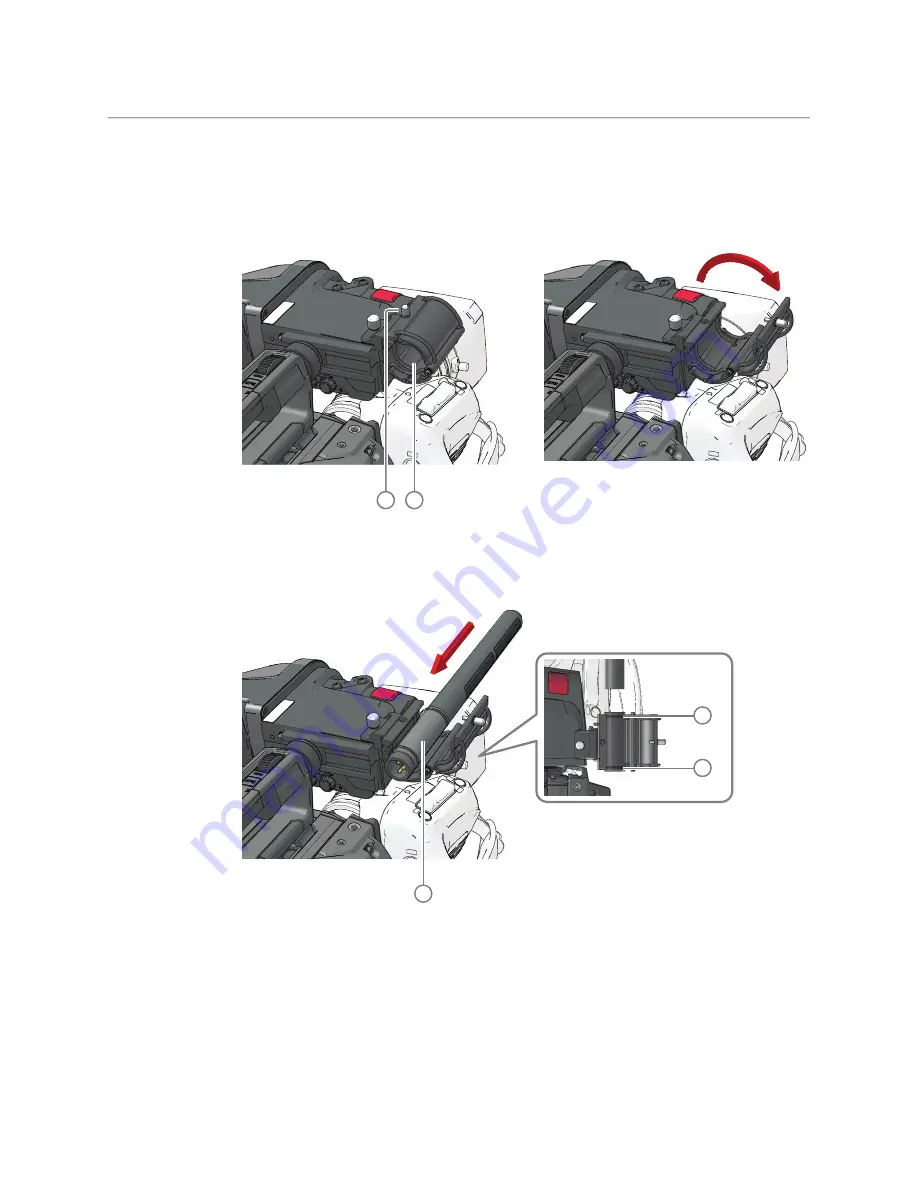
To attach a microphone to the camera proceed as follows:
• Open the microphone holder by unscrewing the knurled screw
(1)
of the microphone
support bracket
(2)
on the viewfinder and open the bracket:
• Slide the microphone into the split tube
(3)
(included with the bracket) until the back
end (connector sied) of the microphone becomes visible.
• Place the tube with the microphone into the holder with the split facing upwards.
Mount the microphone as straight as possible.
• Ensure that the rubber supports at the back and front of the holder fit into the rims
(4)
around the tube.
• Close the holder and tighten the knurled screw at the top. Do not allow a wind hood
(when present) to touch the holder as this reduces the damping effect:
2
1
top view
3
4
4
Содержание LDX 150
Страница 1: ...www grassvalley com LDX 150 Live Production Camera User Guide 13 00126 000 v1 0 2022 11 15 ...
Страница 12: ...xii Notices ...
Страница 18: ...xviii Table of Contents ...
Страница 22: ...4 Introduction System components and accessories ...
Страница 40: ...22 Configuration XCU mode 1X speed UHD with XCU Universe UXF ...
Страница 58: ...40 IP Media setup PTP tab ...
Страница 104: ...86 Video setup Reverse Scan ...
Страница 150: ...132 Menu references Diagnostics menu High Temp Warn 0 65535 0 S Function Values U F Description ...
Страница 153: ...135 B Connectors Right front side Lens connector view finder connector Front Mic connector Bottom view ...
Страница 162: ...144 Connectors C2IP Ethernet connector ...
Страница 174: ...156 Procedures Updating camera software ...
Страница 180: ...162 Installation of Q SFP modules List of Q SFP modules ...
Страница 183: ...165 LDX 150 User Guide Dimensions 166 5 mm 252 3 mm 379 7 mm 92 7 mm 74 mm 153 3 mm 93 mm 5 mm ...
Страница 184: ...166 Specifications Dimensions ...


