background image

13

Motor adjusting slot

三. 

Screen Adjustment

(Please take apart the baffle when adjusting the screen. And please reinstall the baffle after adjusting.)

Avoid the overheating of motor; please do not use the screen 

over 4 seconds for extending and retracting continuously. The 

motor needs 4 minutes to cold down and the motor do not need 

any lubricant. The standard factory setting of upper and lower 

limitation is perfect. To avoid the damage, please contact the 

professional people or local dealers for repairing.

Motor Positioning 

Pleae adjust the motor adjusting slot using M4 allen key 

Screen Extending

 Adjustment

Operate the adjustment when the screen extends completely

(1) For adjusting the viewing area, please insert the adjustment to regulate adjustment hole. A clockwise 

adjustment will increase the viewing area for about 13mm.

Note: After pressing the  Up  button, you will need a few seconds to see the adjustment of screen; and after 

pressing the  down  button, you will see the position changed of screen.

(2) With the over-adjustment, a counter-clockwise adjustment will return the screen. This adjustment can be 

operated when the screen stops at the lowest postion without controlling.

Please be careful while operating, too much retracting will cause the damages of screen and motor.

E. Synchro Power Relay(optional)

After conne cting the Wireless Synchr o 

Conver ter, the screen can be cont rolled 

by FM modul ation wireless cont roller 

which can coope rate with Sychr o Power  

Relay and switch of projector to cont rol 

the up and down of screen synchronous ly.

D. External Wall Switch (optional)

The wall switch is available for a fixed location. Please 

connect RJ11 plug to EXTCTRL input on the screen.

Note: please use a cord for a far location.

Wall Switch 
(optional)

Screen Retracting

Adjustment

Reference: 

(Note: This adjustment is not safety, please contact the professional people for repairing and avoid damaging of 

screen and warranty failure)

Caution

we strongly recommend that do not regulate the screen limitation privately. The standard limitation of 

screen is set from the factory and this standard can satisfy the requirement of users.

2

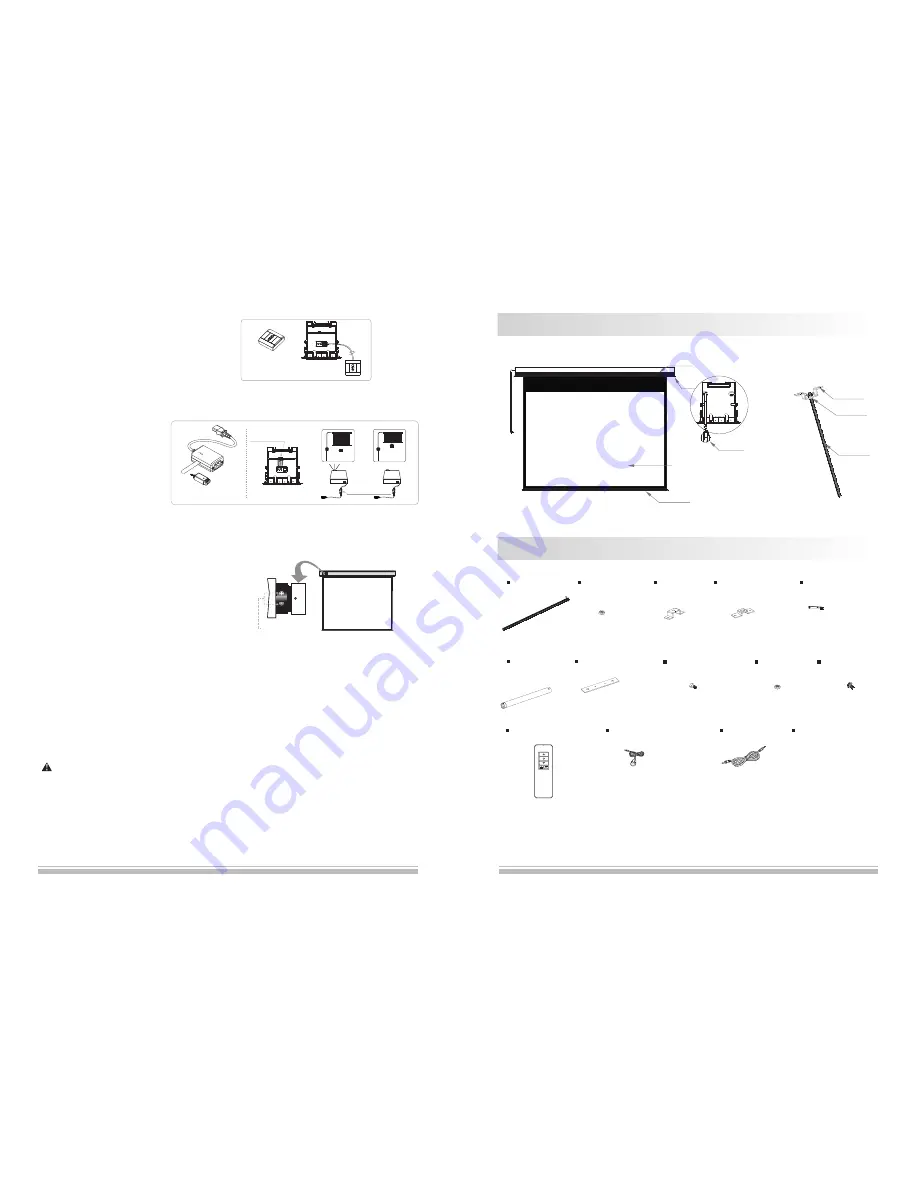
Screen Fabric

Aluminum Casing

Low Bar

M12 Nut (12pcs)

M12 Bar (4p cs)

M12 Bar

M12 Nut

Hook

Bracket

Front View

Hook (4pcs)

Pressing Piece (2pcs)

Wrench (1pc)

M10X100 Expansion 
Screw (8pcs)

Hanging Board (2pcs)

M6 Allen Screw (4pcs)

M6 Nut (4pcs)

M5 Screw (4pcs)

Instruction Manual (1pc)

In fra re d Remote Contro ller (1 pc)

External Infrared Receiver (1pc)

Trigger Line (1pc)

Sychro Power Relay and 
Wireless Synchro Converter

IR to RF receiver

Power Synchro 
and IR 

Side View

P o w e r  l i n e

Description 

Accessaries

“ “

Содержание Cyber Series

Страница 1: ...anual Power line disconnection Screen responds nothing to any operation B1 B2 H W A B3 L 170 170 Reason Solution GRANDVIEW REPRODUCING GENUINE COLORS Thank you for purchasing a Grandview projection screen Before use please read instructions carefully After installation store instructions for future reference B1 B2 B3 32 6 35 8 35 9 39 9 40 4 44 8 32 2 35 6 33 0 36 4 35 5 39 5 37 4 41 4 38 8 43 0 4...

Страница 2: ...about power line device interface power plug please contact the professional people 11 After installation please locate a power device in order to disconnect power or connect the power plug to electrical socket This electrical socket should be installed to a convenient position If the accident occurs during operation please disconnect power or take out the power plug 12 The ceiling or wall used fo...

Страница 3: ...ile operating too much retracting will cause the damages of screen and motor E Synchro Power Relay optional After connecting the Wireless Synchr o Conver ter the screen can be controlled by FM modulation wireless controller which can cooperate with Sychro Power Relay and switch of projector to control the up and down of screen synchronously D External Wall Switch optional The wall switch is availa...

Страница 4: ...tallation 1 Turn the controller around push to open the cover as guide arrow 2 Put the battery in according to the guide of cathode anode 3 Close the cover 二 External Control System Four control systems are available for motorized screen 1 Manual Control 2 Infrared Remote Control IR 3 Dry Contact 4 Switch EXT CTRL TRIG EXT IR Trigger Dry Contact RS232 External Infrared Receiver B Infrared Remote C...

Страница 5: ...gur e 5 TRIG Trigger EXT IR External Infrared Receiver EXT CTRL Dry Contact RS232 Figur e 10 Signal Output Switch M4 Screw Note the power box must be buttoned on the hanger of bracket Bracket Power Box End Cap Board Figur e 11 Four Hangi ng Boar ds are in middl e 100 H L 94 minus H 100 minus 180 100 Figur e6 Power Line Figur e7 Figur e8 Figur e9 11 Controller Buttons Function Instruction 1 Press b...

Страница 6: ...ith ceiling board 6 Connect the power after installation figure 24 figure 25 Figure21 Signal Line Exit Figure22 Figure24 Figure25 Figure26 Figure23 5 Please stay the screen in the opposite direction and fix the left and right hanging board on the screen using M6 screw and nut figure 12 6 Install the whole screen on the hanging bracket figure 13 14 7 Fix the screen using M12 nut figure 15 then adju...

Страница 7: ...in and remove the end cap please ensure the power line is fixed step 3 can be follow 2 Insert the control system signal line to corresponding output figure 11 and take out the signal line from control system signal line exit figure 18 3 Reinstall the end cap after completed control system and fasten the two rubber screws then reinstall the power box and fasten two screws according to step 4 Figure...

Страница 8: ...line cover of end cap and then fill in the power line Afterward stuck the line cover back to end cap then install the power line outside the casing figure 9 5 Please complete the installation of end cap and fasten two rubber screws do not need to install the power box at this moment 5 Install the whole screen on the hanging bracket figure 11 12 Figur e 4 Figur e 5 Figure9 Figure7 Figure8 Figure6 F...

Отзывы: