background image

以 下 情 况 须 要 做归 零校 正:

本 装 置 安装 完 成 后 。

尺寸 有异 常 不 稳 定 时。

C

If the driven roller can not stop. In any section,the driven roller must stop  when the tension valueto

       be adjusted between 890-900 and  the sensitivity is set  at 99 after remove the elastic tape from the 

       sensor  bar (Make sure nothing Contact  with sensor Bar).

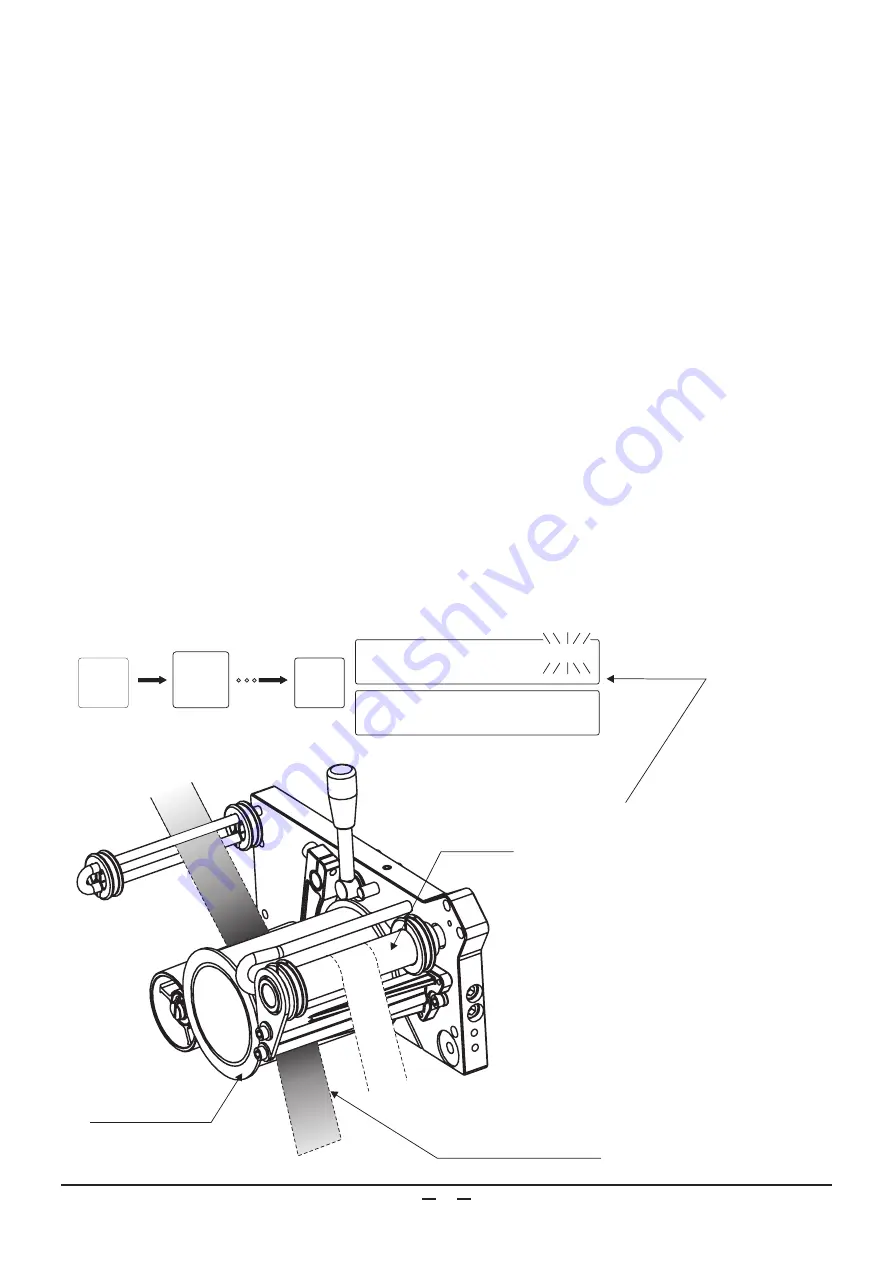
归 零 校 正时 应 移 开 感 应轮 之松 紧 带 ( 如 下 图 )

2

Please remove the elastic tape before calibration (Refer to the following  f i gure).

操 作 说明(须 按2秒 以 上)

Operation guide

(push more than 2 secretary)

注 意

如标 准归 零后 ,其数值不介
于0-99之间时 ,即 表示 装置
有问 题, 需要 检修。

Notice:

If the value is notbetween10-90 
afterRegular Calibration.The 
device needs to be REPAIRED.

1


FUNCTION


-

功 能

  感 应 轮 在无 负载 的状 态( 移开 感应 轮 上 的 松紧 带 ),在 任 何 一段 工程 中,送 料 值 在9 8 0 - 9 9 9

  之 间的 其中 一 值,( 灵敏 度必 须 设 计 在9 9),驱 动 轮 应 停 止转 动而 未 停 止 时。

1)   Always correct the calibration after the following instances:

A

After installation.

B

If the device is feeding irregularly.

驱动轮

Driven Roller

感应 轮

Sensor

0 KGRAMS  SETTING    0042

0 KGRAMS  DEFAULT
0 KGRAMS  SETTING    0042

0 KGRAMS  DEFAULT    0042

松 紧 带移 开 感 应 轮

Remove the elastic tape 

from the sensor bar

3

0 kg Calibration

归零校 正

4

Содержание GMD-M8

Страница 1: ...MANUAL 用户手册 GMD M8 八段上 下 侧 送型松紧带装置 MODEL DEVICES GRAND MICROCOMPUTER CONTROL ELASTIC SERIES ...

Страница 2: ......

Страница 3: ...nsion type computerized metering device schematic 微电脑控制松紧带装置示意图 18 8 Needle counting foot switches Assembly drawings 针数计数器 脚踏开关组件图 9 Stand module and parts list 支撑架组件图 11 Pats list for vibrating tape module 电动抖带装置组件图 13 Component feed device assembly map 送料装置组件图 14 Component feed device assemb a list of 送料装置清单 19 20 22 24 25 26 Contents 目 录 12 Control box accessory and assembly 控制箱组件图 23 10 Foot s...

Страница 4: ... digial display 连过拉力感应器自动调节器整松紧度 使缝纫机同步 4 Seamer synchronization with the taut smooth transportation elastic Power 电 源 Speed 转 速 Tape Width 送带宽带 Engineering Section 工 程 段 110 240v Unlimted 可配合各缝纫机转速 0 50mm 1 99 1 8 Section 1 2 3 4 STITCH SET MODE START 5 6 7 8 FREE TAPE SENSITIVITY FUNC TION 启动 针数设定 工程记忆 松带设定 灵敏度 功能 AUTO 自动 SECTION NO 工程设定 STITCH COUNTER 车缝计数 1 2 3 4 5 6 7 8 9 10 11 12 13 1 13 2 1...

Страница 5: ... Displays all the Sections status from 1 999 Indicated the number of stitches to be sewn from 1 999 for Auto section change Stich count setting page 7 10 Use this key to memorize up to 26 different programs from A Z Page15 Each program has 8 sections Indicates the Mode which you have set A Z Indicates the Sensitivity which you have set from 1 99 Press this key to activate for setting the SPECIAL f...

Страница 6: ...ontact the machin 辅助杆 Auxiliary Guide 缝纫机 Machine 松紧带请勿接触到车头 Do not let the tape to contact the machine 松紧带 Tape 辅助杆调整 2 Auxiliary Guide 高度调整 1 Height 须预留车头旋转空间 但不宜过高 Please keep some space for machine maintenance 预留车头旋转空间 Space for machine s maintenance 2 Installation guide 安装说明 3 ...

Страница 7: ...说明 须按2秒以上 Operation guide push more than 2 secretary 注意 如标准归零后 其数值不介 于0 99之间时 即表示装置 有问题 需要检修 Notice If the value is notbetween10 90 afterRegular Calibration The device needs to be REPAIRED 1 FUNCTION 功能 感应轮在无负载的状态 移开感应轮 上的松紧带 在任何一段工程中 送料值在980 999 之间的其中一值 灵敏度必须设计在99 驱动轮应 停止转动而未停止时 1 Always correct the calibration after the following instances A After installation B If the device is feeding irregula...

Страница 8: ...带往左边 Adjust to the Left side 记号往左边 Mark turn to the Left 记号往右边 Mark turn to the Right 驱动轮 Driven Roller 副轮 Auxiliary Roller 调整松紧带往右边 Adjust to the Left side 驱动轮 Driven Roller 副轮 Auxiliary Roller 4 Adjustment for tape sliding over the roller 松紧带左右偏差调整 记号 Mark 副轮偏心轴 Auxiliary Roller shaft 副轮 Auxiliary Roller 驱动轮 Driven Roller 5 ...

Страница 9: ... too less it will effect the accuracy Therefore the value is large better with number without vibration 例一 2 Example 1 内容 调整灵敏度 Context Adjust the sensitivity value 工程 Section 送料值 灵敏度 Feed Sensitivity 1 750 30 Before adjust 调整前 驱动轮颤动 Driven roller vibration 松紧带颤动 Tape vibration 上下拉动 Pull up and down After adjust 调整后 松紧带不颤动 No tape vibration 1 Sensitivity Adjustment 图二 Figure 2 5 Operation guide 操作...

Страница 10: ... Feed Stitch 1 2 3 4 5 6 950 855 965 958 842 936 工程 送料值 针数 225 75 43 68 设定 1 2 3 4 5工程为自动换段 3 6工程为膝动 或手动 换段 5 Operation guide 操作说明 STITCH SET 针数设定 1 STITCH SET 针数设定 2 3 750 680 735 980 A 90 950 1 2 3 4 5 6 7 8 STITCH SET 针数设定 工程记忆 MODE STITCH COUNTER 灵敏度 SENSITIVITY 225 750 680 735 980 A 90 950 1 2 3 4 5 6 7 8 STITCH SET 针数设定 工程记忆 MODE STITCH COUNTER 灵敏度 SENSITIVITY 075 855 750 680 735 980 A 90 95...

Страница 11: ... STITCH SET 针数设定 5 6 750 680 735 980 A 90 950 1 2 3 4 5 6 7 8 STITCH SET 针数设定 工程记忆 MODE STITCH COUNTER 车缝针数 灵敏度 SENSITIVITY 043 1 2 3 4 5 6 7 8 STITCH SET 针数设定 工程记忆 MODE STITCH COUNTER 灵敏度 SENSITIVITY 1 2 3 4 5 6 7 8 STITCH SET 针数设定 工程记忆 MODE STITCH COUNTER 灵敏度 SENSITIVITY 855 965 958 750 680 735 980 A 90 950 855 965 958 750 680 735 980 A 90 950 855 965 958 842 936 1 2 3 4 5 6 7 8 STITCH SET 针数设定 ...

Страница 12: ...e to disable the function of Auto Switch section function 2 START 启动 1 STITCH SET 针数设定 900 750 680 735 726 627 746 980 A 90 750 680 735 1 2 3 4 5 6 7 8 STITCH SET 针数设定 工程记忆 MODE STITCH COUNTER 车缝针数 灵敏度 SENSITIVITY 750 680 735 000 A 90 750 1 2 3 4 5 6 7 8 操作说明 Operation guide START 启动 750 680 735 980 A 90 750 680 1 2 3 4 5 6 7 8 750 680 735 000 A 90 750 680 1 2 3 4 5 6 7 8 2 STITCH SET 针数设定 STITCH ...

Страница 13: ...Feed value adjustment guide 送料值小 number Smaller feed 送料值大 Larger feed number 750 680 735 980 A 90 750 750 680 735 000 A 90 750 1 操作说明 Operation guide 1 2 3 4 5 6 7 8 STITCH SET 针数设定 工程记忆 MODE STITCH COUNTER 车缝针数 灵敏度 SENSITIVITY 1 2 3 4 5 6 7 8 STITCH SET 针数设定 工程记忆 MODE STITCH COUNTER 车缝针数 灵敏度 SENSITIVITY 10 ...

Страница 14: ...eration guide 操作说明 750 680 735 980 A 90 750 2 3 750 680 735 750 680 735 980 980 A A 90 90 750 750 680 680 735 1 2 3 4 5 6 工程 送料值 针数 1 2 3 4 5 6 7 8 STITCH SET 针数设定 工程记忆 MODE STITCH COUNTER 车缝针数 灵敏度 SENSITIVITY 1 2 3 4 5 6 7 8 STITCH SET 针数设定 工程记忆 MODE STITCH COUNTER 车缝针数 灵敏度 SENSITIVITY 1 2 3 4 5 6 7 8 STITCH SET 针数设定 工程记忆 MODE STITCH COUNTER 车缝针数 灵敏度 SENSITIVITY 11 ...

Страница 15: ...735 726 6 750 680 735 980 A 90 750 680 735 726 672 672 746 750 680 735 980 A 90 750 680 735 726 672 746 START 启动 1 2 3 4 5 6 7 8 STITCH SET 针数设定 工程记忆 MODE STITCH COUNTER 车缝针数 灵敏度 SENSITIVITY 1 2 3 4 5 6 7 8 STITCH SET 针数设定 工程记忆 MODE STITCH COUNTER 车缝针数 灵敏度 SENSITIVITY 1 2 3 4 5 6 7 8 STITCH SET 针数设定 工程记忆 MODE STITCH COUNTER 车缝针数 灵敏度 SENSITIVITY 12 ...

Страница 16: ...80 A 90 750 1 2 3 4 5 6 7 8 STITCH SET 针数设定 工程记忆 MODE STITCH COUNTER 车缝针数 灵敏度 SENSITIVITY 100 750 680 735 980 A 90 750 120 680 750 680 735 980 A 90 750 735 680 750 680 735 000 A 90 750 735 680 100 START 启动 工程 送料值 针数 1 2 3 4 5 6 7 8 STITCH SET 针数设定 工程记忆 MODE STITCH COUNTER 车缝针数 灵敏度 SENSITIVITY 1 2 3 4 5 6 7 8 STITCH SET 针数设定 工程记忆 MODE STITCH COUNTER 车缝针数 灵敏度 SENSITIVITY 1 2 3 4 5 6 7 8 STITCH SET 针...

Страница 17: ...TITCH COUNTER the other is Free Tape After press the FREE TAPE bottom the value will become Flashing that means you can adjust the value of FREE TAPE Larger Number will become looser After finishing the setting press START bottom this location s will become STITCH COUNTER display 配合不同的松紧带 需要设定不同的值 否则 值过多会造成松紧带太松而掉落 反之值太少使 得松紧带 太紧而难以移出布料 出厂设定值 999 Operation guide 操作说明 FREE TAPE 松带设定 750 680 735 A 9...

Страница 18: ... aleady set Not necessary to re set the MODE again Mode operation 此功能提供使用者记忆26组不同的车缝模式使用者可快速选择事先 储存的记忆模式 无须重新设定 工程 Section 送料值 针数 Feed Stitch 1 2 3 4 5 6 738 668 728 716 660 732 1 2 3 5 4 6 105 122 58 118 模式 MODE B Operation guide 操作说明 MODE 工程记忆 750 680 735 950 680 735 1 2 3 4 5 6 7 8 STITCH SET 针数设定 工程记忆 MODE STITCH COUNTER 车缝针数 灵敏度 SENSITIVITY 980 START 启动 1 726 120 A 90 672 746 750 680 735 950 ...

Страница 19: ... page Call the 4 technician to maintain if the value is not between 10 90 电源未接妥善 线路系统断路 控制系统故障 1 Power is not connected properly 2 Connecting line is break 3 Electronic control system error 接好电源 检查各线路插座与插头接角是不明松脱 通知维修人员进行更换 1 Connected power 2 Check the pin of connecting plug or socket are not loose 3 Call the technician to maintain 面板故障 Panel out of order 通知维修人员进行更换维修 Call the technician to maint...

Страница 20: ...other obstacle 灵敏度调整不当 缝制员的手势技巧不熟练及布料 裁剪的尺寸不均 2 Improper Sensitivity setting 灵敏 度伸缩度越大 灵敏度调整需越 高 但如果调太高灵敏度时会产 生主机颤动 不止 而灵敏度太低 时会反应迟缓影响产品尺寸的准 确 请参照第6页 灵敏度调整 说明 依松紧带材质的伸缩性调整 缝制员在车缝过程中 应保持手 势给予布料一致的压力 不可忽松 忽紧 且布料的裁剪尺寸要一致 2 Pls re setting the Sensitivity More flexible taps is with Higher value It will cause vibration if the value is to high However Lover value setting may cause slow reaction and cause...

Страница 21: ...ries tension type computerized metering device schematic 微电脑控制松紧带装置示意图 Supporting frame 支撑架 Feed unit 送料装置 Electric device 电动抖带装置 Counter optional 计数器 选配 Electric 电控箱 Foot switch 脚靠开关 Foot switch optional 脚靠开关 选配 ...

Страница 22: ...art no Description Qty Remarks Orientation piece Anti skid film Retaining coil Back cover Screw Screw Screw Tightening cover Bush for pressing bearing Bearing Flat washer Photoelectric switch chip Counter shaft Screw Front cover Photoelectric switch PCB Screw Assembling set Aeronautic plugs 5 cores Footswitch GX 16 4P Aeronautic plugs 4 cores 250V 10A 1 GA101 3 15A Foot strut GA101 3 14 M6X10 ST4X...

Страница 23: ...70 RC 59 M6X20 螺母 螺杆 钳座 压盖 立臂盖 手臂 内六角圆标柱头螺丝 立臂 2 2 2 1 2 1 2 2 9 8 7 6 5 4 3 2 1 11 12 9 1 M6 螺母 10 6 11 12 RC 68 横臂 1 1 横臂盖 RC 10 1 10 2 M6X35 内六角圆标柱头螺丝 20 Screw Screw Clip washer Clip screw Nut Nut 9 Stand module and parts list 支撑架组件图 Base parts Base shelf Base shaft hat Link base Main bar Main shaft hat ...

Страница 24: ...n Qty RemarkS 1 2 3 4 5 6 7 8 9 RC 04 M3X5 M3X12 M3X12 RC 01 RC 03 RC 06 压杆 盖板 十字圆头螺丝 十字圆头螺丝 A件 B件 弹簧 微动开关 调节螺母 1 1 4 1 1 1 1 1 1 RC 05 10 2 M6X10 内六角圆柱头螺丝 21 10 Foot switch 脚靠开关 RC 02 Screw Screw Screw Switch Nut Stem Sqring Cover plate Fittings Fittings V 15 1C25 ...

Страница 25: ...头螺丝 18 1 RC 4835 线路板 Support bar Screw Elecrtical box A dozen pulleys Screw Screw Play with rod B dozen pulleys Screw Pulley sent board Spring washer Screw Circuit board Stem Taut Line card Motor 1 5 10 4 2 3 8 7 5 7 6 8 9 11 12 13 14 15 16 13 20 19 17 18 RC 14 盒盖 The lid 19 2 20 4 弹簧垫圈 Spring washer 平垫圈 Flat washer 4 4 来料不良筛选器 选配 21 2 GFU 03 带卡 Circuit board 22 2 23 1 前伸杆 Before stretching rod O型...

Страница 26: ...559 2P 5559 4P 5559 8P 5559 10P 5559 6R RCK 02 250V 10A ST4X14 面板 下盖 后面板 十字圆头螺丝 十字圆头螺丝 二档开关 装件板 直流开关电源 风扇 连接器 连接器 连接器 连接器 连接器 连接器 连接器 上盖 美式插头电源线 十字沉头自功螺丝 Screw Screw Switch Screw Plug wire Lower cover Front panel PCB board mount Cover 1 1 1 8 1 1 1 8 1 1 1 1 1 1 1 1 1 1 2 控制箱组件图 Front panel 23 16 14 17 15 11 13 12 20 ZD10 4 主板 1 4 9 20 10 2 3 Connector Connector Connector Connector Connector Conne...

Страница 27: ...11 12 19 17 18 22 21 23 24 25 26 27 29 31 33 34 35 36 38 39 37 41 42 43 44 45 47 46 48 49 50 51 52 53 54 55 56 57 58 59 60 61 62 63 64 65 30 66 71 72 73 75 74 76 84 76 85 86 86 43 67 68 69 70 40 28 32 87 88 62 24 13 Component feed device assembly map 送料装置组件图 ...

Страница 28: ...X5 RC 23 RC 47 RC 31 压带片 导带杆 十字圆头螺丝 内六角紧定螺丝 内六角圆柱头螺丝 内六角圆柱头螺丝 主体件 护杆 挡轴 电线卡座 1 2 1 1 1 1 1 1 28 29 30 31 32 33 34 35 φ3Xφ7X0 5 M3X6 M3X8 RC 26 RC 56 RC 55 RC 26 RC 16 尼龙垫片 撑杆 护圈 隔套 绝缘套A 平垫圈 1 4 1 1 1 1 1 1 36 37 38 39 40 41 42 43 25 14 Component feed device assemb a list of 送料装置清单 Screw Standc Key press board Screw Screw Screw Circuit board Screw Screw Screw Screw Screw Screw Screw Screw Insulatio...

Страница 29: ...段壳A 分段壳B 前滚轮 RC 64 RC 61 RC 62 M2X9 RC 66 MDF8 P4 RC 52 PC板 锁座 1 1 3 1 1 1 1 77 78 79 80 81 82 83 开口挡圈 1 84 RC 29 衬套 1 46 内六角圆柱头螺丝 M3X10 2 44 内六角沉头螺丝 M3X4 1 45 85 内六角紧定螺丝 M4X16 1 85 内六角圆柱头螺丝 内六角圆柱头螺丝 M5X14 M5X14 1 1 86 86 红钢纸垫 1 87 Φ12XΦ8X0 3 红钢纸垫 1 88 Φ10XΦ6X0 3 26 序号 型 号 名 称 数量 备 注 Ref No Part No Description Qty RemarkS Screw Screw Screw Screw Screw Screw Screw Screw Screw Screw Screw Screw Scre...

Страница 30: ...15 GMD M8 Assembly diagram 八段下 侧送松紧带机安装示意图 27 Side to send Next to send 侧送 下送 ...

Страница 31: ......

Страница 32: ...RPRISE U S A INC FACTORY GRAND PRECISION INDUSTRIAL LTD MUHEJING INDUSTRIAL AREA GANGKOU TOWN ZHONG SHAN GUANG DONG CHINA Tel 86 760 88414888 Fax 86 88414668 Http www usa grand com E mail info usa grand com 美 国 百 川 公 司 ...

Отзывы: