background image

C3X 1080

ENGLISH

17

The  screen  has  six  options,  one  for  each  line,  and  two 
columns indicating the keys F1-F2. You can select F1 and 
F2 with the keys 

◀ 

and 

 on the remote control; select the 

function to assign to F1 or F2 with the keys 

▼ 

and 

.

The function performed by the key is confirmed by the 
appearance of a dot on the corresponding column-row 
intersection.

ZOOM

Controls the motorised lens zoom, permitting you to zoom 

in or out, enlarging or shrinking the projected image.

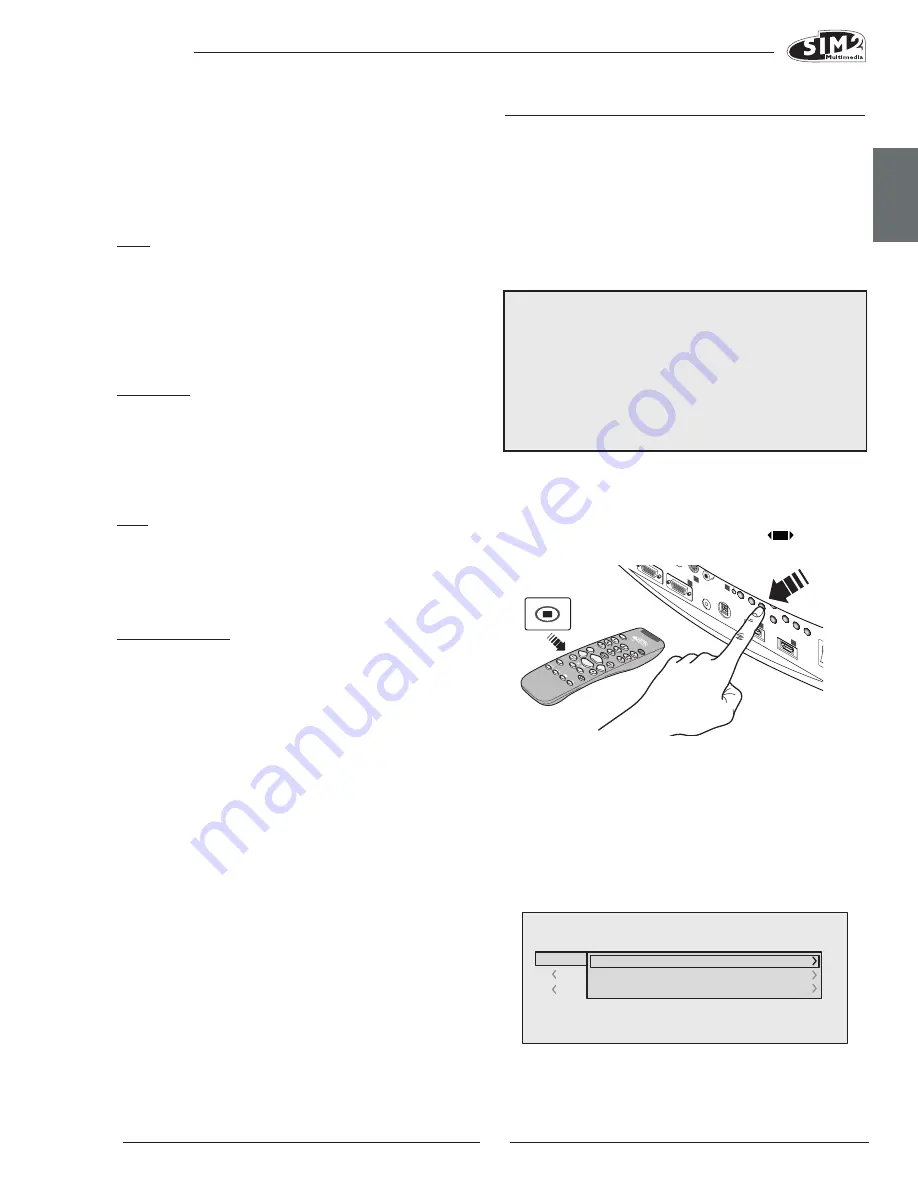
By pressing the 

 button on the remote control next to the 

menu (zoom/focus) you can display a pattern that aids 

zoom/focus operations.

This permits you to access the optic zoom control, where 
the 

◀ 

and 

 keys zoom in and out.

ENLARGEMENT

Activates the electronic zoom, the keys 

 and 

 zoom 

in on the image. If you press the key again you will enter 
PAN mode in which the 

◀ 

and 

,

 ▼ 

and 

 keys enable 

you to pan over the enlarged image. When the 

▼ 

key is 

pressed a third  time,  the  system  resets  the  projector to 

original viewing setting.

BLANK

Switches off the video signal and displays a black screen. 

As soon as the key is pressed an OSD message lasting a 

few  seconds  confirms  that  the  function  has  been  acti-

vated. You can restore the previous conditions by pressing 

any key on the remote control.

GAMMA CORRECTION

Successive pressing of the key in question (F1 or F2) makes 

it possible to select any of the available gamma curves.


SOURCE INfORMATION

When active (YES) each time the source is changed infor-

mation regarding the signal type is displayed. If inactive, 

(NO) no information on the source is displayed.

OSD BACKgROUND

Determines  the  type  of  background  for  the  On  Screen  

Display (opaque transparent).

OSD TIMEOUT

Determines the On Screen Display timeout after the last 

event (adjustment using remote control or keypad). The 

adjustment is made using the 

 (decrease) and 

 (in-

crease) keys within a 6-200 second timeframe.

OSD POSITION

Positions the On Screen Display in a particular area of the 

projected image. The OSD can be positioned using the 

arrow keys for fine adjustments or keys 1...9 on the remote 

control to select one of 9 preset positions.

MEMORIES

The main picture parameters can be saved in discrete 
sets of values called Memories so that they can be subse-
quently applied as a group using a single command.
There are 6 separate Memories (Memory 1, Memory 2, 
Memory 3) for each of the 8 signal types handled:             

making a total of 48 different available Memories.
The following image parameters can be saved/recalled 
by the Memory Management system:

                Image                                     Picture

                    BRIGHTNESS 

                           ASPECT

                    CONTRAST 

                           COLOUR TEMPERATURE

                    COLOUR 

                           OVERSCAN 

                    TINT 

                           GAMMA 

                    SHARPNESS 
                    FILTER 
                    NOISE REDUCTION

Some  of  these  parameters  may  not  be  available  for 

certain  inputs  or  certain  input  signals,  as  indicated  in 

Tables  4  and  5.  The  Memory  Management  function 

menu page is activated by pressing the 

 key on the 

remote control.

Fig.33

SAVE MEMORY

To save the current image settings in Memory 1, move 
the cursor to line 1 using the 

▼ 

and 

 ‚ keys and open 

the  drop-down  menu  by  pressing  the 

  key  (Fig.  32). 

Select the “Save initial settings” line. The message, “Initial 

settings saving in Memory 1” will be shown at the bottom 

of  the  display  to  confirm  that  the  operation  has  been 

completed. Repeat the operation to save other image 

settings in new memories.


Fig.34

0  Auto

3   

    S   MEMORIA 1

-EMORIES

Save current settings

Save initial settings

Rename

2   

     I   

1   

    S   


232)

GRAP

HICS RGB

HV

S-VID

EO

AUDIO OUT

HDM

I 1

REMO

TE

2

S-VID

EO

MEN

U

ESC

INPUT

1

5

4

HDM

I 2

6

Содержание C3X 1080

Страница 1: ... user and installation manual manuale d uso ed installazione bedienungs und wartungsanleit manuel d utilisation et d installation manual de uso e instalación manual de utilização 使用及安装手册 ВИДЕОПРОЕКТОР 460720000 ...

Страница 2: ...ontrolled by a domestic automation system through its serial port or USB port The appliance has been subjected to exhaustive operating tests by SIM2 to ensure the very highest quality The projector bulb life should thus initially be around 30 60 hours In addition to the customary checks the Quality Control department also runs additional statistical tests before shipment In such cases the packagin...

Страница 3: ...h the On Screen Display menus and param eter settings Up Down arrows open the quick menus MENU Switches on the On Screen Display and browses through its pages MEMORIES Opens the Memory management menu INFO Displays information on the selected source and projector status FORMAT Selects the image Aspect ratio SOURCE Displays the source selection menu TEST PATTERN ZOOM FOCUS MENU Switches on the On S...

Страница 4: ...astic and some chemical compounds are recoverable and can be recycled for reuse Please observe the following instructions 1 When you no longer wish to use your electrical and electronic equipment take it to your local waste disposal facility for recycling 2 You may return your old equipment to your dealer when you buy a new product which is equivalent or has the same functions as the old one Call ...

Страница 5: ...through the openings in the unit Make sure that no objects are inserted inside the units If this should occur disconnect the unit from the power supply immediately and call an authorised technician Switch Off Disconnect the mains power supply when the projec tor is not in use This will considerably reduce power consumption and also lengthen the service life of the unit s electrical circuitry Read ...

Страница 6: ...ser manual 6 Live Color Calibration Cd Rom 7 Two jacks to control motorised screens If anything is missing immediately contact your dealer 1 2 3 4 4 UNPACKING To remove the C3X1080 system from its carton follow the diagrams Fig 4 Keep the carton for use when transporting or shipping the unit Fig 4 CONTENTS OF PACKAGE 1 1 2 3 6 4 5 7 Fig 5 ...

Страница 7: ...f the projector For rear projection the screen must be translucent For front projection we recommend the use of a screen with black matt borders to contain the projected image Position the projector on a stable suitable surface or use the optional ceiling mount bracket WARNING When using the ceiling mount bracket the safety instructions provided with the bracket must be strictly observed If using ...

Страница 8: ...s the ON OFF button When the unit is switched on from standby the lamp switches on after a brief period of warming up the im Preferably use a unit gain screen high gain screens are only effective when used with a small group of viewers close to the screen s centre Prevent any lighting in the room from shining directly onto the screen during projec tion as this will reduce the contrast of the proje...

Страница 9: ...wait a few minutes for the lamp to cool down sufficiently Switching off and returning to standby mode With the remote control press With the keypad press When switching off the projector goes into stand by mode and stores the input selection at the time of switch off The fans keep running until the lamp cools down green and red LEDs on after which they automatically switch off Do not switch off th...

Страница 10: ...NECTION BOARD 3 1 2 4 5 Television receiver DVD player VCR Videocamera Video game console Television receiver HDTV receiver DVD player VCR Video game console computer DVD player HDTV receiver BluRay Player HD DVD Player PalyStation 3 Fig 17 6 12V USB 1 1 R Pr CONTROL RS232 GRAPHICS RGB C Y B Pb HV S VIDEO AUDIO OUT HDMI 1 REMOTE 3 2 S VIDEO MENU ESC SOURCE 1 4 O I 1 VIDEO GRAPHICS RGB YPrPb 4 3 RG...

Страница 11: ...CA adapter cable to connect the RGB signal from a source equipped with a SCART output to this input The Component signals connect to the Y Pr and Pb inputs take care that the inputs correspond to the outputs on the source device Since these may be labelled differently refer to Table 1 to establish the correspondence between the various signals As indicated in the table the colours of the connector...

Страница 12: ...ries size AAA Insert the batteries taking care to match the polarity as indicated in the battery compartment in the handset Fig 23 Change the batteries in the remote control if experi encing difficulty in sending commands to the projector Remove batteries from the remote control if it is not to be used for a long period of time The batteries are prone to leak and corrode the remote controls circui...

Страница 13: ...GBS YCrCb RGB Grafico HDMI RGBS 15kHz YCrCb 15kHz Adjustments Inputs Colour Tint Sharpness Sharpness Mode Filter Present only if the Video Standard is NTSC Cinema Mode Noise reduction determines the red green ratio of the picture Decreasing the value increases the red content of the image increas ing it increases the green For this adjustment use skin tones or a test card image with colour bars as...

Страница 14: ...ngs described above PC a mode that is available only if instructions regarding the colour temperature have been sent to the projector by a PC using the Live Colors Calibration software For each of the settings listed in column 1 RGB there are 9 default white balance adjustments IMAGE This menu features adjustments relating to picture position aspect ratio magnification etc Aspect This adjustment a...

Страница 15: ...rt of the graph you will increase the blue content On the contrary by selecting points in the lower part of the graph you will increase the purple content Gamma Correction Determines the systems response to the grey scale em phasising or attenuating the different grades of brightness blacks dark medium light greys whites in the projected image The projector has a range of gamma functions which ena...

Страница 16: ...tem checks the input signal and automati cally sets the most suitable values If however the image is disturbed loss of resolution between equidistant vertical bands or instability and lack of detail in thin vertical lines it may help to ask the system to rerun the input signal analysis and set the best parameters by requesting the automatic adjustment function with button A on the remote control o...

Страница 17: ... MENU key on the remote control If you wish to cancel the changes press MENU on the remote control F1 F2 keys The remote control is equipped with two keys F1 and F2 which are associated with various different functions Fig 31 The following menu options are available INITIAL SETTINGS Resets the projector to original factory settings except Position Orientation Y C Delay Zoom and Focus Before perfor...

Страница 18: ...creen Display opaque transparent OSD TIMEOUT Determines the On Screen Display timeout after the last event adjustment using remote control or keypad The adjustment is made using the decrease and in crease keys within a 6 200 second timeframe OSD Position Positions the On Screen Display in a particular area of the projected image The OSD can be positioned using the arrow keys for fine adjustments o...

Страница 19: ...phic signal This function is displayed by pressing the key on the remote control or when the On Screen Display is not enabled the key on the keypad QUICK MENUS The quick menus provide access to the main adjustments that affect image quality without opening the main menu BRIGHTNESS Contrast Colour Tint Sharpness and Filter adjust 11 CLEANING AND MAINTENANCE The projector does not require internal a...

Страница 20: ...is disturbed unstable or noisy Check compatibility of the video or graphic signals with the technical specifications of the system and specifically with the specifications of the selected input Check all cables If the problem occurs on a terrestrial broadcast source signal check that the receiver has been correctly tuned in and that the aerial system is in good working order If the problem occurs ...

Страница 21: ...distance needs See the Additional Information chapter for greater details on projection distance and enlargement ratios Always contact our service centre to have the lens re placed Use only original or SIM2 Multimedia approved accessories Warning for ceiling wall installation by means of su spension bracket carefully follow the instructions and safety instructions recommended by the Manufacturer i...

Страница 22: ...ol keypad on rear input panel remote con trol RS232fromPC home automation devices USB 1 1 Horizontal frequency from 15 to 80 kHz up to to UXGA format 65 Hz Vertical frequency 48 100 Hz Video Standard automatic selection PAL B G H I M N 60 SECAM NTSC 3 58 and 4 43 High definition video standard ATSC HDTV 480p 720p 1080i 1080p Graphic standards VGA SVGA XGA SXGA UXGA Colour temperature from 5500 to ...

Страница 23: ...C3X 1080 APPENDIX DIMENSIONS C3X 1080 PROJECTION DISTANCES INSTALLATION INSTRUCTIONS ...

Страница 24: ...C3X1080 2 195 6 7 70 336 13 23 431 4 16 99 1 63 41 5 9 5 0 37 2 86 72 6 141 2 5 56 2 92 76 05 108 2 4 26 285 2 11 23 142 6 5 62 280 7 11 05 434 5 17 11 App 1 C3X 1080 DIMENSIONS unit of measure mm ...

Страница 25: ...H lens center in floor position Screen Size Diagonal Screen Width Inches cm cm m m m m cm cm Screen Height Min Projection Distance Max Projection Distance Min Projection Distance Max Projection Distance Min Offset Max Offset SCREEN PROJECTION DISTANCE Height offset Ho T1 T2 T3 60 80 90 100 110 120 150 180 220 250 300 52 3 69 7 78 4 87 2 95 9 104 6 130 7 156 9 191 7 217 9 261 5 29 4 39 2 44 1 49 0 ...

Страница 26: ...92 33 65 40 38 49 36 56 09 67 3 0 0 0 0 0 0 0 0 0 0 0 Height offset H screen center H lens center in floor position Screen Size Diagonal Screen Width Inches cm cm m m m m cm cm Screen Height Min Projection Distance Max Projection Distance Min Projection Distance Max Projection Distance Min Offset Max Offset SCREEN PROJECTION DISTANCE Height offset Ho T1 T2 T3 60 80 90 100 110 120 150 180 220 250 3...

Страница 27: ...y perpendicular to the projection screen as shown in the figure below The centre of the projection lens should be lined up with the centre of the projection screen VERTICAL SHIFT ASSUMING 0 OFFSET 0 Offset Floor Installation Center 0 Screen Height CAUTION The examples shown in the figure give only general indication on the use of the vertical shift Each projection lens may require differing vertic...

Страница 28: ...on screen with the centre of the lens in line with the centre of the screen you can use the mechanical shift to move the projected image either above or below the centre of the projection lens CAUTION The examples shown in the figure give only general indication on the use of the vertical shift Each projection lens may require differing vertical shift settings For more detailed information see the...

Страница 29: ...sse 34 36 D 60325 Frankfurt Am Main Phone 0800 800 7462 Germany only Int Phone 49 163 500 7462 Fax 0800 900 7462 www sim2 de e mail info sim2 de SIM2 UK Steinway House Worth Farm Little Horsted Nr Uckfield East Sussex TN22 5TT Phone 44 0182 5 750850 Fax 44 0182 5 750851 www sim2 co uk e mail info sim2 co uk Producer Registration Number WEE JJ0125YT SIM2 Multimedia Shanghai Representative office Ro...

Отзывы: