C3X1080
ENGLISH
12
PICTURE
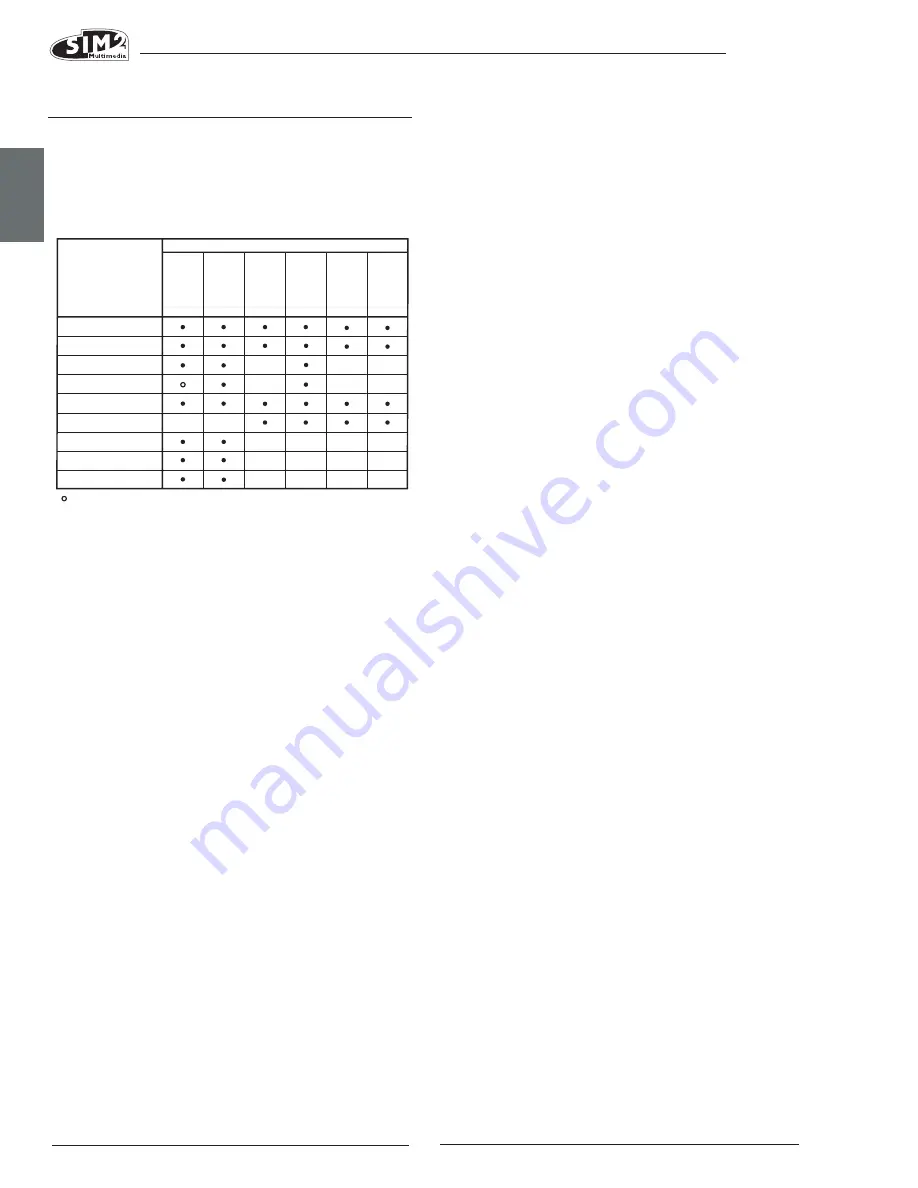
This menu includes all image adjustment settings. Adjust-
ments that are not available for a given input do not ap-
pear on the menu. Table 4 summarises the adjustments
available for each input. For a full listing of the menu, refer
to paragraph STRUCTURE OF ON SCREEN MENUS in the chapter
ADDITIONAL INFORMATION.
BRIghTNESS
Use this control to adjust the darker areas of the picture
(black level), without significantly affecting bright areas.
Increasing the value will give more detail in darker parts
of the picture. For correct adjustment it may prove useful
to display a grey scale with at least twenty bands. Now
try to reduce the brightness of the black band as much
as possible while ensuring that it can still be distinguished
from the adjacent band with brightness slightly higher
than black. Alternatively use a scene composed of black
objects alongside other dark coloured objects and try to
ensure that all the objects can be separately identified.
CONTRAST
Use this control to adjust the image’s white level without af-
fecting its dark areas. For correct adjustment it may prove
useful to display a grey scale with at least twenty bands. Now
try to increase the brightness of the white band as much as
possible while ensuring that it can still be distinguished from
the adjacent band with brightness slightly less than white.
Alternatively use a scene
composed of well-lit white objects surrounded by light ob-
jects with lower level lighting, and try to ensure that all the
objects can be separately identified.
COLOUR
This control (also called Saturation) increases or decreases
the colour intensity in the picture. When set to zero, colour
images will be shown in black and white. Increase the
value until the colours appear natural: suitable references
include skin tones and grass in landscape shots.
TINT
Use this control to adjust the purity of colours. Basically it
Brightness
Contrast
V ideo S-V
ideo
RGBS
YCrCb
RGB Grafico
HDMI™
RGBS 15kHz YCrCb 15kHz
Adjustments
Inputs
Colour
-
-
-
-
-
-
-
-
-
-
-
-
-
-
-
T int
Sharpness
Sharpness Mode
Filter
Present only if the Video Standard is NTSC
Cinema Mode
Noise reduction
-
-
-
-
-
determines the red-green ratio of the picture. Decreasing
the value increases the red content of the image, increas-
ing it increases the green. For this adjustment use skin tones
or a test card image with colour bars as a reference.
ShARPNESS
This adjustment serves to modulate the signal to increase
or decrease the level of picture detail. When the sharp-
ness value is reduced the image details appear less
pronounced, while increasing the value raises image
definition, making the outline of objects sharper. Note
that an excessively high value may result in a noisy pic-
ture and the edges of objects may appear unnaturally
clearly defined.
ShARPNESS MODE
This allows you to select the type of processing associated
with sharpness adjustment. For an interlaced or progressive
video signal, set to VIDEO; for PC graphics signals, setting to
Graphics mode sets the system to receive graphics signals
rather than video signals. If the VIDEO option is set, it applies
Noise Reduction to increase the clarity of the image. The
GRAPHICS option deactivates noise reduction.
fILTER
This allows you to select the mode in which the input signal
is processed. Selecting the most appropriate value for a
given input signal ensures the best horizontal and vertical
definition and makes the picture sharper.
CINEMA MODE
Use this option if the video signal source is a film (created
by a Telecine 3:2 or 2:2 pulldown process). In this case a
deinterlace algorithm optimised for this type of signal is
applied. Selecting AUTO mode causes the deinterlacer
to analyse signal characteristics and automatically apply
the correct deinterlace mode. Selecting the NO option
causes the deinterlacer to apply a
Motion compensated
algorithm optimised for video camera signals algorithm
optimized for video camera signals.
NOISE REDUCTION
This adjustment serves to select the noise reduction filter
value. Simply click on the slider and set the value with the
◀
and
▶
keys on the remote control.


