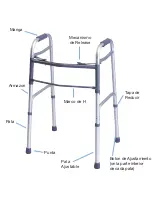
ASSEMBLY OF THE WALKER
1.
Remove closed walker from carton.
2.
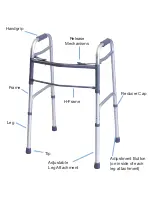
Install legs by depressing the height adjustment button and slide onto
walker frame until the button engages in the desired adjustment hole.
Adjust all leg attachments to the same height.
WARNING:
Ensure all push buttons protrude fully from height
-adjustment holes, all legs are adjusted to the same height, and
wheeled leg attachments are positioned on the front and towards the
outside of the walker.
3.
To open walker, push handgrips and sides out away from each other
until the release mechanisms lock into place.
CLOSING THE WALKER
1.
Push downward on release button and hold.
2.
Grab one handgrip and push inwards towards center of walker.
3.
Repeat for other handgrip.
ADJUSTING THE HEIGHT
NOTE:
Height adjustment should be made to desired height before operation.
Consult with healthcare professional for proper adjustment.
1.
To adjust the height of the leg attachment, depress the adjustment
button and slide upwards or downwards to the desired height.
2.
Adjust the height of the walker by aligning all four leg attachments to
the same position height.
When walking, the user should grasp one handgrip in each hand,
positioning body between the two rear walker legs, and walking at a
comfortable pace. The rear walker legs should be in contact with the floor
at all times.


