background image

ENGLISH

23

c.  If “Er6” occurs, please refer to the section of for details.

11.5 After measurement
1.  Power off: Device will automatically shut off if left idle for more than 1 minute to extend battery life.
2.  Clean the probe after each use to ensure an accurate reading and avoid cross contamination. (See the section 
 

of Care and Cleaning for details.)

11.6 Temperature Taking Hints
1.  The right ear reading may differ from the reading taken at the left ear. Therefore, always take the temperature
 

in the same ear.

2.  The ear must be free from obstructions or excess earwax buildup to take an accurate reading.
3.  External factors may influence ear temperatures such as:


• been lying on one ear or the other


• had their ears covered


• been exposed to very hot or very cold temperatures


• been recently swimming or bathing

In these cases, remove the individual from the situation and wait  20 minutes prior to taking a temperature.
4.  For persons wearing hearing aids or ear plugs, remove the device and wait 20 minutes prior to taking 
 

a temperature.

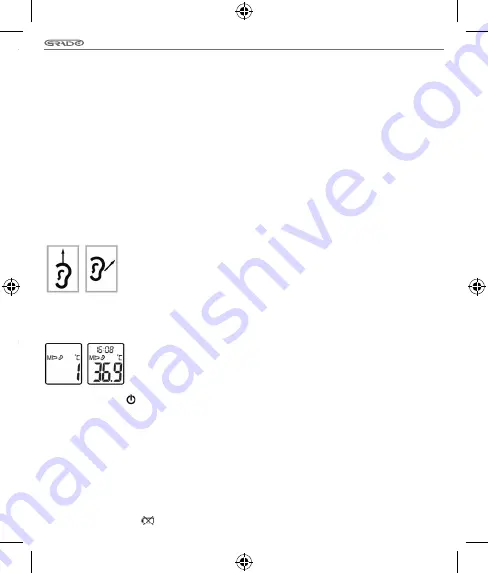
(Fig.9)

(Fig.10)

  5. When using the thermometer on infants under age 1, pull the ear up making sure the  

    sensor faces the eardrum. (See Figure 9)
6. When using the thermometer on individuals over the age of 1, pull the ear back making    
    sure the sensor faces the eardrum. (See Figure 10)
7. Do not touch the probe window. A cotton swab and rubbing alcohol may be used to clean 
the sensor window.

8. If  thermometer  is  stored  in  a  significantly  different  environment  than  testing  location, 

place it in the testing location for approximately 30 minutes prior to use.

11.7 Memory Mode

(Fig. 11)

(Fig. 12)

1. The Memory Mode can be accessed ether in ear mode or object mode:
  - When the thermometer has been turned on and followed by Figure 3 or finished 
  testing, press and hold the   Button for three seconds. The letter M will appear in 
  the center left corner of the display. (See Figure 8)
2. The thermometer will automatically memorize the last 10 temperature readings.    
Each memory also records the measurement date/time/mode icon. Each time the      

 Button is pressed, the screen displays past readings that correspond with 

  a number 1-10. The number 1 reflects the most recent reading while the number 10  


reveals the oldest reading stored in memory. (See Figure 9)

3.  In the memory mode, ear mark or scan mark always exist. The user can press the TEST BUTTON to take new  
 

measurements.

11.8 Selecting A Temperature Scale
1.  Temperature readings are available in the Celsius (°C) or Fahrenheit (°F) scale.
2.   With the unit off, press and hold the TEST BUTTON for 3 seconds to enter into unit changing mode.
3.   Press and release TEST BUTTON to select the unit.
4.   When the preferred unit on the display, press   BUTTON to exit the unit changing mode.

11.9 Battery Replacement
1.  Replace battery when “

” appears in the upper right corner of LCD display. (See Figure 11)

11.2 Get  the room temperature

1.  

When the thermometer has been turned on, room temperature will be shown on 


the screen with icon. Room temperature, date and time will alternately display 


every 3 seconds. (See figure 4)

2. 

For room temperature, the thermometer should be placed on the table and avoid 


the direct sunshine or air conditioner  flow on.

3. 

The room temperature can be reference after 5 minute later when taking 


the temperature.

 
(Fig.5)

11.3  To measure ear  temperature
1.  To achieve accurate readings, make sure a new, clean probe cover is in place before each measurement. Place  
 

a new probe cover on the probe firmly; making sure the probe and the inner portion of the probe cover fit    


snugly. To ensure proper hygiene and to avoid contamination, a new probe cover should be applied for each user.

2.  Press the TEST BUTTON, you can get the body temperature by ear measurement after hearing two 
 

beep sounds. 

(Fig.6)

Remarks:
a.  Probe cover sign stand for taking the ear temperature with probe cover now and vice versa.
b.  To avoid the risk of cross contamination, it is recommended that you always measure the ear temperature 
 

with probe cover.

c.  If you see as shown in figure 6 shows, it stand for the mode of taking the object temperature. You can press and hold  


BUTTON and then press and hold the TEST BUTTON  to switch the mode between ear mode and object mode.

3.  Insert  the probe along the ear canal as deep as possible  into the ear as depicted in Figure 7. Then press the  
 

TEST BUTTON once to start the measurement. A long beep will sound approximately 1 second after the TEST  


BUTTON is activated. This signals the end of the process as results are displayed on the LCD screen.

4.  The thermometer is ready for testing again once an ear mark displays on the LCD. A waiting period of 20  
 

seconds between testing is recommended to avoid excessive cooling of the skin.

5.  The thermometer will shut off automatically after 60 seconds of inactivity. To prolong battery life, press the    


  BUTTON  to turn the unit off.

11.4  To measure object temperature

(Fig.8)

  1. Eject the probe cover out firstly. Press the TEST BUTTON to turn on the thermometer, you can 
  take the object temperature after hearing two beep sounds. (see figure 5)

  Remarks:
  a. This mode shows the actual, unadjusted surface temperatures, which is different from 
  the body temperature.  


  b. If you see as shown in figure 3 shows, it stand for the mode of taking the ear temperature. You 

can press and hold 

 BUTTON and then press and hold   the TEST BUTTON to switch the mode between ear mode 

and object mode.

Содержание RM355

Страница 1: ...MA RM355 01 A_04 2016 TERMOMETRO AURICOLARE AD INFRAROSSI MANUALE DI ISTRUZIONI INFRARED EAR THERMOMETER INSTRUCTION MANUAL ...

Страница 2: ...a corporea pag 5 11 MODALITÀ D USO pag 6 11 1 Misurazione della temperatura pag 6 11 2 Consigli per la misurazione pag 6 11 3 Funzione memoria pag 6 11 4 Sostituzione delle batterie pag 7 12 MANUTENZIONE pag 7 13 PULIZIA E DISINFEZIONE pag 7 13 1 Pulizia pag 7 13 2 Disinfezione pag 7 14 CONDIZIONI DI SMALTIMENTO pag 7 15 PARTI DI RICAMBIO E ACCESSORI pag 8 16 RISOLUZIONE PROBLEMI pag 8 17 DICHIARA...

Страница 3: ...dard indicati nelle norme sottostanti CEI EN 60601 1 Parte 1 Prescrizioni generali relative alla sicurezza fondamentale e alle prestazioni essenziali EN 60601 1 2 Parte 1 Prescrizioni generali per la sicurezza Norma collaterale Compatibilità elettromagnetica ISO 80601 2 56 2009 Apparecchi elettromedicali Parte 2 56 Norme particolari per la sicurezza di base e le prestazioni essenziali dei termomet...

Страница 4: ...he le interferenze elettromagnetiche possano verificarsi in particolari circostanze Se questo dispositivo dovesse causare interferenze nocive ad aItri dispositivi le quali possono essere determinate dall accensione o spegnimento si consiglia all utente di seguire le seguenti misure Riorientare o riposizionare il dispositivo ricevente Aumentare la distanza di separazione tra i dispositivi Consultar...

Страница 5: ...ico Si ricorda di confrontare il risultato della misura con la temperatura corporea normale del proprio corpo Si prega di consultare la sezione Modalità d uso per imparare a misurare la temperatura corporea Object Temperature Mode La modalità oggetto mostra la temperatura superficiale non rettificate effettive che è diversa dalla temperatura del corpo Può aiutare a controllare se la temperatura de...

Страница 6: ...cchio che nelle altre parti del corpo Studi clinici hanno dimostrato che l orecchio è un ottimo sito per la misurazione della temperatura in quanto temperature rilevate nell orecchio riflettono la temperatura interna del corpo La temperatura corporea è regolata dall ipotalamo che condivide lo stesso apporto di sangue come la membrana timpanica Le variazioni di temperatura corporea sono di solito r...

Страница 7: ...a lampeggia automaticamente 2 Impostare l ora Premere e rilasciare il pulsante TEST per avanzare di un un ora fino a visualizzare l ora corretta Dopo che l ora è impostata premere il pulsante il minuto lampeggia automaticamente 3 Impostare i minuti Premere e rilasciare il pulsante TEST per avanzare di un minuto fino a visualizzare il corretto minuto Dopo il minuto è impostato premere il pulsante l...

Страница 8: ... possibile tenendo premuto il pulsante e poi tener premuto il pulsante TEST cambiare la modalità da orecchio a modalità oggetto e viceversa 3 Inserire la sonda lungo il condotto uditivo più profondamente possibile come mostrato in Figura 7 Quindi premere il pulsante TEST una volta per avviare la misurazione Seguirà un lungo segnale acustico di circa 1 secondo Questo segnala la fine del processo mo...

Страница 9: ...ale uditivo Figura 9 7 Non toccare la sonda Usare un batuffolo di cotone o un panno morbido bagnato con alcool per pulire il sensore 8 Se il termometro fosse riposto in un ambiente differente da dove verrà effettuata la misurazione porre il termometro in quest ultimo e aspettare circa 30 min prima di eseguire il test 11 7 Funzione memoria Fig 11 Fig 12 1 L accesso alla funzione memoria è consentit...

Страница 10: ...ume polvere e altri composti riducono la trasparenza della lente e si traducono in letture di temperatura più basse Se il termometro viene accidentalmente inserito nell orecchio senza coprilente la lente deve essere pulita immediatamente 4 La lente è la parte più delicata del termometro Per pulire in modo sicuro la lente pulire delicatamente la superficie con un batuffolo di cotone inumidito con a...

Страница 11: ... negative per l ambiente e per la salute che potrebbero altrimenti essere causate dal loro inadeguato smaltimento Il riciclaggio dei materiali aiuta a conservare le risorse naturali Conferire le batterie esauste presso i punti di raccolta indicati per il riciclo Per in formazioni più dettagliate circa lo smaltimento delle batterie esauste o del prodotto potete contattare il Comune il servizio loca...

Страница 12: ...lasse B Il dispositivo è adatto a tutti i locali compresi quelli domestici e quelli collegati direttamente ad un alimentazione di rete pubblica a bassa tensione che alimenta edifici usati per scopi domestici Emissioni armoniche IEC 61000 3 2 N A Emissioni di fluttuazioni di tensione flicker IEC 61000 3 3 N A Guida e dichiarazione del costruttore Immunità elettromagnetica Il dispositivo è previsto ...

Страница 13: ...e di strutture oggetti e persone NOTA 3 Le intensità di campo per trasmettitori fissi come le stazioni base per radiotelefoni cellulari e cordless e radiomobili terrestri apparecchi di radioamatori trasmettitori radio in AM e FM e trasmettitori TV non possono essere previste teoreticamente e con precisione Per valutare un ambiente elettromagnetico causato da trasmettitori RF fissi si dovrebbe cons...

Страница 14: ...sabile di danni risultanti di lesioni personali o quant altro causato o relativo all installazione e o all uso dell apparecchiatura non scrupolosamente conforme alle istruzioni riportate nei manuali per l installazione il montaggio e l uso Moretti non garantisce i prodotti Moretti contro danni o difetti nelle seguenti condizioni calamità naturali operazioni di manutenzione o riparazione non autori...

Страница 15: ...rico del cliente o del rivenditore Le riparazioni su prodotti non coperti dalla garanzia sono garantite per 6 sei mesi a decorrere dal giorno in cui si riceve il prodotto riparato Prodotti non difettosi Il cliente sarà avvisato se dopo avere esaminato e provato un prodotto restituito Moretti conclude che il prodotto non è difettoso Il prodotto sarà restituito al cliente e saranno a suo carico i co...

Страница 16: ...room temperature pag 11 3 To measure ear temperature pag 11 4 To measure object temperature pag 11 5 After measurement pag 11 6 Temperature Taking Hints pag 11 7 Memory mode pag 11 8 Selecting a Temperature Scale pag 11 9 Battery Replacement pag 12 MAINTENANCE pag 12 1 Calibration pag 13 13 CLEANING AND DISINFECTION pag 13 1 Cleaning pag 13 2 Disinfection pag 14 CONDITIONS OF DISPOSAL pag 15 SPARE...

Страница 17: ...N 60601 1 2 Part 1 General requirements for safety Collateral standard Electromagnetic compatibility ISO 80601 2 56 2009 Medical electrical device Part 2 56 Particular requirements for basic safety and essential performance of clinical thermometers for measuring body temperature The manufacturer is ISO 9001and ISO 13485 certified 5 GENERAL WARNINGS Read instructions thoroughly prior to use Store a...

Страница 18: ...he user is encouraged to try to correct the interference following one or more of the suggestions below Reorient or relocate the receiving device Increase the separation between the equipment Consult the manufacturer or field service technician for help Do not use in proximity of the device mobile phones and other devices which can generate strong electrical or electromagnetic fields as they can i...

Страница 19: ...pare the measurement result to your regular body temperature Please see the Illustration For Use section to learn how to measure the body temperature Object Temperature Mode The object mode shows the actual unadjusted surface temperatures which is different from the body temperature It can help you to monitor if the object temperature is suitable for the baby or patient for example the baby s milk...

Страница 20: ...hypothalamus which shares the same blood supply as the tympanic membrane Changes in core body temperature are usually seen sooner at the tympanic membrane than at other sites such as the rectum mouth or under the arm Advantages of taking temperatures at the ear versus other sites Axillary temperature readings only reflect skin temperature which may not indicate the internal body temperature Rectal...

Страница 21: ...dvance one hour until the correct hour appears After the hour is set press BUTTON the Minute figure is flashing automatically 3 Set the minute Press and release the TEST BUTTON to advance one minute until the correct minute appears After the minute is set press BUTTON the Year figure is flashing automatically 4 Set the year Press and release the TEST BUTTON to advance one year until the correct ye...

Страница 22: ...igure 6 shows it stand for the mode of taking the object temperature You can press and hold BUTTON and then press and hold the TEST BUTTON to switch the mode between ear mode and object mode 3 Insert the probe along the ear canal as deep as possible into the ear as depicted in Figure 7 Then press the TEST BUTTON once to start the measurement A long beep will sound approximately 1 second after the ...

Страница 23: ...wab and rubbing alcohol may be used to clean the sensor window 8 If thermometer is stored in a significantly different environment than testing location place it in the testing location for approximately 30 minutes prior to use 11 7 Memory Mode Fig 11 Fig 12 1 The Memory Mode can be accessed ether in ear mode or object mode When the thermometer has been turned on and followed by Figure 3 or finish...

Страница 24: ...urate readings The accuracy of temperature readings can be affected by damage to the probe window or the presence of dirt and ear wax on the probe window 3 Fingerprints earwax dust and other soiling compounds reduce transparency of the window and result in lower temperature readings If the thermometer is accidentally placed in the ear without a probe cover installed the window must be cleaned imme...

Страница 25: ... By ensuring these batteries are disposed of correctly you will help prevent potentially negative consequences for the environment and human health which could otherwise be caused by inappropriate waste handling of the battery The recycling of the materials will help to conserve natural resources At the end of their life hand the batteries over to the applicable collection points for the recycling...

Страница 26: ...ories can affect the device negatively and alter the electromagnetic compatibility The device should not be used directly adjacent to or between other electrical equipment EMISSION TEST COMPLIANCE ELECTROMAGNETIC ENVIRONMENT GUIDANCE RF emissions CISPR 11 Group 1 The device uses RF Energy only for its internal function Therefore its RF emissions are very low and are not likely to cause any interfe...

Страница 27: ...e transmitter manufacturer and d is the recom mended separation distance in meters m b Field strengths from fixed RF transmitters as determined by an electromagnetic site survey c should be less than the compliance level in each frequency ranged Interference may occur in the vicinity of equip ment marked with the following symbol Radiated RF IEC 61000 4 3 3 V m 80 MHz to 2 5 GHz 3 V m NOTE 1 At 80...

Страница 28: ...AA Batteries Battery life Approx 1 Year 3000 readings Classification tipo BF Ingress protecting Rating IP22 19 WARRANTY Every Moretti product is guaranteed for 2 two YEARS from the purchase date except the restrictions specified below The warranty shall not apply in case of damage caused by improper use abuse alterations of the product or any other use not in compliance with the user manual The pr...

Страница 29: ... returned for reparation only after receiving prior authorization from Moretti client service Labour and delivery costs for an out of warranty reparation will be fully at the client s or reseller s expense Reparations of out of warranty products are guaranteed for 6 six months from the day the client receives the repaired product Non defective device The client is informed if after examining and t...

Страница 30: ...30 Note ...

Страница 31: ...31 Note ...

Страница 32: ...MORETTI S P A Via Bruxelles 3 Meleto 52022 Cavriglia Arezzo Tel 39 055 96 21 11 Fax 39 055 96 21 200 www morettispa com info morettispa com ...

Отзывы: