background image


21

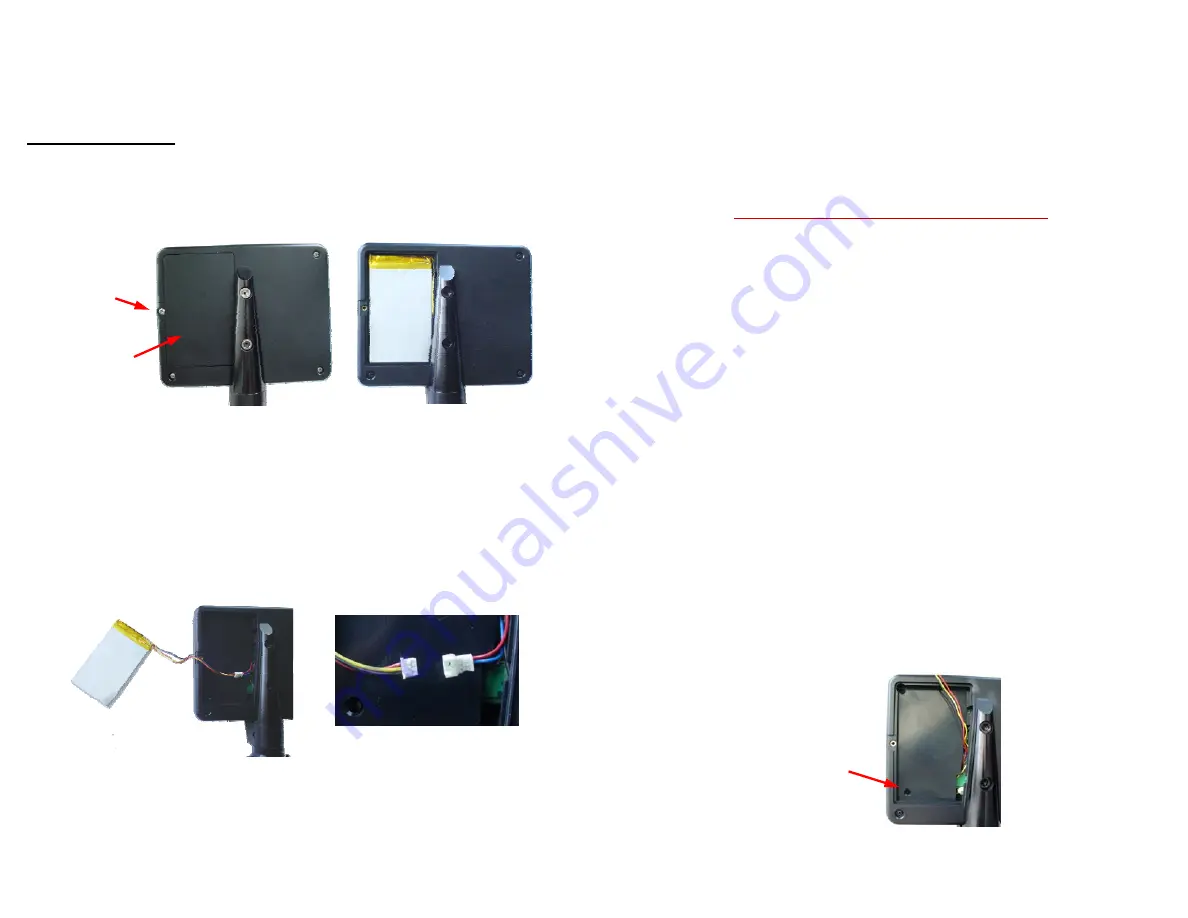
Battery Cover 

Screw 

Battery Cover 

Hawkeye

®

 Pro Videoscope

 – 

Operation 


Changing the Battery 


To change the battery, remove the screw from the battery cover and 

remove the cover. 


Carefully expose the battery wires and connector.  Pull the connector 

apart and connect new battery.  Replace the battery in its 
compartment and replace the cover and screw.  


22

RESET


Hawkeye

®

 Pro Videoscope

 – 

Troubleshooting 


The following troubleshooting hints should help you to solve some 
performance problems on site.  If a problem is not solved using these 

suggestions, call the Service Center at the number listed under the SERVICE 
section of the Warranty page and arrange to return your videoscope for 
evaluation and repair.


NEVER Attempt to Disassemble the Videoscope 


If Image Is Not Clear and Sharp… 


If using a detachable tip adapter, the tip may not be properly 

attached.  Detach tip adapter and reinstall. 


Lenses or glass windows may be dirty.  Clean glass surface on 

insertion tube tip with alcohol and cotton swab (or soft cloth).   
Also clean detachable tip if being used. 


Light may be insufficient.  Increase light source intensity or move 
viewing tip closer to object.   


If the Video Display & Capture Unit is not working properly… 


Nothing on LCD screen:  Battery Power too low.  Recharge battery. 


No Image - but words and status symbols on LCD display: Power and 

signal cable is not connected securely.  Reattach cable. 


Cannot capture photos or video: No SD Card inserted.  


Shut down: Battery has discharged below operating threshold. 
Recharge battery. 


!!! No functions working!!!  If all functions freeze or fail, first try to 
power the unit off and restart.  If the unit does not recover, 
remove the battery compartment cover.  Move the battery to 

reveal the reset hole.  Insert a toothpick, or other non-conducting 
probe, into the reset hole and push the reset button to perform a 

system reset. 


Содержание Hawkeye Pro

Страница 1: ...or bend it beyond its normal bend radius Strong impact on the insertion tube may break the glass window or the video sensor at the tip Do not use or store the device at a temperature higher than 60 C...

Страница 2: ...ED Light Source Batteries Optional Tips LED Light Source Charger 4 Hawkeye Pro Videoscope Description The Hawkeye Pro Videoscope consists of a CMOS image sensor mounted in the tip of a flexible insert...

Страница 3: ...st vulnerable It cannot tolerate the same rough handling as the insertion tube TAKE CARE NOT TO CRUSH OR PINCH THIS AREA Articulation Levers Maximum bending of the tip will be possible when the insert...

Страница 4: ...live video to an external monitor via a composite signal connector and the included cable Stored images can be downloaded to a computer via the USB port and included cable or through the removable SD...

Страница 5: ...hen it will flash alternately red and green As the charge builds up the red flashes will become shorter in duration until they finally cease At that point the light will glow a steady green indicating...

Страница 6: ...ht left movement and the other controls up down Use caution when bending the insertion tube or bending section excessive force can cause damage Use the articulation locks if necessary to hold the tip...

Страница 7: ...ALL ARTICULATION LOCKS PRIOR TO WITHDRAWAL to prevent damage to the articulation system Move the articulation thumb levers back and forth to ensure they are in the loose neutral position and the tip...

Страница 8: ...ttery bar The memory bar is filled in as the memory fills up 16 Hawkeye Pro Videoscope Operation Image Review Mode View captured photos or video clips Push the or button to enter Image Review mode You...

Страница 9: ...d images will always include a time date stamp Confirm changes by pressing OK LANGUAGE If your unit is supplied with a language option this function will allow you to select English or the optional la...

Страница 10: ...d The displays may be toggled by using the VIDEO OUTPUT function on the main menu The video display and the external display cannot be viewed at the same time The video output format to the auxiliary...

Страница 11: ...p may not be properly attached Detach tip adapter and reinstall Lenses or glass windows may be dirty Clean glass surface on insertion tube tip with alcohol and cotton swab or soft cloth Also clean det...

Страница 12: ...ecommend 80X SD card or faster for best quality video clips Use cotton swabs and lens cleaning solution or isopropyl alcohol rubbing alcohol to clean the tip optics Clean the video display with a damp...

Страница 13: ...ation shipping or to improper maintenance service and cleaning procedures This warranty is also void if the instrument is not used in accordance with the manufacture s recommendations or if required s...

Страница 14: ...27 28 InterTest Inc 303 Route 94 Columbia NJ 07832 Office 908 496 8008 Fax 908 496 8004 service intertest com www intertest com...

Отзывы: