background image

Grounding

311238ZAM

9

Motor Lubrication

Graco does not require lubrication beyond the grease 
installed at the factory or through regular maintenance. 
With good quality compressed air and normal ambient 
conditions NXT air motors will run millions of cycles 
without additional lubrication. 

However, if any of the following criteria apply to your 
system, you will benefit from installing a 3/4 in. air line 
lubricator in the air line before the air motor or from 
occasionally adding oil to an air filter cup. 

Air supply does not contain any oil.

Air supply is very wet.

Air supply is very dry.

Air motor is run at low air pressure.

Air motor is run in unusually hot or cold environ-
ments.

Areas that benefit from lubrication: 

main piston o-rings(17),

sliding valve spool(119/108), and

motor detent assembly (113).

Add Lubrication

The three methods for adding lubrication are described 
below.

Lubricate Air Valve

Perform these steps annually, or more often depending 
on your duty cycle, air pressure, and air quality. Use a 
high quality lithium-based grease. 

1. Remove the 10 air valve cover screws (124) and air 

valve cover (112). 

2. Grease all visible moving parts, especially detent 

(113) and valve pistons (119).

Lubricate Air Filter Bowl

If using a motor with integrated air controls, add 50-75 
ml of oil to the air filter bowl and run the motor for a few 
minutes at a fast cycle rate. The oil will move through 
the air valve and main piston.

Add Accessory Air Lubricator

If using an air motor with integrated air controls, add an 
accessory airline lubricator

 to the motor inlet. The oil 

will move through the air filter. 

Graco offers airline lubricators for NXT air motors. 
Order 214848 (1/2 in.) for NXT 2200 and NXT 3400 
air motors. Order 214849 (3/4 in.) for NXT 6500 air 
motors.

If using an air motor without integrated air controls, add 
a standard type filter/regulator/lubricator that is sized for 
the specific air motor, such as 217073 (3/4 in.) or 
217072 (1/2 in.).

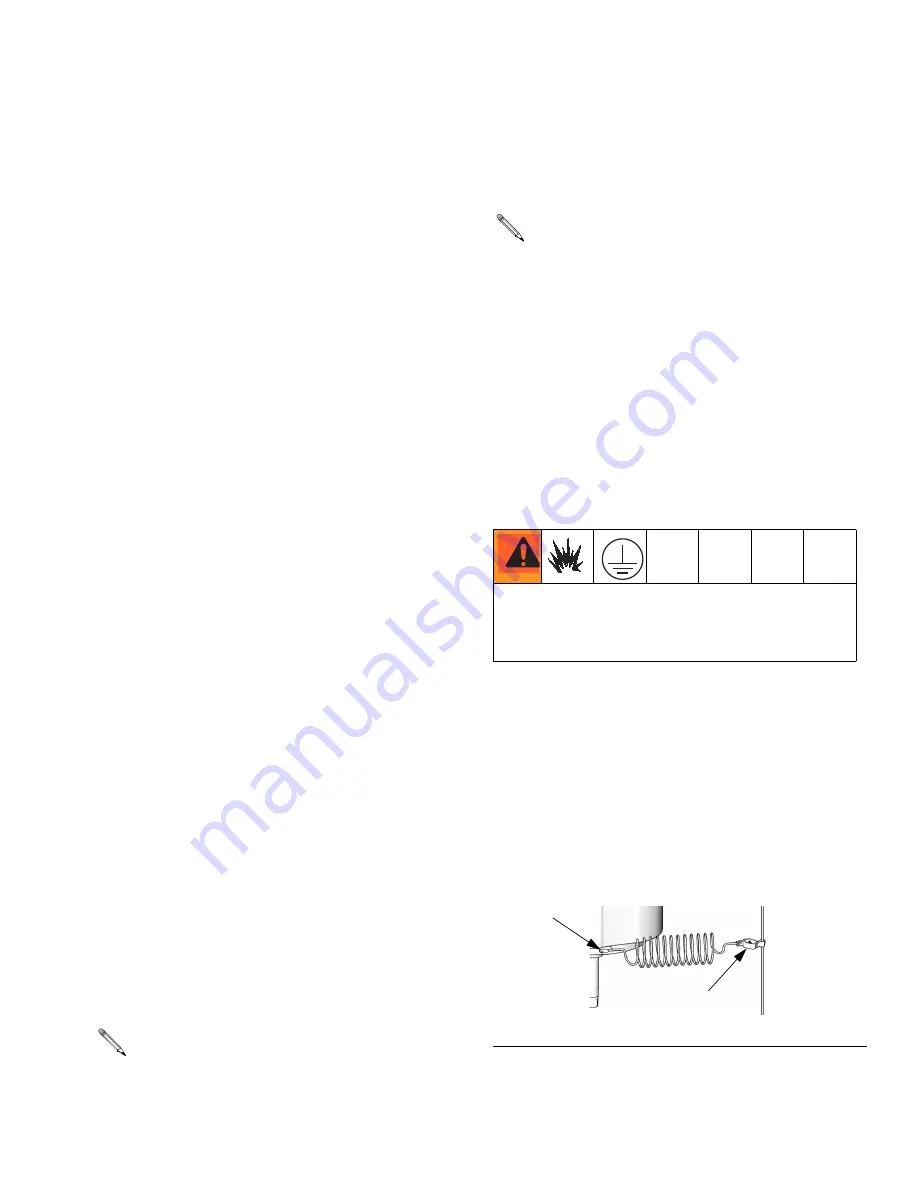
Grounding

The equipment must be grounded. Grounding reduces 
the risk of static and electric shock by providing an 
escape wire for the electrical current due to static build 
up or in the event of a short circuit.

See F

IG

. 2. Use the ground screw (60) and lockwasher 

(61) to attach Part No. 244524 Ground Wire (GW) at the 
rear of the air motor. Tighten the screw securely. Con-
nect the other end of the ground wire to a true earth 
ground. 

It is normal for some oil to come out through the 
exhaust. 

Depending on air quality you may need to change 
the air filter more frequently.

The equipment must be grounded to reduce the risk of 
static sparking. Static sparking can cause fumes to 
ignite or explode. Grounding provides an escape wire 
for the electric current.

F

IG

. 2. Ground Wire

60, 61

TI8250a

GW

Содержание N22DH0

Страница 1: ...ctions Read all warnings and instructions in this manual Save these instructions See page 3 for model information 100 psi 0 7 MPa 7 0 bar Maximum Working Pressure Updated technical information and rep...

Страница 2: ...re with built in air control 18 Air continuously exhausting from motor 18 Repair 20 Preventive Maintenance Schedule 20 Tools Required 20 Pressure Relief Procedure 20 Air Valve Repair 20 Cylinder and P...

Страница 3: ...in cc per stroke Fourth Digit Exhaust Type Fifth Digit Data Monitoring Sixth Digit unassigned N NXT Air Motor 65 6500 D De icing N None 0 None assigned 34 3400 L Low noise T DataTrak 2 22 2200 R Remo...

Страница 4: ...0 L 2200 6 0 152 N22LH0 L 2200 6 0 152 N22RN0 L 2200 6 0 152 N22RT0 L 2200 6 0 152 N22RH0 L 2200 6 0 152 N34DN0 L 3400 7 5 191 N34DT0 L 3400 7 5 191 N34DH0 L 3400 7 5 191 N34LN0 L 3400 7 5 191 N34LN2...

Страница 5: ...king fire extinguisher in the work area SPECIAL CONDITIONS FOR SAFE USE Equipment must comply with the following conditions to avoid a hazardous condition which can cause fire or explosion All label a...

Страница 6: ...or damaged parts immediately with genuine Graco replacement parts only Do not alter or modify equipment Use equipment only for its intended purpose Call your Graco distributor for information Route h...

Страница 7: ...t rear of air control kit F De icing Control G Air Valve behind cover H DataTrak module see pages 9 14 not present on all models J Runaway Solenoid component 1 K DataTrak Sensors component 2 L Air Val...

Страница 8: ...ve M Automatically opens to relieve air pressure to prevent pump overpressurization Air Filter E Removes harmful dirt from compressed air supply Low noise models have exhaust baffles that can accumula...

Страница 9: ...s add 50 75 ml of oil to the air filter bowl and run the motor for a few minutes at a fast cycle rate The oil will move through the air valve and main piston Add Accessory Air Lubricator If using an a...

Страница 10: ...t Key Resets faults Press and hold for 3 seconds to clear the batch totalizer CF Cycle Flow Rate BT Batch Totalizer GT Grand Totalizer RT Runaway Toggle enable disable UT E1 Toggle DT E2 Toggle ST E5...

Страница 11: ...ve B Wait for air to completely bleed off the air motor before going to step 3 The screen will change to indicate this as shown below 3 Press to clear the diagnostic code and reset the runaway solenoi...

Страница 12: ...of gallons or liters To reset the totalizer press any key to wake up the display then press and hold for 3 seconds Display See FIG 3 The display Y will turn off after 1 minute of inactivity in Run mo...

Страница 13: ...o replace battery see page 14 Disable Runaway mode until battery is replaced see page 11 E 4 Service Component 1 Problem with stopping runaway Damaged solenoid Damaged valve carriage E 4 Disconnected...

Страница 14: ...4 shows where to find the Series letter To reduce the risk of fire and explosion the battery and fuse must be replaced in a non hazardous loca tion Use only an approved replacement battery shown in T...

Страница 15: ...2 NXT Model 3400 34 NXT Model 6500 36 Symptom Cause Check Procedure Solution Runaway error code displayed pump running faster than set runaway limit Exhausted fluid supply increased air pressure incre...

Страница 16: ...ng sticking spring loaded detent 113 NXT145 Remove air valve cover 112 16A038 and check for binding sticking of spring loaded detent 113 NXT145 Note be careful removing Gasket 106 15H634 Remove air va...

Страница 17: ...s debris or is damaged on top or bottom poppet valve 12 NXT100 Clean or replace the bottom poppet valve 12 NXT100 Note Problem poppet is typically opposite from where motor bounces because the opposit...

Страница 18: ...jumps to line input pressure from set point Formed gasket 17 15G439 is leaking Replace gasket 3 15G439 or seal repair kit NXT096 Sticking damaged regulator valve spool 8 NXT098 Remove inspect for dam...

Страница 19: ...oppet Piston Shaft Seals Piston O ring Air Valve Seals Air Valve Spool Air Valve Slide Plate Air Valve Seals FIG 7 Cutaway View Models with Linear Sensor TI8066b Poppet Poppet Piston Shaft Seals Pisto...

Страница 20: ...lock 6 Open all fluid drain valves in the system having a waste container ready to catch drainage Leave drain valve s open until you are ready to spray again 7 If you suspect the spray tip or hose is...

Страница 21: ...e air valve 40 Install the air valve Install the screws 41 and torque to 20 ft lb 27 1 N m Thread the screws 43 in by hand then fully tighten them against the muf fler 15 9 For motors with DataTrak or...

Страница 22: ...mble the Air Valve 1 Install a new gasket 102 between valve body 103 and exhaust cover 101 2 Lubricate the valve plate 105 Install the seal 104 and plate 105 in the valve body 103 Thread the screws 12...

Страница 23: ...ews 43 in by hand then fully tighten them against the muffler 15 8 For motors with DataTrak or the linear sensor rein stall the modules see step 9 page 21 FIG 11 Air Valve Repair NXT107 Shown Apply hi...

Страница 24: ...r valve 40 to make disassembly easier 8 Remove the tie bolts 13 Using a rubber mallet hit the underside of the top cap 1 to separate Lift the top cap off the motor 9 Disconnect the air motor from the...

Страница 25: ...42 ft lb 51 3 56 7 N m Use 3 8 in drive socket to fit in recess Torque to 20 ft lb 27 1 N m Fully tighten against muffler 15 Installation order two leather o rings 8 one u cup 7 facing up and one spir...

Страница 26: ...e bolts 13 evenly to 38 42 ft lb 51 3 56 7 N m 8 Retighten the bottom two air valve screws 41 and torque to 20 ft lb 27 1 N m 9 Reconnect the air motor to the lower see your sep arate pump manual 10 R...

Страница 27: ...e poppet o rings 12a 12b 12d and backup 12c Replace damaged o rings or replace the entire poppet assembly 6 Lubricate the poppet assemblies 12 and reinstall in the top cap 1 and bottom cover 3 Torque...

Страница 28: ...1 Torque to 30 36 ft lb 40 6 48 8 N m 9 Apply thread adhesive to the adapter 33 Extend the sensor cable straight up out the top of the adapter then screw the adapter into the top cap 1 Torque to 30 3...

Страница 29: ...onto the reed switch sensor about 2 in 50 mm behind the connection C 6 Route the remote DataTrak wire harness 76 down the front of the air valve and carefully slide the grommet G into the slot S of t...

Страница 30: ...Detail see page 27 12a 12b 12d 30 21 12 1 56 47 12 3 14 61 60 18 7 9 8 17 4 10 13 2 15 43 41 40 46 58 58 TI8620a 59 18 45 Top Cover 30 Detail for Models without DataTrak 30 TI8214d 62 20 44 23 TI8801...

Страница 31: ...12b 112d 30 21 33 35 12 1 18 12 3 14 61 60 18 17 4 10 45 13 2 15 43 41 40 46 36 58 58 TI7748e 59 47 45 62 20 44 23 TI8801a Remote Exhaust 23 Detail De Ice Exhaust 22 Detail Low Noise Exhaust 24 Detail...

Страница 32: ...d O RING buna N 1 13 119050 BOLT hex hd 1 2 13 x 8 in 203 mm 4 14 15F639 NUT with lockwasher 1 2 13 4 15 NXT203 MUFFLER 1 17 123196 O RING piston nitrile 1 18 15F449 O RING end cap nitrile 2 20 119990...

Страница 33: ...0730 120730 120730 120730 120730 120730 2 30 COVER top 15G377 15G576 15G379 15G377 15G576 15G379 15G377 15G576 15G379 1 33 ADAPTER lift ring 15F772 15F772 15F772 1 35 SENSOR ASSEMBLY 287839 287839 287...

Страница 34: ...d O RING buna N 1 13 119050 BOLT hex hd 1 2 13 x 8 in 203 mm 6 14 15F639 NUT with lockwasher 1 2 13 6 15 NXT303 MUFFLER 1 17 122434 O RING piston nitrile 1 18 15F449 O RING end cap nitrile 2 20 119990...

Страница 35: ...120730 120730 120730 120730 120730 120730 2 30 COVER top 15G556 15G575 15G558 15G556 15G575 15G558 15G556 15G575 15G558 1 33 ADAPTER lift ring 15F772 15F772 15F772 1 35 SENSOR ASSEMBLY 287839 287839 2...

Страница 36: ...d O RING buna N 1 13 119050 BOLT hex hd 1 2 13 x 8 in 203 mm 6 14 15F639 NUT with lockwasher 1 2 13 6 15 NXT603 MUFFLER 1 17 122675 O RING piston nitrile 1 18 15F448 O RING end cap nitrile 2 20 119990...

Страница 37: ...0 120730 120730 120730 2 30 COVER top 16R866 16R868 15F880 16R866 16R868 15F880 16R866 16R868 15F880 15F880 1 33 ADAPTER lift ring 15F772 15F772 15F772 15F772 1 35 SENSOR ASSEMBLY 287839 287839 287839...

Страница 38: ...2LR0 N34LR0 N65LR0 TI7750b 12a 12b 12d 30 21 12 1 47 12 3 14 61 60 18 17 4 10 13 2 15 43 41 40 46 58 58 59 18 45 TI10948B 62 See Exhaust Details Above Low Noise Exhaust 24 Detail 44 20 57 56 55 54 63...

Страница 39: ...18 15F449 O RING end cap nitrile 2 20 119990 O RING buna N 1 21 15F931 RING lift 1 24 NXT104 KIT low noise exhaust includes items 20 25 44 54 55 56 57 63 1 25 120730 SCREW machine hex hd 1 4 20 x 1 i...

Страница 40: ...XT109 Air Valve with Junction Box TI11295b 102 101 104 105 117 123 108 107 113 124 138 140 142 112 106 111 103 132 134 145 139 144 131 135 134 133 Detail of Part NXT108 with DataTrak Module Detail of...

Страница 41: ...ked with B 1 117 15G905 RETAINER valve plate 4 119 NXT142 VALVE piston 1 119a n a SEAL u cup piston spool 1 123 120089 SCREW 3 8 16 x 1 3 4 in 44 mm 4 124 120730 SCREW machine hex washer hd 1 4 20 x 1...

Страница 42: ...ee Integrated Air Control Modules manual 311239 Air Control See Air Controls manual 3A0293 Air Motor Model A inch mm B inch mm C inch mm D inch mm NXT Model 2200 15 6 394 16 8 427 15 4 391 12 4 315 NX...

Страница 43: ...Rod Holes 8 000 in 203 mm x 120 Bolt Circle Six 5 8 11 Tie Rod Holes 8 000 in 203 mm x 120 Bolt Circle 5 906 in 150 mm x 120 Bolt Circle Three 5 8 11 Tie Rod Holes 5 906 in 150 mm x 120 Bolt Circle F...

Страница 44: ...emature pump wear 60 cycles per minute Operating temperature range 32 140 F 0 60 C Materials of construction Aluminum ductile iron stainless steel carbon steel acetal polyethylene Santoprene alloy ste...

Страница 45: ...0 65 60 0 5 10 15 20 Cycles per Minute 0 5 10 15 20 Key A 100 psi 0 7 MPa 7 bar B 40 psi 0 3 MPa 2 8 bar A B A B N22LN0 N34LN2 Sound Power N22LN0 N34LN2 Sound Pressure 1 m corrected sound pressure lev...

Страница 46: ...0 0 5 10 15 20 Cycles per Minute 0 5 10 15 20 Key A 100 psi 0 7 MPa 7 bar B 40 psi 0 3 MPa 2 8 bar A B A B N34LN0 N34LN2 Sound Power N34LN0 N34LN2 Sound Pressure 1 m corrected sound pressure levels ba...

Страница 47: ...70 65 60 0 5 10 15 20 Cycles per Minute 0 5 10 15 20 Key A 100 psi 0 7 MPa 7 bar B 40 psi 0 3 MPa 2 8 bar A B A B N65LN0 Sound Power N65LN0 Sound Pressure 1 m corrected sound pressure levels based on...

Страница 48: ...not disclose any defect in material or workmanship repairs will be made at a reasonable charge which charges may include the costs of parts labor and transportation THIS WARRANTY IS EXCLUSIVE AND IS I...

Отзывы: