background image

ITS Camera System - Installation and User Manual

2650 Biscayne Boulevard, Miami, Florida 33137 | 305-937-2000 | www.GovComm.us | [email protected]

© GovComm, Inc. 2017

23

2.  Configure  the  NIC  settings,  including  the 

IPv4(IPv6)  Address,  IPv4(IPv6)  Subnet  Mask

 and 

IPv4(IPv6) Default Gateway

.

3.  Click 

Save

 to save the above settings.

Note:

•  If the DHCP server is available, the user can check DHCP to automatically obtain an IP address 

and other network settings from that server.

•  The valid value range of Maximum Transmission Unit(MTU) is 500 ~ 9676. The default value is 

1500.

•  The Multicast sends a stream to the multicast group address and allows multiple clients to 

acquire the stream at the same time by requesting a copy from the multicast group address. 

Before utilizing this function, the user has to enable the Multicast function of the router and 

configure the gateway of the network ITS Camera.

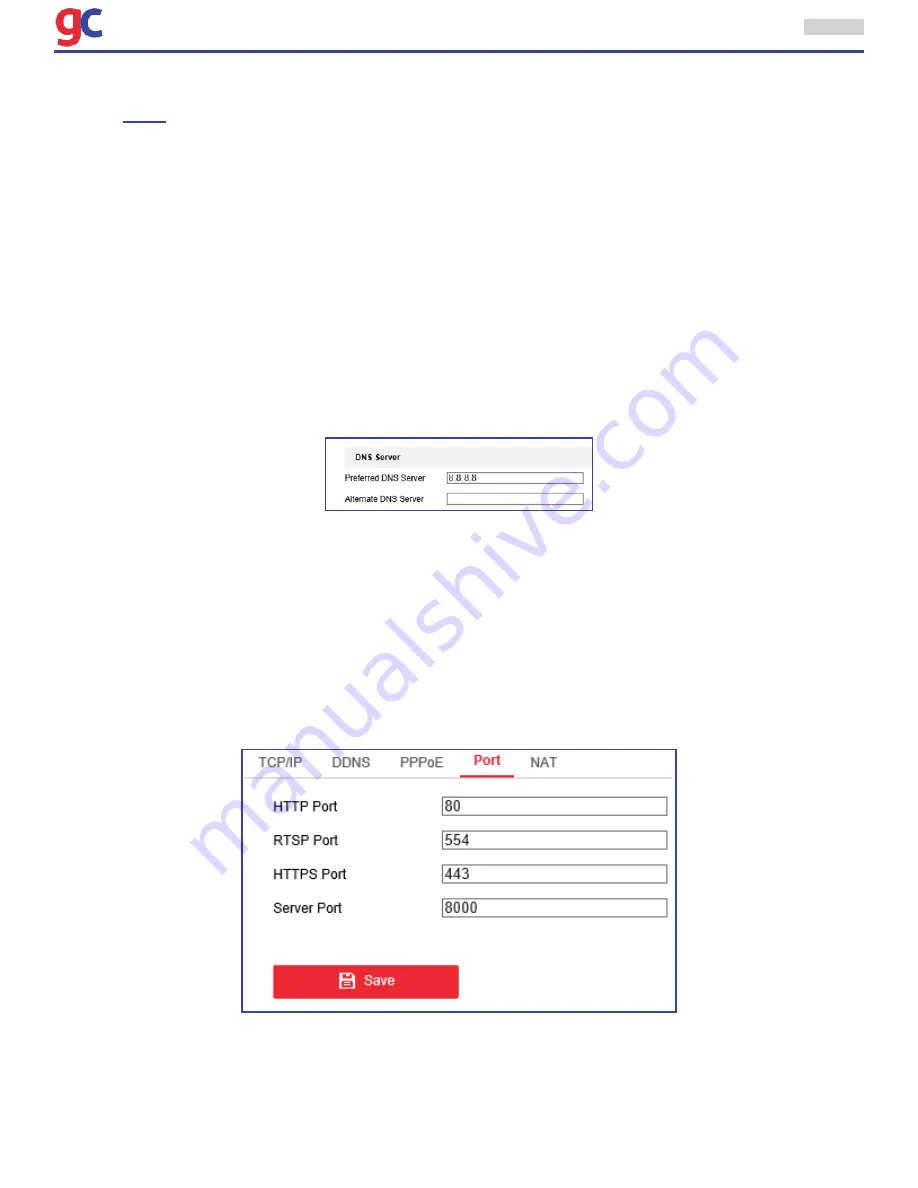
•  If the DNS server settings are required for some applications (e.g., sending email), the user 

should properly configure the 

Preferred DNS Server

 and 

Alternate DNS server

.

Note: 

The router must support the route advertisement function if the user selects Route 

Advertisement as the IPv6 mode.

3.3.2 Configuring Port Settings

Purpose:

If there is a router and the user wants to access the ITS Camera through Wide Area Network (WAN), 

the user needs to forward the 3 ports for the ITS Camera.

Steps:

1.  Enter the Port Settings interface: 

Configuration > Network > Port

Содержание Eagle GC-ICPO-FI2DE

Страница 1: ...ITS Camera Systems Installation and User Manual Sales GovComm us 305 937 2000 2650 Biscayne Blvd Miami Florida 33137 GovComm Inc 2017...

Страница 2: ...rmation FCC compliance This equipment has been tested and found to comply with the limits for a digital device pursuant to part 15 of the FCC Rules These limits are designed to provide reasonable prot...

Страница 3: ...ake sure the power supplied is the correct voltage 110 if powered AC or 24 48 if powered DC and current AC if powered 24VAC or DC if powered w Moxa PoE injector Although the camera has been tested for...

Страница 4: ...18 3 0 ITS Camera Configuration 19 3 1 Configuring Local Parameters 19 3 2 Configuring Time Settings 20 3 3 Configuring Network Settings 22 3 3 1 Configuring TCP IP Settings 22 3 3 2 Configuring Port...

Страница 5: ...n 42 3 6 2 Configuring Video Loss Alarm 44 3 6 3 Configuring Tamper proof Alarm 45 3 6 4 Configuring External Alarm Input 47 3 6 5 Configuring Alarm Output 48 3 6 6 Handling Exception 49 Sales GovComm...

Страница 6: ...nt System requirement of web browser accessing is as follows Operating System Microsoft Windows XP SP1 and above version Vista W in7 Server 2003 Server 2008 32bits CPU Intel Pentium IV 3 0 GHz or high...

Страница 7: ...S cameras 2 Connect the ITS camera to the appropriate power source Either of these options will work with all GovComm ITS cameras GovComm Supplied 24 VAC Transformer Separate cabling is required Power...

Страница 8: ...omm cameras use End span 1 2 3 6 Mid span 4 5 7 8 Some other cameras AXIS for example use different polarity http tyconpower com products files TP DCDC xx56GD VHP_Spec_Sheet pdf End span 1 2 3 6 Mid s...

Страница 9: ...ITS Camera System Installation and User Manual 2650 Biscayne Boulevard Miami Florida 33137 305 937 2000 www GovComm us Sales GovComm us GovComm Inc 2017 4 Image 2 Image 1 Image 3...

Страница 10: ...nges of scenery When on Semi Auto the camera s focus will adjust only once after a PTZ function is engaged and will not readjust until a subsequent PTZ function is performed When the camera is not mov...

Страница 11: ...w settings 4 In the Compatibility View Settings window under Add this website enter the address of the device to add to the list and then click the Add button NOTE The current webpage address will aut...

Страница 12: ...sites in this zone option if it is not connecting via HTTPS 9 In the Add this website to the zone box type the address of the device that needs to be accessed and click the Add button NOTE The current...

Страница 13: ...tarting the camera gives the chance for cache to flush settings to recalibrate and connections to be renegotiated This step is the least difficult and cheapest to perform one only has to remove power...

Страница 14: ...sible look at the camera to make sure it is powered up Most cameras have LED s that indicate the camera s power status and if it is connected to and transmitting data to the network Many times these L...

Страница 15: ...they know tricks specific to their hardware and can remotely connect to the PC via the internet to diagnose Don t be afraid to ask for help many times technicians waste hours tracking down a problem t...

Страница 16: ...serving how the image quality is affected Lower the resolution Lower the frame rate Make sure the bit rate is not capped In order to be able to get a 2 MP at 30 FPS in H 264 at least 10Mb is needed so...

Страница 17: ...guration PTZ Initial Position 2 Click the PTZ control buttons to find a position as the initial position of the dome the user can also call a defined preset and set it as the initial position of the d...

Страница 18: ...network system Note Preset freezing function is invalid when calling a pattern Preset Speed The user can set the speed of a defined preset from 1 to 8 Keyboard Control Speed Define the speed of PTZ c...

Страница 19: ...ble Limit and choose the limit type as manual stops or scan stops Manual Stops When manual limit stops are set operate the PTZ control panel manually only in the limited surveillance area Scan Stops W...

Страница 20: ...iguration PTZ Scheduled Tasks 2 Check the checkbox of Enable Scheduled Task 3 Set the Park Time Set the park time a period of inactivity before the dome starts the scheduled tasks 4 Set the schedule a...

Страница 21: ...be overlapped Up to 10 tasks can be configured for each day 5 Click Save to save the settings 2 5 Configuring Park Actions Purpose Thisfeatureallowsthedometostartapredefinedparkaction scan preset patt...

Страница 22: ...tons to find the area to set the privacy mask 3 Click Draw Area click and drag the mouse in the live video window to draw the area 4 The user can drag the corners of the red rectangle area to draw a p...

Страница 23: ...t zoom ratio as the tracking zoom ratio 5 Set the tracking duration The ITS Camera stops tracking when the duration time is up The duration ranges from 0 to 300 seconds Note Setting the duration to 0...

Страница 24: ...d HTTP are selectable TCP Ensures complete delivery of streaming data and better video quality yet the real time transmission will be affected UDP Provides real time audio and video streams HTTP Allow...

Страница 25: ...and clipped video files Save snapshots in live view to Set the saving path of the manually captured pictures in the Playback interface Save snapshots when playback to Set the saving path of the captur...

Страница 26: ...ally Steps 1 Check the Manual Time Sync radio button 2 Click the calendar icon to set the system time from the pop up calendar 3 Click Save to save the settings Note The user can alsocheck the Sync wi...

Страница 27: ...the user can turn this function on The time will be adjusted automatically when the Daylight Saving Time DST comes Steps 1 Enter the DST interface by Configuration System System Settings DST 2 Check...

Страница 28: ...d allows multiple clients to acquire the stream at the same time by requesting a copy from the multicast group address Before utilizing this function the user has to enable the Multicast function of t...

Страница 29: ...use Point to Point Protocol over Ethernet PPPoE function Steps 1 Enter the PPPoE Settings interface Configuration Network PPPoE 2 Check the Enable PPPoE checkbox to enable this feature 3 Enter User Na...

Страница 30: ...e g members dyndns org 2 In the Domain text field enter the domain name obtained from the DynDNS website 3 Enter the Port of DynDNS server 4 Enter the User Name and Password registered on the DynDNS...

Страница 31: ...onfiguring SNMP Settings Purpose The user can use SNMP to get ITS Camera status and parameters related information Before starting Before setting the SNMP please use the SNMP software and manage to re...

Страница 32: ...The protected LAN with 802 1X standard is shown as follows Before connecting the Network Camera to the protected LAN please apply a digital certificate from a Certificate Authority The network camera...

Страница 33: ...The EAP MD5 version must be identical with that of the router or the switch 5 Enter the user name and password issued by the CA to access the server 6 Click Save to finish the settings Note The camer...

Страница 34: ...r 3 Click Save to save the settings Note If the user wants to upload the captured pictures to FTP server the user also has to enable the continuous snapshot or event triggered snapshot in Snapshot int...

Страница 35: ...an check the checkbox of HTTP RTSP or SDK port according to the demand 4 Click Save to save the settings 3 3 10 Configuring Email Settings Purpose The system can be configured to send an Email notific...

Страница 36: ...checkbox of Attached Image to send emails with attached alarm images Interval The interval refers to the time between two actions of sending attached pictures Authentication optional If the email ser...

Страница 37: ...nal will be recorded only when the Video Type is Video Audio Resolution Select the resolution of the video output Bitrate Type Select the bitrate type to constant or variable Video Quality When bitrat...

Страница 38: ...tarting ROI Region of Interest encoding is used to enhance the quality of images which are specified in advance Stream Type The user can set the ROI function for main stream sub stream or third stream...

Страница 39: ...acking 2 Adjust the Enhance the level from 1 to 6 The higher the value the better the ROI quality 3 Click Save to save the settings 3 5 Configuring Image Settings 3 5 1 Configuring Display Settings Pu...

Страница 40: ...s of the image The value ranges from 0 to 100 Contrast This feature enhances the difference in color and light between parts of an image The value ranges from 0 to 100 Saturation This feature is used...

Страница 41: ...o the brightness of the environment Iris Priority The value of iris needs to be adjusted manually The shutter and gain values will be adjusted automatically according to the brightness of the environm...

Страница 42: ...ming Manual In Manual mode the user needs to use on the control panel to focus manually Min Focus Distance This function is used to limit the minimum focus distance The value can be set to 1 5m 3m 6m...

Страница 43: ...l of the whole image and provide clear images with details The user can enable or disable the WDR function The wide dynamic level ranges from 0 to 100 Note This function varies depending on the models...

Страница 44: ...e scene illumination Note This function varies depending on the models of the ITS Camera Image Enhancement 3D Digital Noise Reduction The user can enable or disable the 3D Digital Noise Reduction func...

Страница 45: ...f the ITS Camera Local Output The user can select the output mode to ON or OFF 3 5 2 Configuring OSD Settings Purpose The ITS Camera supports following on screen displays Zoom Identifies the amount of...

Страница 46: ...r can use the mouse to click and drag the text frame IPDome2 in the live view window to adjust the OSD position 6 Click Save to activate above settings 3 5 3 Configuring Text Overlay Settings Purpose...

Страница 47: ...Camera sends a notification to an e mail address 3 6 1 Configuring Motion Detection Purpose Motion detection is a feature which can trigger alarm actions and actions of recording videos when the motio...

Страница 48: ...drag the slider next to the days to set the time for the Arming Schedule The user can also click on the bar to open the settings for the time and it can be inputted 3 After setting the arming schedul...

Страница 49: ...nagement software when an event occurs Upload to FTP Capture the image when an alarm is triggered and upload the picture to a FTP server Note A FTP server is needed and to set FTP parameters first Ref...

Страница 50: ...p 3 Set the Alarm Actions for Motion Detection in Section 3 6 1 5 Click Save to save the settings 3 6 3 Configuring Tamper proof Alarm Purpose The user can configure the ITS Camera to trigger the alar...

Страница 51: ...hedule for motion detection Refer to Step 2 Set the Arming Schedule for Motion Detection in Section 3 6 1 Configuring Motion Detection 5 Check the checkbox to select the linkage method taken for the t...

Страница 52: ...or the alarm input optional 4 Click Edit to set the arming schedule for the alarm input Refer to Step 2 Set the Arming Schedule for Motion Detection in Section 3 6 1 Configuring Motion Detection 5 Che...

Страница 53: ...Name for the alarm output optional 4 The Delay time can be set to 5sec 10sec 30sec 1min 2min 5min 10min or Manual The delay time refers to the time duration that the alarm output remains in effect af...

Страница 54: ...can be HDD full HDD error network disconnected IP address conflicted and illegal login to the ITS Cameras Steps 1 Enter the Exception Settings interface Configuration Events Exception 2 Check the che...

Отзывы: