


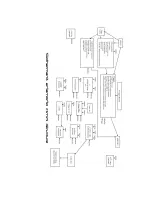
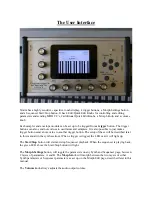


On the left end panel of your Xmini, you will find the MIDI in and out connectors. The optional CV
inputs and outputs are also found here, if installed. Please notice, that the upper row of CV
connectors are the outputs, and the lower row are the inputs. The upper MIDI connector are the
input, and the lower are the output.
If the Xmini touch screen keyboard seems too limited, you might want to connect a MIDI keyboard
to MIDI in, in order to take full advantage of Xmini’s fully chromatically playable sounds. It is also
possible to connect anything that transmits a MIDI clock, if you would like the sequencer of Xmini
to sync to your setup.
On MIDI out, MIDI clock, MIDI CC’s form the Xmini edit knobs, and notes and CC’s from its
sequencer are transmitted. Connect any MIDI gear to this, that you would like to control from
Xmini.
Connect any CV voltage source to the 4 CV inputs. Each input can be set up to match the voltage
range of any CV source, up to +/- 15 volts. The CV inputs can be used as modulation for any Xmini
module and as trigger sources.
Via the CV outputs it is possible to control analog gear. Each CV output, outputs both an adjustable
static voltage, plus an Xmini modulation source, so it is possible to both adjust t.ex. the cutoff
frequency of a connected analog filter, and to add modulation to this. It can even output audio
through these outputs.
Содержание Anamono Xmini
Страница 1: ...Gotharman s aNamoNo Xmini Modular Synthesizer User Manual V 2 27...
Страница 11: ......
Страница 12: ...Turn it on Push the I on the power switch Your Xmini should now turn on...
Страница 13: ......
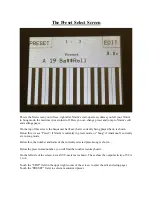
Страница 29: ...Accessing The Synth Pages From the Preset Song Select screen Touch the EDIT field...
Страница 47: ...Sub Modulates the level of the sub oscillator square wave...
Страница 65: ...Gfeed Modulates the G Ray feedback...
Страница 73: ...Outp Modulates the output level of the VCA...
Страница 89: ...Xdis Complete destruction of the sound...
Страница 94: ...Feed Pitch shifter feedback Adjusts the portion of the output signal that is fed back to the input...
Страница 101: ...Feed FM feedback Adjusts the portion of the output signal that is fed back to the input...
Страница 115: ...Feed Glitch shifter feedback Adjusts the portion of the output signal that is fed back to the input...
Страница 135: ...Enter the sequencer From the Preset Select Screen touch the EDIT field...
Страница 136: ...Touch SEQUENCER...
Страница 154: ...Touching EXIT will exit you to the Sequencer Modules page...
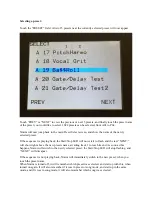
Страница 162: ...More preset parameters From the Preset Select page touch the Edit field...
Страница 163: ...Now touch MORE...
Страница 170: ...Examples of different octave settings...
Страница 171: ......
Страница 187: ...PRS Touch this to toggle between preset mode and song mode Song mode is described later in this manual...
Страница 190: ...Turn edit knob 1 to 4 to select the first 4 letters of the name for your new preset Touch NEXT when you are done...
Страница 191: ...Turn edit knob 1 to 4 to select letters 5 to 8 of the name for your new preset Touch NEXT when you are done...
Страница 192: ...Turn edit knob 1 to 4 to select letters 9 to 12 of the name for your new preset Touch NEXT when you are done...
Страница 196: ...Touch MORE...
Страница 197: ...In the far right row you will find the text PRS Please hit this after making sure that the sequencer is stopped...
Страница 198: ...Now PRS turns into SONG and Xmini are in song mode If you would like to go back to preset mode just touch SONG...
Страница 211: ...Turn edit knob 1 to 4 to select the first 4 letters of the name for your new song Touch NEXT when you are done...
Страница 212: ...Turn edit knob 1 to 4 to select letters 5 to 8 of the name for your new song Touch NEXT when you are done...
Страница 213: ...Turn edit knob 1 to 4 to select letters 9 to 12 of the name for your new song Touch NEXT when you are done...
Страница 218: ...From the Preset Select screen touch the EDIT field to enter the Edit Group page Touch SAMPLE REC EDIT...
Страница 224: ...Turn Edit Knob 1 to 4 to select character 5 to 8 of the sample name Touch NEXT to go on...
Страница 225: ...Turn Edit Knob 1 to 4 to select character 9 to 12 of the sample name Touch NEXT to go on...
Страница 238: ...Touch the Import button Xmini will now import the selected file and show the progress on a progress bar...
Страница 248: ...11 Touch the UPD button...
Страница 251: ...Programming processor counter in the bottom counts up...
Страница 252: ...15 When programming is done Xmini will ask you to restart it Please turn Xmini off and then on again...
Страница 255: ...And a filter board...
Страница 256: ...Make sure that your Xmini is turned off and remove the power connector cable from its connector...
Страница 257: ...Remove the 4 screws in the corners of the left endplate using the Phillips screwdriver...
Страница 258: ...Pull the endplate leftwards...
Страница 261: ...Old filterboard is out...
Страница 266: ...Written by Flemming Christensen Gotharman 2017 www gotharman dk...


