background image

Important Safeguards (Continued)

CAUTION

CLASS 1 LASER PRODUCT

Use of Controls or adjustments or performance of procedures other than those specified herein
may result in hazardous radiation exposure.

LASER SAFETY

This unit employs a laser, only qualified service personnel should attempt repair.

SOME DO'S AND DONT'S ON THE SAFE USE OF EQUIPMENT

Above all

WARNING:

This equipment has been designed and manufactured to meet European safety standards but
like any electrical equipment, care must be taken if you are to obtain the best results and safety is
to be assured.
Do read the operating instructions before you attempt to use the equipment.
Do ensure that all electrical connections (Including the mains plug, extension leads and
interconnections between pieces of equipment) are properly made in accordance with the
manufacturer's instructions. Switch off and withdraw the mains plug when making or changing
connections.
Do consult your dealer if you are ever in doubt of the installation, operating, or safety of your
equipment.
Don't continue to operate the equipment if you are in any doubt about it working normally, or if it is
damaged in any way- switch off, withdraw the mains plug and consult your dealer.
Don't remove any fixed covers as this may expose dangerous voltages.
Don't leave equipment switched on when it is unattended unless it is specifically stated that it is
designed for unattended operation or has a standby mode. Switch off using the switch on the
equipment and make sure that your family knows how to do this. Special arrangements may need
to be made for infirm or handicapped people.
Don't listen to headphones at high volume, as such use can permanently damage your hearing.
Don't obstruct the ventilation of the equiment, for example with curtains or soft furnishings.
Overheating will cause damage and shorten the life of the equipment.
Don't allow electrical equipment to be exposed to rain or moisture.

Never let anyone, especially children, push anything into holes, slots or any other opening as
this could result in a fatal electric shock.

Never guess or take chances with electrical equipment of any kind.

It is better to be safe than sorry!

TO REDUCE THE RISK OF FIRE OR ELECTRIC SHOCK, DO NOT EXPOSE THIS

APPLIANCE TO RAIN OR MOISTURE, DANGEROUS HIGH VOLTAGES ARE
PRESENT INSIDE THE ENCLOSURE, DO NOT OPEN THE CABINET, REFER
SERVICING TO QUALIFIED PERSONNEL ONLY.

CAUTION

CLEANING:

Always disconnect unit from mains supply before attempting to clean it. Use soft

cloth moistened with soapy water, wipe gently. Do not use solvents or abrasive
materials.

DANGER:

CAUTION:

INVISIBLE LASER RADIATION WHEN OPEN AND

INTERLOCK FAILED OR DEFEATED. AVOID DIRECT
EXPOSURE TO BEAM.
HAZARDOUS LASER RADIATION WHEN OPEN AND

INTERLOCK DEFEATED.

4

Содержание GPS185DAB

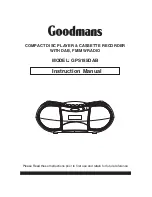
Страница 1: ...anual MODEL GPS185DAB Please Read these Instructions prior to first use and retain for future reference COMPACT DISC PLAYER CASSETTE RECORDER WITH DAB FM MW RADIO Goodmans Product Information Helpline 0870 873 0080 ...

Страница 2: ...pecifications 1 Goodmans Product Information Helpline 0870 873 0080 On unpacking the unit the following should be located within the packing 1 x Main Unit 1 x Remote control 1 x Detachable mains power cord with 3 pin plug 1 x Digital radio questionaries 1 x Digital one station leaflet 1 x Instruction Manual 1 x External wire aerial Please retain all packaging materials as in the event of the produ...

Страница 3: ...is irreversible Any ringing or discomfort in the ears indicates that the volume is too loud Once you have established a comfortable listening level DO NOT INCREASE THE SOUND LEVEL FURTHER THE FOLLOWING NOISE CAN BE HARMFUL UNDER CONSTANT EXPOSURE PERMANENT LOSS OF HEARING THRESHOLD OF PAIN The following list of typical sound levels may assist you in recognising just how loud you have set the volum...

Страница 4: ... the discarded plug Do not leave the plug lying around where children might see it To prevent fire or shock hazard do not expose this unit to rain or moisture CAUTION DANGEROUS VOLTAGES EXIST INSIDE THIS UNIT DO NOT REMOVE COVER OR BACK NO USER SERVICEABLE PARTS INSIDE REFER SERVICING TO QUALIFIED SERVICE PERSONNEL DISCONNECT FROM MAINS SUPPLY WHEN NOTIN USE PLUG WIRING DETAILS The wires in this m...

Страница 5: ...t switched on when it is unattended unless it is specifically stated that it is designed for unattended operation or has a standby mode Switch off using the switch on the equipment and make sure that your family knows how to do this Special arrangements may need to be made for infirm or handicapped people Don t listen to headphones at high volume as such use can permanently damage your hearing Don...

Страница 6: ... operate To operate the set on batteries check that the AC plug is detached from the AC socket of the unit The remote control uses two AAA or UM 4 batteries If the AC plug of this unit does not fit in your AC outlet a plug adaptor should be used Consult your local dealer on the right type of plug adaptor that is required AC OUTLET 5 Goodmans Product Information Helpline 0870 873 0080 AC OPERATION ...

Страница 7: ...lukewarm water Warning Remove mains plug from mains outlet socket before clean A dirty lens will cause sound skipping and if the lens is very dirty the CD may not work Open the disc cover and clean the lens as follows Using a camera lens brush blower to blow on the lens couple times then wipe it lightly with the brush to remove dust and blow on the lens once more If the lens cannot be cleaned by u...

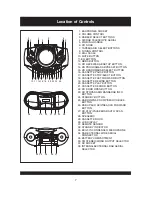
Страница 8: ...RD BUTTON 22 CD DOOR OPEN BUTTON 23 CD STOP RADIO BAND DAB INFO BUTTON 24 STAND BY BUTTON 25 DAB DOWN CD SKIP SEARCH BACK BUTTON 26 DAB UP CD SKIP SEARCH FORWARD BUTTON 27 CD PLAY PAUSE DAB AUTO SCAN BUTTON 28 SPEAKERS 29 CASSETTE DOOR 30 LCD DISPLAY 31 REMOTE SENSOR 32 STAND BY INDICATOR 33 BUILT IN CONDENSER MICROPHONE 34 DAB EXTERNAL WIRE AERIAL CONNECTOR 35 BATTERY COMPARTMENT 36 FM STEREO MON...

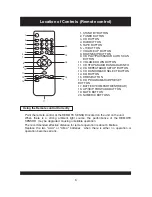
Страница 9: ...commended effective distance for remote operation is about 6 Metres Replace the two AAA or UM 4 batteries when there is either no operation or operation becomes erratic 1 STAND BY BUTTON 2 TUNER BUTTON 3 CD BUTTON 4 DAB BUTTON 5 TAPE BUTTON 6 10 BUTTON 7 VOLUME UP 8 DOWN SKIP 9 CD PLAY PAUSE DAB AUTO SCAN BUTTON 10 VOLUME DOWN BUTTON 11 CD STOP RADIO BAND DAB INFO 12 CD REPEAT DAB SETUP BUTTON 13 ...

Страница 10: ...is too much background noise slide the FM ST FM selector to the FM MONO position This will often result in a much clearer reception When the is in the FM STEREO position and a station is broadcasting the FM STEREO indicator will be lit The built in MW aerial and external FM TELESCOPIC AERIALare directional To turnoff the radio press the STANDBY button to turn the unit to STAND BYmode FM ST FM sele...

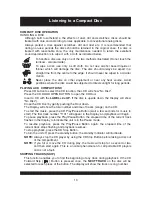
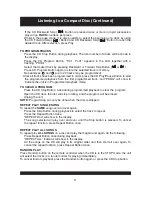
Страница 11: ...h the side If the disc is upside down the Display will show Close the CD Door by gently pushing the Door down The Display will show the total number and time of tracks songs on the CD To start the music press the CD Play Pause Button wait a few seconds for music to start The first track number Tr 01 will appear in the Display and playback will begin To pause playback press the Play Pause Button th...

Страница 12: ... playback to clear the program Open the CD door the disc will stop rotating and the program will be erased Unplug the unit Programming can only be done when the disc is stopped To repeat the song over and over again Press the Skip Button during playback to select the track to repeat Press the Repeat Button twice REPEAT One will show in the display The song selected will play over and over until th...

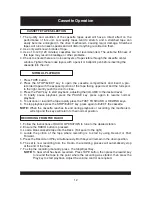
Страница 13: ... to start playback adjusting the VOLUME to the desired level 4 To briefly pause playback press the PAUSE key 5 To advance or rewind the tape rapidly press the FAST FORWARD or REWIND keys 6 To stop playback press the STOP EJECT key press again to EJECT the cassette When the cassette reaches its end during playback or recording the mechanism will stop and the keys will return to their normal positio...

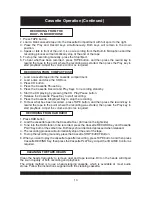
Страница 14: ...cally stop at the end of the tape 5 To stop the recording manually press the Stop Eject 6 To hear what has been recorded press TAPE button and then press the rewind key to rewind the tape to the point where the recording was started then press the Play key to start playback Adjust the volume control as required 1 Load a cassette tape into the cassette compartment 2 Load a disc and close the CD Doo...

Страница 15: ... the local area Check with the DRDB at www digitalradionow co uk or call the reception Helpline on 08707 747474 c In the event that the available signal is still not sufficient it may be necessary to connect an external aerial to the socket on the rear of this unit In this case please ensure the aerial switch is set to the EXT position 3 Assuming there is now a service list available the other sta...

Страница 16: ... the options and press Select to choose that option TUNING FOR THE FIRST TIME The additional functions of this unit in DAB mode are as follows Once the Radio is tuned the volume can be adjusted using the volume control ADJUSTING THE VOLUME Displays the channel identifier and frequency for the station to which you are tuning in CHANNEL Displays the mode of the current service Stereo or Mono and the...

Страница 17: ...n one multiplex Channels allocated to the UK Are in the range 11B to12D Multiplexes and stations have labels names which are used to identify them Instead of needing to know a particular frequency to listen to a favourite Secondary services and additional data such as text containing programme or multiplex information are also easily accessed using this unit the reception of multiplex broadcasts s...

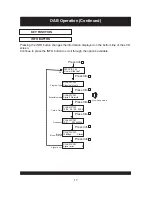
Страница 18: ... through the options available KEY FUNCTION INFO BUTTON Non Stop Audio CLASSIC FM Classical music CLASSIC FM How will that be Press Info Press Info Press Info Press Info Press Info CLASSIC FM Digital1 Network CLASSIC FM 12B 225 64Mhz CLASSIC FM 128Kbps Stereo CLASSIC FM Signal error 2 Press Info Press Info CLASSIC FM 12 00 06 05 2005 DLS Program Type Ensemble Name Time Date Frequency Bitrate Mono ...

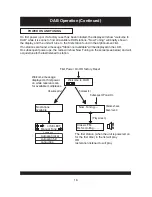
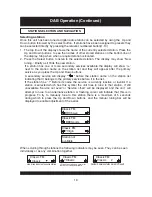
Страница 19: ...will acquire tune to the last listened to station welcome to DAB available stations will briefly show in the display the unit will tune to POWER ON AND TUNING The first station when the unit is powered on for the first time in the list will play OR last station listened to will play Welcome message displayed at first power on while receiver scan for available multiplexes First Power On OR factory ...

Страница 20: ...rvice is currently inactive or invalid If a station which has this symbol the unit tries to tune to that station If still unavailable Service not avail or Service off air will be displayed and the unit will attempt to tune to an alternative station A flashing cursor will indicate that this is in progress To try to manually tune to this station during which to press the Up and Down buttons and the ...

Страница 21: ...s and a progress bar is displayed Audio is suspended On completion the radio will tune and return to play the station being listened to 2 If the button is held for more than 2 seconds or more t 11B to 12D he unit completes a full band III scan 5Ato 13F Now Tuning Press AUTO for 2 seconds or less Press Auto tune for more then 2 seconds No Audio Scanning Scanning 13 This full band Scanning takes a l...

Страница 22: ...s the information displayed on the bottom line See the INFO function for the options available SELECT BUTTON The Select key has 2 functions In normal navigation it confirms the highlighted selection When pressed in normal mode it will display the signal strength The grey bars are the current signal level and the central highlighted bar is the minimum signal required Press Select to cancel the sign...

Страница 23: ...n your location Any station with a in front of the name will be removed For numerical order 0 9 the station with lowest number will be placed at the start of the list For alphabetical order Aa Zz the station with the most preceding letter will be placed at the start of the list case insensitive For punctuation characters order the station with the lowest ANSII character value will be put in the fo...

Страница 24: ... channel is selected the radio tunes to this frequency Once tuned the signal strength will be displayed using the signal strength meter This function can be used to check for the best position for the antenna As the antenna is moved the indicator will fluctuate according to the change in signal strength To exit this menu press Select 1 Press the UP and Down key to scroll through different channels...

Страница 25: ... level Select the channel you want to tune to Press Select Press Press Up Down DRC 1 DRC 1 2 DRC 0 DRC 1 Fav station Prune stations Alphanumeric Alphanumeric Sw version Language V 1 7 2 2 Sw version DRC value Station Order Classic FM Scrolling DLS 11D 222 06MHz 11B 218 64MHz 11D 222 06MHz Active station Alphanumeric Fav station Fav station DAB Operation Continued 24 Goodmans Product Information He...

Страница 26: ...en to the station Press and hold a Preset button 1 10 for two seconds Alternatively the station you wish to assign can be displayed in the second line of the display when you are browsing stations Again press and hold the Preset button 1 10 for two seconds In both cases a confirmation message will show that the preset has been saved Once assigned to a station the preset button can be pressed and t...

Страница 27: ...n briefly Use UPor DOWN button to select a preset memory position Press and hold Preset button a message that show that the chosen station has been saved appears on the LCD If you are browsing stations a preset will be shown by the number of the preset displayed at the end of the line To recall one of the preset stations press PRESET button briefly then press t UP or DOWN button When the desired P...

Страница 28: ...n Unit 2 x 3W Rms MW 522 1620 KHz FM 87 5 108 0 MHz 2 channels stereo Below measurable limits 20 20 000Hz 1 3 dB 1 bit DAC 8 times oversampling AUDIO RADIO GENERAL System Cross interleave Reed solomon code material GaAIAs Compact disc digital audio system Error correction Properties Laser diode PICK UP Wavelength 780nm Emission Duration continuous Laser output 44 6 W 27 Goodmans Product Informatio...

Отзывы: