background image

Goodmans Product Information HELPLINE 0870 873 0080

18

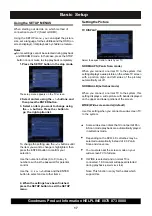
TV System

.

Select NTSC When a NTSC TV is connected.

PAL: (default)

NTSC:

MULTI

GENERAL SETTING

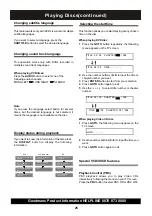
Angle Mark

The Language for OSD

The default OSD language is ENGLISH.

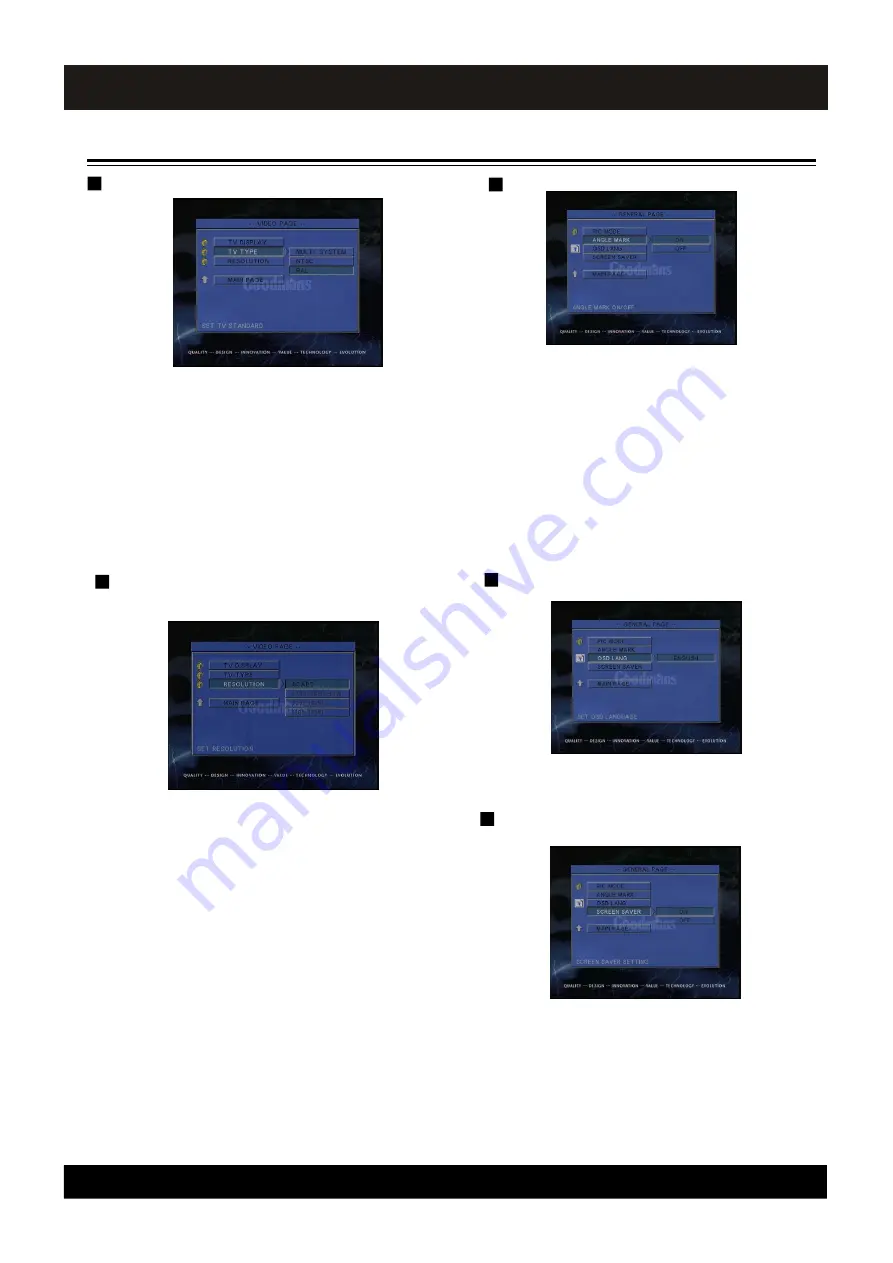
Screen Saver

Turns on or off the screen saver.
If you turn on the screen saver, the screen saver
image appears when you leave the system in stop
mode for more than 5 minutes. The screen saver is
useful to prevent your display from becoming
damaged.

The default setting is 

ON.

Select MULTI When a MULTI TV is connected.

Select PAL when a PAL TV(European standard) is
connected

Basic Setup

Select whether the angle mark appears on the TV
screen or not during playback of a multi-angles
scene.

ANGLE MARK appears on the TV screen.

OFF :

ANGLE MARK does not appear.

You can change the angles using the ANGLE
button.

ON (default) :

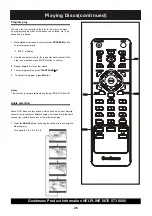
Resolution

576P/480P: Standard definition progressive mode.

720P: High definition at 1280x720, progressive mode.
(FACTORY DEFAULT)

1080I: High definition at 1920x1080, interlace mode.

SOME HD TV’

S MAY NOT SUPPORT THIS

RESOLUTION AND BLANK SCREEN WILL RESULT.
PRESS THE HDMI SEL BUTTON ON THE REMOTE
SLOWLY 3 TIMES TO RETURN THE RESOLUTION
BACK TO 720P.

Содержание GDVD148HDMI

Страница 1: ...HDMI INSTRUCTION MANUAL Before attempting to connect operate or adjust this player please read these instructions completely Please save this manual High Definition DVD player This Instruction manual covers the following models Goodmans Helpline 0870 8730080 Web site www goodmans co uk Model GDVD148HDMI ...

Страница 2: ...ol within an equilateral triangle is intended to alert the user to the presence of uninsulated dangerous voltage within the product s enclosure that may be of sufficient magnitude to constitute a risk of electric shock to persons The exclamation point within an equilateral triangle is intended to alert the user to the presence of important operating and main tenance servicing instructions in the l...

Страница 3: ...it employs a laser Only a qualified service person should remove the cover or attempt to service To prevent electric shock disconnect from the mains before removing cover No user serviceable parts inside Refer servicing to qualified service personnel OUTER SLEEVE FUSE BROWN LIVE CORD GRIP BLUE NEUTRAL IMPORTANT The wires in the mains plug should be connected as shown in the diagram The colours of ...

Страница 4: ...ertain the power cord is properly installed Store your tapes or CD in a cool area to avoid damage from heat For safety reasons do not remove any covers or attempt to gain access to the inside of the product Refer any servicing to qualified personal Do not attempt to remove any screws or open the casing of the unit there are no user serviceable parts inside refer all serving to qualified service pe...

Страница 5: ...s indicates that the volume is maybe too loud BEFORE YOUR HEARING ADAPTS Once you have established a comfortable listening level The following list of typical sound levels may assist you in recognising just how loud you have set the volume level DECIBEL Level dB Example 30 40 50 60 70 THE FOLLOWING NOISE CAN BE HARMFUL UNDER CONSTANT EXPOSURE 80 90 100 120 PERMANENT LOSS OF HEARING 140dB THRESHOLD...

Страница 6: ...UP Using the SETUP menus 17 Setting the picture 17 General setting 18 Setting the audio 19 Setting the speaker 19 Setting the language 20 Setting the controls 20 21 Defaults 21 Speaker setup for 5 1CH 22 Playing Discs Basic playback 23 Slow Fast Zooming 24 Changing subtitle language 25 Display status during playback 25 Program play 26 Angle selection 26 Repeat viewing A B repeat play KODAKPICTURED...

Страница 7: ... on the remote control if they have the same or similar names as those on the system The types of functions and operations that can be used for a par ticular disc vary depending on the features of that disc In some cases these functions and operations may differ from the descrip tions given in this Operations Manual In this event follow the in structions given on the screen This Operations Manual ...

Страница 8: ...s not installed properly Install Batteries in the Remote Control 1 Open the battery cover on the back of the remote 2 Insert two AAA batteries Make sure that the battery polarity and are aligned correctly 3 Replace the battery cover You can control the system using the supplied remote Insert two batteries by matching the and on the batteries When using the remote point it at the remote sensor on t...

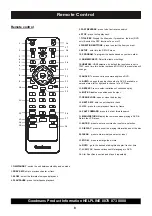
Страница 9: ...GLE To access various camera angles on DVD 14 AUDIO change the audio channels of a DVD if available or selects stereo left or right audio channel of a VCD disc 15 REPEAT Press to select variations of continuous play 16 MUTE Disables or enables sound output 17 OPEN CLOSE open or close the disc tray 18 NEXT SKIP skip to next chapter or track 19 STEP press to view playback frame by frame 20 FAST FORW...

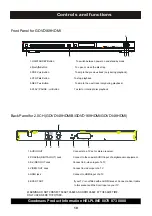
Страница 10: ...kip to the next track 1 AUDIO OUT socket Connects to a TV set or stereo receiver 2 COAXIAL DIGITAL OUT socket Connect to the coaxial AUDIO input of a digital audio equipment 3 S VIDEO OUT socket Connect to S video input of a TV 4 VIDEO OUT socket Connect to video input of a TV 5 HDMI socket Connect to HDMI input of a TV Warning do not connect a Scart cable when using the HDMI cable 6 SCART OUT soc...

Страница 11: ...ur TV is not fitted with an HDMI socket Connect a Scart cable to this socket and the Scart input on your TV Back Panel for 2 0CH GDVD148HDMIB GDVD169HDMI GDVD148HDMI 1 2 3 4 5 6 1 2 3 4 5 6 1 ON STANDBY Button To switch between power on and standby mode 2 Eject Button To open or close the disc tray 3 PREV 9 Button To skip to the previous track only during playback 4 STOP Button To stop playback 5 ...

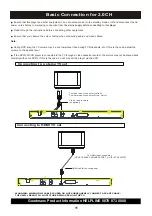
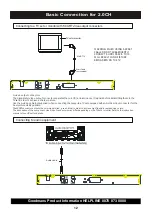
Страница 12: ...er and other equipment to be connected are set to the standby mode or off and disconnect the AC power cords before commencing connection from the mains supply before connecting to this player n Read through the instructions before connecting other equipment n Ensure that you observe the colour coding when connecting audio and video cables Note n During DVD play the TV volume may be at a lower leve...

Страница 13: ...t in order to achieve a sharper picture Use the S video cable not supplied when connecting the player to a TV set equipped with an S Video input connector for the best picture clarity possible TheSCARTconnector outputs the color signals red green blue in order to achieve high fidelity in reproducing colors The description of the component video input connectors may differ depending on the TV set o...

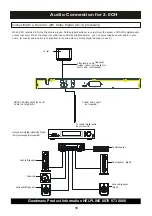
Страница 14: ...bwoofer Surround speaker left Center speaker Front speaker Right Surround speaker Right To coaxial digital audio input connector NOTE Coaxial output jack and cable not supplied Audio Connection for 2 0CH When DVD recorded in Dolby Digital are played Dolby digital bitstream is output from the player s COAXIAL digital audio output connector When the player is connected to a Dolby Digital decoder you...

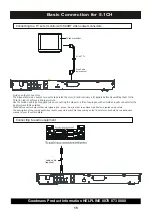
Страница 15: ...ect the AC power cords before commencing connection from the mains supply before connecting to this player n Read through the instructions before connecting other equipment n Ensure that you observe the colour coding when connecting audio and video cables Note n During DVD play the TV volume may be at a lower level than during TV broadcasts etc If this is the case adjust the volume to the desired ...

Страница 16: ... signals before transmitting them to the TV set in order to achieve a sharper picture Use the S video cable not supplied when connecting the player to a TV set equipped with an S Video input connector for the best picture clarity possible TheSCARTconnector outputs the color signals red green blue in order to achieve high fidelity in reproducing colors The description of the component video input c...

Страница 17: ...bwoofer Surround speaker left Center speaker Front speaker Right Surround speaker Right To coaxial digital audio input connector NOTE Coaxial output jack and cable not supplied Audio Connection for 5 1CH When DVD recorded in Dolby Digital are played Dolby digital bitstream is output from the player s COAXIAL digital audio output connector When the player is connected to a Dolby Digital decoder you...

Страница 18: ... 3 4 5 6buttons and the ENTER button to select and set other items Setting the Picture Select the aspect ratio to match your TV NORMAL PS Pan Scan mode When you connect a normal TV to the system this setting displays a wide picture on the whole TV screen with a portion right and left sides of the picture automatically cut off NORMAL LB Letterbox mode When you connect a normal TV to the system this...

Страница 19: ... ON Select MULTI When a MULTI TV is connected Select PAL when a PAL TV European standard is connected Basic Setup Select whether the angle mark appears on the TV screen or not during playback of a multi angles scene ANGLE MARK appears on the TV screen OFF ANGLE MARK does not appear You can change the angles using the ANGLE button ON default Resolution 576P 480P Standard definition progressive mode...

Страница 20: ... dynamic range This function is effective only when playing back a DVD disc recorded with Dolby Digital This control has no effect on other disc FULL default 7 8 to 1 8 OFF SPEAKER SETTING LT RT MONO output STEREO STEREO output default DOWNMIX AUDIO SETTING AUDIO SETTING Selects the audio output mode of Downmix If the audio coding mode of the playing disc does not match the output channel configur...

Страница 21: ...in this system allows playback limitation level to be set by the parent The default setting is NOPARENTAL When you use this function for the first time you have to set a password Notes When you increase the rating level the limitation on discs that can be played will also increase To change the parental control level a correct password is needed to key in How to set and change the password for Par...

Страница 22: ...ER button Now the parental lock level has been changed If the rating of the loaded DVD disc is higher than the level you set the system will require a password Enter your password to start playback Defaults To reset the settings select RESET and press the ENTER button All the items in the SETUP menu except for Parental Control and its Password will be reset to the default settings The parental con...

Страница 23: ...ode of the playing disc does not match the output channel configuration you must set this unit to downmix in order to reproduce the complete audio program Speaker Setup for 5 1CH Goodmans Product Information HELPLINE 0870 873 0080 22 CENTER DELAY If the listening position is closer to the center speaker than the front speakers you can set the center delay time to improve the sorround sound effect ...

Страница 24: ... seconds Repeatedly press this button until a picture is seen on the TV 3 Press the OPEN CLOSE button to open the disc tray Place a disc on the tray and press again to close the tray Notes Load the disc placing the label side face up and use the disc tray as a guide for proper alignment When playing a double sided disc load it with the desired playing side face down As the player begins loading a ...

Страница 25: ...fast reverse FR 2x FR 4x FR 6x FR 8x PLAY Y For MP3 discs FF fast forward FF 2x FF 4x FF 6x FF 8x PLAY Y FR fast reverse FR 2x FR 4x FR 6x FR 8x PLAY Y For VCD CD SVCD discs FF fast forward FF 2x FF 4x FF 8x FF 16x PLAY Y FR fast reverse FR 2x FR 4x FR 8x FR 16x PLAY Y Notes In any FF fast forward or FR fast reverse mode press the PLAY PAUSE ll button to return immediately to normal play The sound...

Страница 26: ...it means the language is not available on the disc Display status during playback If you want to know the information of the disc press the DISPLAY button to display the following information This function allows you to start playing at any chosen time on the disc When playing DVD disc 1 Press the GOTO button repeatedly the following menu appears on the TV screen TITLE 02 05 CHAPTER 001 006 TITLE ...

Страница 27: ...iscs continued Program play You can play the contents of the disc in the order you want by programming the order of the tracks to be played Up to 99 tracks can be stored 1 While playback is stopped select or press PROGRAM button to enter program mode P 00 00 is display 2 Use the number buttons 0 9 to input the track number in the order you want and press ENTER button to confirm 3 Repeat step 2 to ...

Страница 28: ...button again at your chosen end point A to B SET B will be displayed and the passage will now repeat continuously 3 To resume normal play press the A B button again A to B CANCELLED will be displayed on your screen Note The A B function can be set only within the same chapter track Repeat play KODAK PICTURE DISCS JPEG DISCS HDMI Picture Resolution When playing the above mentioned discs and you wan...

Страница 29: ...numbered and specific parts of video presentations can be searched quickly using these numbers DVD This refers to a high density optical disc on which highquality pictures and sound have been obtained by means of digital signals Incorporation a new video compression technology MPEG II and high density recording technology DVD enables esthetically pleasing full motion video to be rercorded over lon...

Страница 30: ...are exhausted replace them with new ones Point the remote control unit at the remote control sensor and operate Operate the remote control unit at a distance of not more than 7 m from the remote control sensor Remove the obstacles between the remote control unit and remote control sensor Press POWER to set the player to the standby mode and then back to ON Alternatively press POWER to set the play...

Страница 31: ...ove the cloth from the centre hole toward the occur which will not cause noise If you wipe the discs using a circular motion circular scratches are likely to occur which will cause noise Wipe this moisture off with a soft dry lint free cloth before using the disc You can damage discs if you store them in the following places Areas exposed to direct sunlight Humid or dusty areas Areas directly expo...

Отзывы: