background image

9

 Basic Operation

Controlling Thermostats

To  adjust  a  thermostat’s  settings,  use  the 

following steps.


NOTE: 

Several types of Z-Wave compatible 

thermostats  are  available.  Each  type  will 

display different supported options.

Setting the Mode

1. 

Use  the 

  or 

  arrows  on  each  side  of  the 

mode display to choose between off, heat, cool, 

auto, auxilliary heat, resume, fan only, furnace, 

dry air, moist air, auto changeover, energy save 

heat, energy save cool, or away heat modes.

2. 

The thermostat will immediately switch to the 

mode selected.

Setting the Temperature

1. 

Each thermostat mode (except OFF) can be set to 

a temperature  setpoint. Use the 

 or 

 arrows 

to choose a temperature setpoint for the current 

mode displayed. When the thermostat mode is 

“auto”,  2  setpoints  are  displayed,  “heat”  and 

“cool”.

2. 

The  temperature  setpoint  is  immediately 

transmitted to the thermostat.

 Setting the Fan Mode

If the thermostat supports Z-Wave fan control, 

the fan mode selector will be displayed.

1. 

Use the 

 or 

 arrows on each side of the fan 

mode  display  to  choose  between 

MANUAL, 

AUTO,  MANUAL  HIGH,  MANUAL  LOW, 

AUTO  HIGH, 

or

  AUTO  LOW

  (NOTE:  Only 

modes  supported  by  the  thermostat  will  be 

displayed).

2. 

The thermostat will set the system’s fan to the 

selected mode. Manual modes are displayed in 

yellow  to  indicate  that  the  fan  will  remain  on 

and will not be automatically controlled by the 

heating or cooling system.

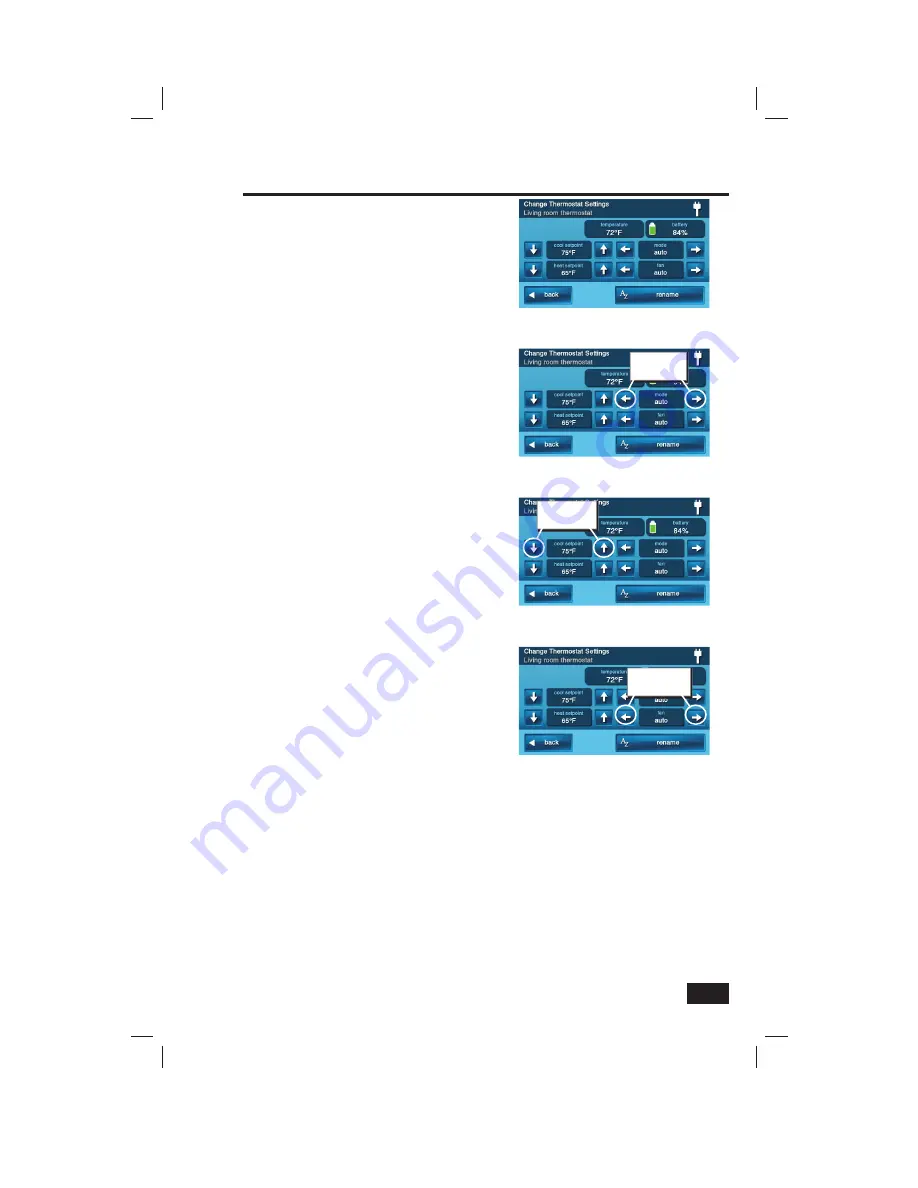
Thermostat Settings Screen

Selecting a Mode

Use arrows to 

select mode

Selecting a Setpoint

Use arrows to 

select setpoint

Selecting the Fan Mode

Use arrows to 

select fan mode

Содержание 2GIG-CNTRL2

Страница 1: ...E V1 9 LINEAR P N 233494 X4 INK BLACK MATERIAL 20 LB MEAD BOND WITH 80 LB WHITE COATED COVER SIZE 5 500 X 8 500 SCALE 1 1 FOLDING ALBUM FOLD BINDING SADDLE STITCH Wireless Security System 2GIG CNTRL2...

Страница 2: ...is the capability to remotely control your Z Wave network of devices from your own computer using a Web browser over the Internet This provides you with home automation control from anywhere in the w...

Страница 3: ...Devices 12 Creating Scenes 12 Z Wave Switches 13 Z Wave Thermostats 13 Z Wave Door Locks 13 Testing Scenes 13 Editing Scenes 14 Changing a Device s Action 14 Removing a Device s Action 14 Renaming a...

Страница 4: ...Wave devices that are repeating the wireless signals Beyond simple controlling of a single device multiple device control commands can be assigned using a Scene A Scene can be run on its own or Rules...

Страница 5: ...OSTATS button will display the currently included thermostat devices The DOOR LOCKS button will display the currently included door lock devices The RULES button will display the currently programmed...

Страница 6: ...to be added to the network at this time 6 Press BACK when finished Additional Z Wave Devices If additional Z Wave compatible devices are purchased and your home control network expands these steps ca...

Страница 7: ...c keyboard to assign a name up to 40 characters to the device Use the arrow key to shift to capital letters Use the arrow key to shift to lower case letters Press the key to access numeric and symbol...

Страница 8: ...f there are more than three switches use the or arrows to scroll the list 4 Press the display where the device is listed to display the control buttons for the switch 5 The display indicates if the sw...

Страница 9: ...is listed to display the control buttons for the switch 5 The display indicates if the switch is OFF or ON If the switch is ON the dimming level with a number 1 12 will be shown below Press the desire...

Страница 10: ...ay the control buttons for the thermostat 5 The display shows the current temperature the thermostat setpoint the thermostat s battery status the thermostat mode and the fan mode When the thermostat m...

Страница 11: ...the current mode displayed When the thermostat mode is auto 2 setpoints are displayed heat and cool 2 The temperature setpoint is immediately transmitted to the thermostat Setting the Fan Mode If the...

Страница 12: ...tton 7 Press the BACK button three times or the button on the Control Panel to exit Services NOTE The Control Panel supports but the Schlage Wireless Keypad Deadbolt does not support remote unlocking...

Страница 13: ...r s new 4 8 digit Door Lock User Code then enter it again to verify the code 5 A progress screen will be displayed while the new code is being sent to the door lock 6 A confirmation screen will be dis...

Страница 14: ...use the following steps 1 From the Home Screen press the SERVICES button 2 From the Manage Z Wave Devices Screen press the SCENES button 3 From the Z Wave Scenes Screen press the ADD SCENE button 4 Us...

Страница 15: ...OK NOTE The device will not activate while setting Steps 7A 7B 7C The scene must be run or triggered by an event with a rule Testing Scenes 8 The assigned action s for the Scene will be displayed Repe...

Страница 16: ...anage Z Wave Devices Screen press the SCENES button 3 A list of programmed Scenes will be displayed Press the name of the Scene to edit 4 Press the desired device s button to select it 5 Press the del...

Страница 17: ...ne will also delete any Rule associated with the Scene To delete a Scene use the following steps 1 From the Home Screen press the SERVICES button 2 From the Manage Z Wave Devices Screen press the SCEN...

Страница 18: ...s Screen press the ADD RULE button 4 Use the or arrows to choose a system event to trigger the Scene The events available are System Armed Away System Armed Stay System Disarmed Exit Delay Started Ent...

Страница 19: ...ected event occurs the scene can also be edited here by pressing the Run this Scene button 6 Press OK to change the Rule or CANCEL to quit Deleting Rules Rules can be deleted individually To delete a...

Страница 20: ...the device This button may also be called bind learn or may not be labeled NOTE Some devices may require pressing the program button more than once refer to the device s instructions 3 When the device...

Страница 21: ...Press the trouble alert icon to display the device s the network has detected trouble with 4 Go to the displayed devices location s and inspect for un plugged or missing devices Either correct the de...

Страница 22: ...LER button The Control Panel will display Learning Z Wave Controller and wait for a signal from the primary controller 2 Press and release the include button on the primary controller This button may...

Страница 23: ...listed The controller listings will show the controller s name manufacturer and network node number 3 Press BACK to quit View All Devices Use the following steps to display all the devices programmed...

Страница 24: ...ent positions in the installation it is recommended to rediscover the network so the routing path will be re configured Use the following steps to rediscover the network 1 From the Advanced Toolbox Sc...

Страница 25: ...uarantee that interference will not occur in a particular installation If this equipment does cause interference to radio or television reception which can be determined by turning the equipment off a...

Страница 26: ...roller 20 LEARN CONTROLLER button 20 Limited warranty 23 LOCK button 10 M Multi level switches 2 7 N NAME button 14 Naming devices 5 Network diagnostics 19 Network maintenance 18 19 Network setup 4 5...

Страница 27: ...L DEVICES button 21 View controllers 21 VIEW CONTROLLERS button 21 Viewing thermostats 8 W Warranty service 23 Z Z Wave Association reports 2 Z Wave devices 2 Z Wave door locks 13 Z Wave network 2 Z W...

Страница 28: ...YOUR LOCAL ALARM INSTALLATION AND SERVICE PROFESSIONAL Copyright 2012 233494 X4 v1 9...

Отзывы: