Page 6
Installation
IMPORTANT:
Use only the baskets provided and the pot attached to the unit. DO NOT replace the baskets or attempt to replace
the pot with other containers.
The pasta cooker electrical head has two locating buttons that need to be aligned to operate.
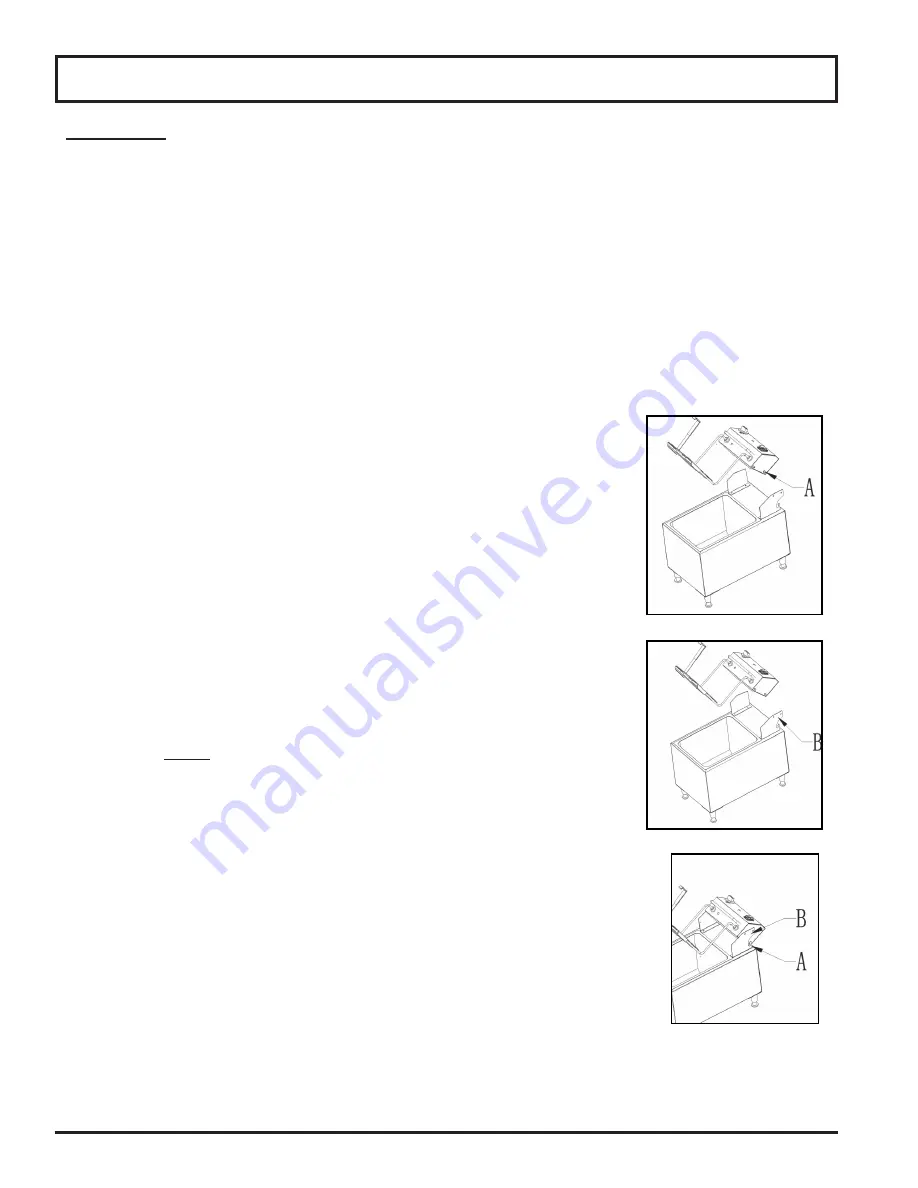
Lower the element into pot by following the two simple steps (Fig. 6-1 and Fig. 6-2). Point A cradles and guides the
head to unit’s body.
Push buttons are located on the operator right-side to lock and unlock; lift and lower heating element for cooking
or cleaning. Point A is the cradle pin guide. Point B determines the position of the head in either the working (Drip)
position or cleaning position (Access Pot position) (Fig 6-3).
Put control head into supporting cradle brackets. Put Point A into element cradle pin guide, then gently push the
electrical head forward to lock Point B into first position.
Use Point B to keep control head in the raised (Drip or Access Pot) position. To
lower element into pan and operating position, hold insulated element handle and
push and/or depress button.
These steps can be repeated in reverse for cleaning purposes.
NOTE:
Point B has two level options: Fully raised 90° (Access Pot position) allows
pot to be accessed for cleaning; raised to 75° (Drip position) allows for cleaning and
draining water from element.
Make sure pasta cooker is “Off”. It is now ready to be filled with the appropriate
amount of water.
NOTE:
In the “Off” position, the pot can be filled with the heating element up or
down. Once the pot is full with appropriate amount of water, carefully lower the
heating element into the pot if heating element is in up position. Make sure the
element is
always
submerged. Once the element is submerged, pasta cooker
can be plugged in and can be turned “On”. See Operating Instruction section in
manual to correctly start and operate pasta cooker.
IMPORTANT:
Continually observe and maintain water level in boiling pan. Water
level will decrease with each boil.
FIG. 6-3
FIG. 6-1
FIG. 6-2


