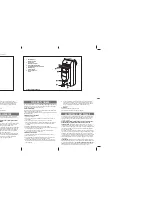
Step 16
Attach the flag bracket to the curved section of the horizontal
track using the 1/4' x 5/8’ screws and nuts ensure that the
screws are on the inside of the track. Attach the end of the
horizontal angle to the top of the wall mounted flag bracket
the 3/8’ x 3/4' carriage bolt and nut. Refer Fig. 15.
Make sure horizontal and vertical tracks are aligned
when joined.
Step 14
Loosen the slide on each top bracket enabling easy roller
adjustment.
INSTALLING HORIZONTAL TRACKS
Step 17
Lower the final door panel into the vertical tracks. Fasten the
hinges to the bottom of this panel. That is in a four panel door
secure the hinges from the top of panel three to the bottom of
panel four. This is done to prevent the top panel from falling out
of the vertical track.
No horizontal track can be installed until the top panel is installed.
Step 13
Make sure front face of panels do not touch wall.
IMPORTANT- Do Not force the track too tightly against the
rollers as this will cause the door to bind when in operation.
Check that all door panels are level and make necessary
adjustment with temporary packers. Once satisfied secure
all wall mounted brackets to eliminate any further track
movement.
Fig. 13
Fig. 15
Step 18
Secure the rear of the horizontal track with the steel angle.
Due to the variance in installation requirements within a
garage these angles are not provided. The angle may be
attached to return walls or the ceiling. Make sure that the
track is level and square with the opening. Due to the fact
that the horizontal tracks are weight bearing when the door
is fully opened ensure that adequate fasteners are used into
solid fixings. Refer Fig. 16. Repeat this step for the second
horizontal track.
Fig. 16
Step 19
The sliding section on the top door panel bracket should be
loose. Push the top of the door tightly against the opening
and pull the roller towards yourself. Once satisfied that the
roller is correctly positioned in the track then tighten the slide
bracket. If an operator is to be installed. Tighten bracket to
leave clearance between panel and lintel. Refer Fig. 17.
Fig. 17
Step 15
Use a suitable support to hold the back of the horizontal
track in position. Refer Fig. 14.
Fig. 14
Содержание Garage door
Страница 1: ...Panel Glide Installation Instructions...