Instructions for Installation
WARNING:
DO NOT penetrate any screws into the range hood
as this may result in electrical hazards.
WARNING:
Failure to install the screws or fixing device in
accordance with these instructions may result in electrical
hazards.
If a connection flue composed of two parts is used, the upper part
must be placed outside the lower part.
Exhaust air must not be discharged into a flue which is used for
exhausting fumes from appliances burning gas or other fuels.
Installation must comply with any local regulations concerning the
discharge of exhaust air.
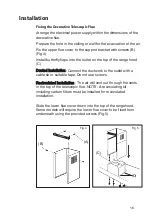
Before proceeding with the assembly, remove the anti-grease filter
so that the unit is easier to handle. Prepare the hole in the ceiling
or wall for the evacuation of the air.
Installation
650-750
Rangehood
Cooking Surface
Recommended Clearances
Install Range Hoods in accordance
with the manufacturer’s instructions.
For optimum performance, we
recommend that all Range Hood
clearances be a minimum of 650mm
to a maximum of 750mm between
the top of the cooking surface to the
underside of the Range Hood. The
distance may be reduced to 600mm
to align with AS/NZS 5601.
Fixing to the Wall
Ensure the fixings used for this range hood are suitable.
Check the area where the range hood is to be fitted, to ensure
that it is structurally sound and will support the weight of the
appliance. Do not install direct onto plaster board using 'Wall
mates' or other similar anchors.
Range hood must be fixed into studs or noggins in the wall to
ensure it is secure and minimize vibration in the wall.
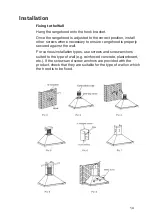
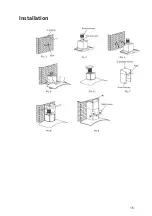
Mark the position and height and attach the rangehood hook
bracket to the wall.
13
Содержание AAG6SE1
Страница 15: ...Installation 15...


