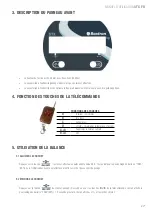
background image

ES

MANUAL DE USUARIO 

STX

6

5.3 TARA Y PUESTA A CERO

Para realizar una tara coloque el peso a tarar en el gancho, una vez tenga el peso estable pulse la tecla 

  o la tecla

 B

 del control remoto 

y el peso quedara tarado en la memoria del gancho. (Pulsar 

 para destarar)

Si en el gancho no tenemos nada colgado, el peso debería ser cero, si nos muestra algún peso estando vacío, utilizaremos la tecla 


del gancho o la tecla 

B

 del control remoto, para realizar el cero.

5.4 FUNCIÓN DE ACUMULACIÓN DE PESADAS

Cuando la lectura del display esté estable y con un peso por encima de 20 divisiones pulsar la tecla 

C

 del control remoto para acumular la 

pesada efectuada y así consecutivamente. Pulsando la tecla 

C

, a cada pesada iremos visualizando el número de acumulaciones (“n32”), 

transcurridos 2 segundos el gancho vuelve al modo normal de pesaje. 
Para visualizar la última pesada, así como el ultimo total, presione la tecla 

A

 en cualquier momento. Para cancelar la función de acumulación 

de pesadas, pulsar la tecla 

B

 del control remoto para volver al modo normal de pesaje

5.5 FUNCIÓN HOLD

Pulsar la tecla

 D

 del control remoto, la lectura del display quedará fijada durante 30 segundos.

Pulsar de nuevo la tecla

 D 

del control remoto, la función Hold se desactiva y entra al modo normal de pesaje.

5.6 AHORRO DE ENERGÍA

Si el gancho permanece a cero e inactivo durante un minuto, la pantalla se pondrá en blanco, en función de ahorro de batería (solo un punto 
aparecerá en la parte inferior de la pantalla). Tan pronto como se cargue peso en el gancho o se presione una tecla, la pantalla volverá a 
mostrar el valor de carga actual.

5.7 SELECCIÓN DEL CANAL REMOTO

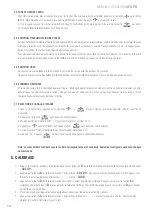
1. Con el gancho apagado, pulsar las teclas 

   y  

 al mismo tiempo. El display mostrará: “Dsp X”. (función no disponible)

2. Pulsar la tecla 

  para pasar a la siguiente opción.

3. Ahora la pantalla mostrara “

CHX

 ” (“

” que representa el canal actual 

0-7 

)

4. Presionar 

 para seleccionar un canal y presionar 

para ir a la siguiente opción

5. La pantalla mostrarà “

Ft0 

”.(Configuración del comando). 

6. Mantener en 

"0 "

. Presionar 


para volver el modo de pesaje y reiniciar el aparato.

Nota: El canal ya viene configurado con el mando correspondiente  a cada gancho. Solo configurar cuando se haga un cambio 
del mando

6. CALIBRACIÓN

1.  Encender el gancho y durante la inicialización, mantener pulsada la tecla

 D 

del control remoto hasta visualizar “

CAL SP

”.

2.  Pulsar la tecla 

A

 del control remoto, el display mostrará “

CAL 00

”, sin carga colgada en el gancho, pulsar la tecla A y el display mos-

trará brevemente “------“ y finalmente “

LOAD

”.

3.  Pulsar la tecla 

D

 del control remoto para introducir el valor de la pesa de calibración. Apretar la tecla 

C

 una vez, o mantener pulsada la 

tecla 

D

 para incrementar el valor del dígito en edición y pulsar solo una vez 

D

, para cambiar de dígito en edición. 

4.  Colocar la pesa de calibración y espere unos segundos hasta que el indicador de estabilidad se encienda.
5.  Pulsar la tecla 

A

 del control remoto, el display mostrará brevemente “------“ y finalmente mostrará el valor de peso. Retire la pesa y 

apague el gancho y vuélvala a encenderlo para testear.

7. CONFIGURACIÓN

• 

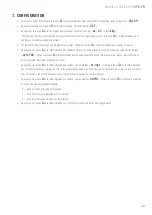
Encender el gancho y durante la inicialización, mantener pulsada la tecla 

D

 del control remoto hasta visualizar “

CAL SP

”.

Содержание 261246

Страница 1: ...sus productos para introducir mejoras técnicas o cumplir con nuevas regulaciones oficiales Le constructeur se réserve le droit de modifier les caractéristiques de ses produits en vue d y apporter des améliorations techniques ou de respecter de nouvelles réglamentations The manufacturer reserves the right to modify the specifications of its products in order to make technical improvements or comply...

Страница 2: ...STX ...

Страница 3: ...LES 4 3 REQUISITOS PARA UNA ÓPTIMA INSTALACIÓN 5 4 FUNCIÓN DE LAS TECLAS DEL CONTROL REMOTO 5 5 UTILIZACIÓN DEL GANCHO 5 5 1 ENCENDER EL GANCHO 5 5 2 APAGAR EL GANCHO 5 5 3 TARA Y PUESTA A CERO 6 5 4 FUNCIÓN DE ACUMULACIÓN DE PESADAS 6 5 5 FUNCIÓN HOLD 6 5 6 AHORRO DE ENERGÍA 6 5 7 SELECCIÓN DEL CANAL REMOTO 6 6 CALIBRACIÓN 6 7 CONFIGURACIÓN 7 ...

Страница 4: ...ula de carga y anular la garantía No deje objetos colgados durante mucho tiempo esto podría disminuir la precisión del gancho y reducir la duración de la célula de carga Antes de su utilización revisar la cadena y el gancho Revisar regularmente los clips pins y tornillos Revisar con frecuencia la carga de la batería Cuando el gancho se queda sin energía cargar la batería con el alimentador carga d...

Страница 5: ...r B Tara Cero C Acumular D Hold mantener lectura en display A B Borrar total acumulado B D Apagar 5 UTILIZACIÓN DE LA BÁSCULA 5 1 ENCENDER EL GANCHO Pulsar la tecla el gancho realizará un auto chequeo Versión 6 0 el display mostrará el porcentaje de batería PA85 85 y seguidamente se realiza la inicialización del cero y finalmente el gancho entrará en el modo de pesaje 5 2 APAGAR EL GANCHO Pulsar l...

Страница 6: ...mo se cargue peso en el gancho o se presione una tecla la pantalla volverá a mostrar el valor de carga actual 5 7 SELECCIÓN DEL CANAL REMOTO 1 Con el gancho apagado pulsar las teclas y al mismo tiempo El display mostrará Dsp X función no disponible 2 Pulsar la tecla para pasar a la siguiente opción 3 Ahora la pantalla mostrara CHX X que representa el canal actual 0 7 4 Presionar para seleccionar u...

Страница 7: ... fLT 00 Utilizar la tecla D del control remoto para cambiar el valor del filtro cómo más alto el valor más estable la lectura de peso pero más lenta la respuesta Pulsar la tecla A del control remoto para validar el display mostrará ej rng 1 Utilizar la tecla D del control remoto para cambiar el valor del rango de cero Cómo más alto el valor menor desviación de cero y mayor recuperación del cero Po...

Страница 8: ...STX ...

Страница 9: ... 10 3 REQUIREMENTS FOR OPTIMAL INSTALLATION 11 4 FUNCTIONS OF THE REMOTE CONTROL BUTTONS 11 5 USING THE HOOK 11 5 1 SWITCHING THE HOOK ON 11 5 2 SWITCHING THE HOOK OFF 11 5 3 TARE AND ZEROING 12 5 4 SUMMING FUNCTION 12 5 5 HOLD FUNCTION 12 5 6 ENERGY SAVING 12 5 7 REMOTE CHANNEL SELECTION 12 6 CALIBRATION 12 7 CONFIGURATION 13 ...

Страница 10: ...mage the load cell and void the warranty Do not leave objects hanging for a long time this could decrease the accuracy of the hook and shorten the life of the load cell Check the chain and hook before using Check clips pins and screws regularly Check the battery charge frequently When the hook runs out of power charge the battery with the charger supplied Do not expose the weighing hook to the rai...

Страница 11: ...on D Hold function keep reading on display A B Delete accumulated total B D Off 5 USING THE SCALE 5 1 SWITCHING THE HOOK ON Upon pressing the button the hook will perform a self check Version 6 0 the display will show the remaining battery PA85 85 the zeroing initialisation will be performed and finally the hook will enter weighing mode 5 2 SWITCHING THE HOOK OFF Press the hook button for 2 second...

Страница 12: ...m of the display As soon as weight is loaded onto the hook or a button is pressed the display will return to showing the current load value 5 7 REMOTE CHANNEL SELECTION 1 With the hook off press the keys y at the same time The display will show Dsp X function not available 2 Press the key to go to the next option 3 Now the display will show CHX X representing the current channel 0 7 4 Press key to...

Страница 13: ...ay will show the value of the weighing filter ex fLT 00 Use the D but ton on the remote control to change the filter value the higher the value the more stable the weight reading but the slower the response Press the A button on the remote control to confirm The display will show ex rng 1 Use the D button on the remote control to change the value of the zero range The higher the value the smaller ...

Страница 14: ......

Страница 15: ...6 3 CONDITIONS POUR UNE INSTALLATION OPTIMALE 17 4 FONCTION DES TOUCHES DE LA TÉLÉCOMMANDE 17 5 UTILISATION DU CROCHET 17 5 1 ALLUMER LE CROCHET 17 5 2 ÉTEINDRE LE CROCHET 17 5 3 TARE ET REMISE À ZÉRO 18 5 4 FONCTION D ACCUMULATION DE PESÉES 18 5 5 FONCTION HOLD 18 5 6 ÉCONOMIE D ÉNERGIE 18 5 7 SÉLECTION DE CANAL À DISTANCE 18 6 CALIBRAGE 18 7 CONFIGURATION 19 ...

Страница 16: ...le capteur de chargement et annuler la garantie Ne laissez pas pendre des objets pendant longtemps cela pourrait diminuer la précision du crochet et raccourcir la durée de vie du capteur de chargement Vérifiez la chaîne et le crochet avant utilisation Vérifiez régulièrement les clips les broches et les vis Vérifiez fréquemment la charge de la batterie Lorsque le crochet est à court d énergie charg...

Страница 17: ... B Tare zéro C Accumuler D Hold maintenez la lecture sur l écran A B Supprimer le total accumulé B D Off 5 UTILISATION DE LA BALANCE 5 1 ALLUMER LE CROCHET Appuyez sur la touche le crochet effectue un autocontrôle Versaô 6 0 l écran indique le pourcentage de batterie PA85 85 puis l initialisation du zéro est effectuée et enfin le crochet passe en mode pesage 5 2 ÉTEINDRE LE CROCHET Appuyez sur la ...

Страница 18: ...la partie inférieure de l écran Dès que le poids est chargé sur le crochet ou que vous appuyez sur une touche l écran indique à nouveau la valeur actuelle de la charge 5 7 SELECTION DE CANAL À DISTANCE 1 Avec le crochet éteinte appuyez sur les touches y al mismo tiempo El display mostrará Dsp X función no disponible 2 Appuyez sur la touche pour passer à l option suivante 3 Maintenant l écran montr...

Страница 19: ...pesage L écran indique ex fLT 00 Utilisez la touche D la télécommande pour changer la valeur du filtre plus la valeur est élevée plus la lecture du poids est stable mais plus la réponse est lente Appuyez sur la touche A de la télécommande pour valider l écran indique ex rng 1 Utilisez la touche D de la télécommande pour modifier la valeur de la plage de zéro Plus la valeur est élevée plus l écart ...

Страница 20: ......

Страница 21: ...RAIS 22 3 REQUISITOS PARA UMA INSTALAÇÃO ÓTIMA 23 4 FUNÇÃO DAS TECLAS DO TELECOMANDO 23 5 UTILIZAÇÃO DO GANCHO 23 5 1 LIGAR O GANCHO 23 5 2 APAGAR O GANCHO 23 5 3 TARA E COLOCAÇÃO A ZERO 24 5 4 FUNÇÃO DE ACUMULAÇÃO DE PESAGENS 24 5 5 FUNÇÃO HOLD 24 5 6 POUPANÇA DE ENERGIA 24 5 7 SELEÇÃO DE CANAL REMOTO 24 6 CALIBRAÇÃO 24 7 CONFIGURAÇÃO 25 ...

Страница 22: ...icar a célula de carga e anular a garantia Não deixe objetos pendurados por muito tempo isso pode diminuir a precisão do gancho e encurtar a vida útil da célula de carga Antes de usar verifique a corrente e o gancho Verifique regularmente os clipes pinos e parafusos Verifique frequentemente a carga da bateria Quando o gancho ficar sem energia carregue a bateria com o alimentador carregador incluíd...

Страница 23: ...Hold continue lendo no visor A B Excluir total acumulado B D Desligar 5 UTILIZAÇÃO DA BALANÇA 5 1 LIGAR O GANCHO Pressione a tecla o gancho realizará uma auto verificação Versão 6 0 o display mostrará a percentagem de bateria PA85 85 e posteriormente será realizada a inicialização do zero realizada e por último o gancho entrará em modo de pesagem 5 2 APAGAR O GANCHO Pressione a tecla de gancho por...

Страница 24: ... aparecer um ponto na parte inferior do ecrã Assim que o peso for carregado no gancho ou quando uma tecla for pressionada o ecrã voltará a mostrar o valor da carga atual 5 7 SELEÇÃO DE CANAL COM O CONTROLE REMOTO 1 Com o gancho desligado pressione as teclas y e ao mesmo tempo O display mostrará Dsp X função não disponível 2 Pressione a tecla para ir para a próxima opção 3 Agora a tela mostrará CHX...

Страница 25: ... do filtro de pesagem o visor mostrará ex fLT 00 Usar a tecla D o controlo remoto para alterar o valor do filtro quanto maior for o valor mais estável será a leitura do peso mas mais lenta será a resposta Prima a tecla A do controlo remoto ou telecomando a validar o visor mostrará ex rng 1 Usar a tecla D do controlo remoto para alterar o valor da faixa de zero Quanto maior for o valor menor o desv...

Страница 26: ......

Страница 27: ...RALI 28 3 REQUISITI PER UN INSTALLAZIONE OTTIMALE 29 4 FUNZIONE DEI TASTI DEL TELECOMANDO 29 5 USO DEL GANCIO 29 5 1 ACCENSIONE DEL GANCIO 29 5 2 SPEGNIMENTO DEL GANCIO 29 5 3 TARA E AZZERAMENTO 30 5 4 FUNZIONE DI ACCUMULO PESATURE 30 5 5 FUNZIONE HOLD 30 5 6 RISPARMIO ENERGETICO 30 5 7 SELEZIONE DEL CANALE REMOTO 30 6 TARATURA 30 7 CONFIGURAZIONE 31 ...

Страница 28: ...e la cella di carico e annullare la garanzia Non lasciare gli oggetti appesi per lungo tempo ciò potrebbe diminuire la precisione del gancio e ridurre la durata della cella di carico Prima dell uso controllare la catena e il gancio Controllare regolarmente clip perni e viti Controllare frequentemente la carica della batteria Quando il gancio si scarica caricare la batteria con l alimentatore caric...

Страница 29: ...eramento C Accumulare D Hold continua a leggere sul display A B Cancellare il totale accumulato B D Spegnere 5 USO DELLA BILANCIA 5 1 ACCENSIONE DEL GANCIO Premendo il tasto il gancio eseguirà un autoverifica Versione 6 0 il display mostrerà la percentuale di batteria PA85 85 viene realizzato l azzeramento e infine il gancio pesatore entra in modalità di pesatura 5 2 SPEGNIMENTO DEL GANCIO Premere...

Страница 30: ...e del display Non appena il peso viene caricato sul gancio o viene premuto un tasto il display tornerà a visualizzare il valore di carico attuale 5 7 SELEZIONE DEL CANALE REMOTO 1 Con il gancio spento premere contemporaneamente i tasti e Il display mostrerà Dsp X funzione non disponibile 2 Premere il tasto per passare all opzione successiva 3 Ora il display mostrerà CHX X che rappresenta il canale...

Страница 31: ...il valore del filtro di pesatura il display mostrerà ej fLT 00 Utilizzare il tasto D del telecomando per cambiare il valore del filtro più alto è il valore più stabile è la lettura del peso ma con una risposta più lenta Premere il tasto A del telecomando per confermare il display mostrerà ej rng 1 Usare il tasto D del telecomando per modificare il valore del campo zero Più alto è il valore minore ...

Страница 32: ......

Страница 33: ...ENSCHAFTEN 34 3 VORAUSSETZUNGEN FÜR EINE OPTIMALE INSTALLATION 35 4 FUNKTION DER FERNBEDIENUNGSTASTEN 35 5 VERWENDUNG DES HAKENS 35 5 1 DEN HAKEN EINSCHALTEN 35 5 2 DEN HAKEN AUSSCHALTEN 35 5 3 TARA UND NULLSTELLUNG 36 5 4 FUNKTION WÄGEKUMULATION 36 5 5 HOLD FUNKTION 36 5 6 ENERGIE SPAREN 36 5 7 AUSWAHL DES FUNKKANALS 36 6 KALIBRIERUNG 36 7 KONFIGURATION 37 ...

Страница 34: ...e keine Gegenstände für längere Zeit hängen da dies die Genauigkeit des Hakens beeinträchtigen und die Lebensdauer der Wägezelle verkürzen könnte Überprüfen Sie vor Gebrauch die Kette und den Haken Überprüfen Sie regelmäßig Clips Stifte und Schrauben Überprüfen Sie regelmäßig den Ladezustand des Akkus Wenn der Haken keine Energie mehr hat laden Sie den Akku mit dem mitgelieferten Ladegerät auf Ver...

Страница 35: ...Hold Anzeige auf dem Display halten A B Kumulative Summe löschen B D Ausschalten 5 ANWENDUNG DER WAAGE 5 1 DEN HAKEN EINSCHALTEN Drücken Sie die Taste der Haken führt einen Selbsttest durch Version 6 0 die Anzeige zeigt den Batterieprozentsatz PA85 85 und dann wird die Nullinitialisierung durchgeführt Anschließend beginnt der Haken den Wägemodus 5 2 DEN HAKEN AUSSCHALTEN Drücken Sie die Taste am H...

Страница 36: ...ewicht an den Haken geladen oder eine Taste gedrückt wird schaltet sich das Display wieder ein um den aktuellen Lastwert anzuzeigen 5 7 AUSWAHL DES FUNKKANALS 1 Drücken Sie bei ausgeschaltetem Haken die Tasten und gleichzeitig Auf dem Display erscheint Dsp X Funktion nicht verfügbar 2 Drücken Sie die Taste um zur nächsten Option zu gelangen 3 Auf der Anzeige erscheint nun CHX X für den aktuellen K...

Страница 37: ...it die Anzeige den Wert des Wägefilters anzeigt Auf dem Display erscheint z B fLT 00 Verwenden Sie die Taste D auf der Fernbedienung zum Ändern des Filterwertes je höher der Wert desto stabiler der Gewichtswert aber desto langsamer die Reaktion Drücken Sie die Taste A auf der Fernbedienung um zu validieren Das Display zeigt z B rng 1 Benutzen Sie die Taste D auf der Fernbedienung um den Wert des N...

Страница 38: ...DE BEDIENUNGSANLEITUNG STX 38 ...

Страница 39: ...39 DE BEDIENUNGSANLEITUNG STX ...

Страница 40: ...y of marca propiedad de trade mark propiety of Pol Empordà Internacional Calle F Parcela 15 16 17469 VILAMALLA Girona SPAIN T 34 972 527 212 F 34 972 527 211 marchio di proprietà di est une marque de Die Marke ist Eigentum von ...

Отзывы: