background image

ENGLISH

It

looks like a plain block of wood, but make a sound (clap your hands or tap on the top) and it will light up instantly with the time, date

and temperature, which display alternately. The clock can be set to display continually or to display for a few seconds when you make a

sound. Press the 'V/S' button at the back to turn on/off the sound activation function. It's strongly recommended to have sound activation

function turned ON to save more energy or save batteries life.

PRODUCT FEATURES

Displays TimeDate, and Temperature alternately, and can also be set to display time only

Sound activated.

12 and 24 hour formats can be selected (initial mode: 24 hour).

Alarm clock with “beep” sound lasting 1 minute.

5/ 7 days alarm with snooze function

The LED display will be off but the clock will still be running.

In-built rechargeable lithium battery to have a wire-free display

INSTALLATION

1, Take the clock and plug adapter from the package and place it in a safe place

2, Switch on the clock by pressing and holding down the ON/OFF button for 5 seconds, then LED display will instantly light up on the front

of the clock. If not, please recharge the clock first and refer to the below charging instruction as below.

3, When the LED display is on, please go to the setting instructions to set your clock.

CLOCK CHARGING INSTRUCTIONS

1, The clock has been initially fully charged when you open the packaging box and the battery should last 7 days if in permanent display

mode and approximately 3 months in sound activation display mode.

2, The LED display will start to faint when the clock has low battery. You will need to recharge the clock as soon as possible;

3, Please only use the DC/AC adapter included with the clock to charge the clock; when the clock is charging, the red charging indication

LED light will light up. When it’s fully charged, the LED light will turn green.

4, Charging time can take up to 3-4 hours. Please remove the charging adapter when it’s fully charged.

5, We advise you to set the clock on sound activation display to save energy, unless you really need to have it on permanent display.

6, You can also use the charging DC adapter to power the clock rather than using the built-in rechargeable battery.

Содержание clickclock

Страница 1: ......

Страница 2: ...holding down the ON OFF button for 5 seconds then LED display will instantly light up on the front of the clock If not please recharge the clock first and refer to the below charging instruction as below 3 When the LED display is on please go to the setting instructions to set your clock CLOCK CHARGING INSTRUCTIONS 1 The clock has been initially fully charged when you open the packaging box and th...

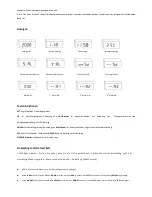
Страница 3: ...Important Notice make sure you start setting the clock within 5 seconds after accessing to the setting mode or it will revert to the non setting mode Press SET for 3 seconds to access the settings mode When YEAR is flashing press UP or DOWN to change the YEAR then press SET to go to DATE setting When MONTH is flashing press UP or DOWN to change the MONTH then press SET to go to DAY setting When DA...

Страница 4: ...ow 0 00 To turn off press DOWN button Follow the same instructions as above to set your second alarm time If you don t want to set the second alarm just continue to press SET button to access the third alarm setting screen After pressing SET it will go to the third alarm showing initial display A3 to turn alarm ON press UP button to show 0 00 To turn OFF press DOWN button Follow the instructions a...

Страница 5: ...ce when the alarm is on can turn off the snooze function IMPORTANT PRODUCT CARE NOTICES This product is made of MDF wood with plastic wood effect veneer Please keep in a dry environment When the LED display light becomes feint or flashes continuously you must charge the clock as soon as possible It s suggested to have the sound activation function turned on to save battery life When sound activate...

Страница 6: ...eides an einen sicheren Ort 2 Schalten Sie die Uhr durch Drücken und Halten Sie die ON OFF Taste für 5 Sekunden dann wird LED Anzeige sofort leuchten auf der Vorderseite der Uhr Wenn nicht laden Sie bitte zuerst die Uhr und beziehen sich auf die folgenden Ladeanweisung als unten 3 Wenn die LED Anzeige leuchtet stellen Sie die Uhr bitte wie beschrieben ein Aufladen der Uhr 1 Die Uhr wurde vor Versa...

Страница 7: ... Anzeige DOWN Im Einstellungsmodus Änderung von Zeit Datum Im normalen Modus Zugriff auf die Alarmeinstellung V S Zum Einstellen der Tonfunktion AN AUS und Einstellung nur Zeitanzeige EIN AUS Schalter schaltet die Uhr ein oder aus Einstellung Jahr Datum Zeit Wichtiger Hinweis Stellen Sie sicher dass Sie die Uhr innerhalb von 5 Sekunden starten Einstellung nach der Einstellung Modus zugreifen oder ...

Страница 8: ... Alarmeinstellungen zu gelangen Anfangs zeigt der Wecker 7 AL UP und DOWN drücken um den Alarmmodus auszuwählen anschließend zum Bestätigen SET drücken Nun geht der Wecker auf die erste Seite der Alarmeinstellungen der erste Alarm ist anfänglich ausgeschaltet mit der Anzeige A1 zum EINSCHALTEN des Alarms die Taste UP drücken um 00 00 anzuzeigen Um ihn wieder auszuschalten die Taste DOWN drücken Zu...

Страница 9: ...r besitzt eine Schlummerfunktion Der Zeitabstand beträgt jeweils 5 Minuten die Funktion kann 5 Mal ausgeschaltet werden Die Schlummerfunktion wird automatisch eingeschaltet wenn der Wecker durch Adapter oder Batterien mit Strom versorgt wird Bei eingeschaltetem Alarm beendet das Drücken einer beliebigen Taste den Alarm bis er nach 5 Minuten wieder angeht Bei eingeschaltetem Alarm kann die Schlumme...

Страница 10: ...ant 5 secondes puis l affichage LED sera instantanément la lumière sur le devant de l horloge Sinon s il vous plaît recharger la première horloge et se référer à l instruction ci dessous charge comme ci dessous 3 Lorsque l affichage LED est allumé suivez les instructions pour régler votre horloge Instructions pour recharger l horloge 1 L horloge est complètement rechargée lorsque vous la retirez d...

Страница 11: ... l horloge Instructions de réglage d année date heure Avis important assurez vous que vous commencez à régler l horloge dans les 5 secondes après avoir accédé au mode de réglage ou il reviendra au mode de réglage non Appuyez sur SET pendant 3 secondes pour accéder au mode réglage Quand ANNEE clignote appuyez sur UP ou DOWN pour modifier l ANNEE puis appuyez sur SET pour aller au réglage de la DATE...

Страница 12: ...gler les minutes Après avoir réglé l heure appuyez encore sur SET Vous arriverez à l heure de la deuxième alarme le mode initial sera A2 pour activer l alarme appuyez sur le bouton UP pour afficher 00 00 Pour désactiver l alarme appuyez sur le bouton DOWN Suivez les mêmes instructions que ci dessus pour régler l heure Après avoir appuyé sur SET vous arriverez au mode initial d affichage de la troi...

Страница 13: ...deux fois sur n importe quel bouton quand l alarme est en marche permet d éteindre la fonction sommeil Informations importantes Ce produit est fait en bois Veuillez le conserver dans un environnement sec Lorsque l éclairage de l écran LED devient feinte ou clignote en permanence vous devez charger l horloge dès que possible Il est suggéré d avoir la fonction d activation de son activé pour sauver ...

Страница 14: ...ida útil de las pilas CARACTERÍSTICAS DEL PRODUCTO Se visualizan alternativamente la Hora Fecha y Temperatura Además también se puede configurar para que solo se visualice la hora Sonido activado Se puede seleccionar el formato de 12 ó 24 horas modo inicial 24 horas El sonido de alarma despertador con pitido tiene una duración de 1 minuto Alarma de 5 7 días con función de repetición La pantalla LE...

Страница 15: ...sione UP o DOWN para cambiar incrementar o reducir el DÍA A continuación presione SET para ir a la configuración de HORA Cuando HOUR parpadee presione UP o DOWN para cambiar incrementar o reducir la HORA A continuación presione SET para ir a la configuración de MINUTO MINUTE Cuando MINUTE parpadee presione UP o DOWN para cambiar incrementar o reducir los MINUTOS A continuación presione SET para ir...

Страница 16: ...izará A3 para ACTIVAR la alarma presione el botón UP para mostrar 0 00 Para DESACTIVAR presione el botón DOWN Siga las instrucciones indicadas anteriormente Después de terminar la configuración de las tres alarmas presione SET para regresar a la visualización normal Si no quiere configurar la segunda alarma simplemente continúe presionando el botón SET para salir de la configuración de alarma y el...

Страница 17: ...stá activada se puede desactivar la función de repetición de alarma INFORMACIÓN IMPORTANTE SOBRE CUIDADOS DEL PRODUCTO Este producto se ha elaborado con madera MDF con revestimiento plástico de imitación a madera Manténgalo en un ambiente seco Cuando la luz de la pantalla LED pierda intensidad o parpadee continuamente debe cambiar la batería o cargar el reloj lo antes posible Se sugiere tener acti...

Отзывы: