background image

EN

EN

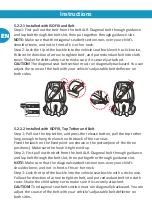
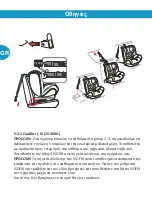
5.2.2 Group II, III (15-36KG)
NOTE: 

When you use this safety car seat in group II,III,  please remove the 

5-point harness, sleeping pads refer to Chapter 4.6. Place the child seat forward 
facing on the vehicle seat (in the direction of travel).
Step1: First pull out the belt from the belt ALR. Diagonal belt through guidance
and lap belt through the belt slot, then put together through guidance slot.

NOTE:

 Make sure that the diagonal seatbelt section runs over your child's 

shoulder bone, and not in front of his or her neck.
Step 2: Lock the tip of the buckle into the vehicle seat buckle with a click noise.
Follow the direction of arrow to tighten belt, and put redundant belt into cloth
cover. Shake the child safety car to make sure it is securely attached.

CAUTION!

 The diagonal seat belt section must run diagonally backward. You can 

adjust the course of the belt with your vehicle's adjustable belt deflector on 
both sides.

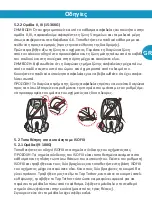
5.2  Installed in Car with ISOFIX
5.2.1 Group I(9-18KG)

Put the ISOFIX insert guide into the two ISOFIX attachment points of your vehicle.
NOTE: The ISOFIX attachment points are located between the surface and the 
backrest of the vehicle seat.
Press the ISOFIX button to pull out the two locking arms from the base bottom. 
Pull the locking arm to and fro until you hear an audible CLICK which indicates 
they are fully engaged. And on both sides of the locking arms' button turn into 
green safety color.
Pull out the top tether, and press the release button, pull the top tether long 
enough to hang the latch on the back of the car seat.
Fixed the latch on the fixed point, and the position of the fixed point are shown 
in the picture(one of the three positions).Make sure the hook is tightened up.

Instructions

Содержание Bebe Stars Milano Isofix

Страница 1: ...STANDARDS ECE R44 04 MILANO ISOFIX group 123 9 36KG ...

Страница 2: ... this no ce If in doubt consult either the child restraint manufacturer or the retailer Only suitable if the approved vehicles are fi ed with lap 3 point sta c with retractor safety belts approved according to UN ECE Regula on n 16 or other equivalent standards Notice regarding ISOFIX child restraint system Group 1 Forward Position 1 This is an ISOFIX CHILD RESTRAINT SYSTEM It is approved to Regula...

Страница 3: ...table to accept this child restraint Please refer to the informa on documents or the retailer s website for the suitable car model list If in doubt consult either the child restraint manufacturer or the retailer any me Introduction Know your car seat ...

Страница 4: ... frayed harness straps or vehicle belt NEVER use this child safety seat without the car seat cover DO NOT replace the child seat cover or harness with any other than the ones we recommend as these parts are integral to the child safety seat s performance NEVER use this child restraint with any other base except ones that the manufacturer permits DO NOT use a child safety seat that has been in a cr...

Страница 5: ...se on it 4 1 3 When using as Semi Universal category Group 1 2 3 this child restraint system is suitable for seat belt models equipped with the three point retractor that has passed the ECE R16 requirement and in not suitable for models only equipped with 2 point seat belts And only after installed ISOFIX they can use on it 4 2 How to use the harness buckle Hold the two buckle latches together Mak...

Страница 6: ...e the left shoulder belt first then to the right one you can remove the shoulder belt Then from the front of the child seat pull out shoulder straps through the slots put them on below of cloth cover After remove them pull the headrest height adjuster select the correct height of the shoulder straps and engage it in the position that fits your child by releasing the adjuster ATTENTION A correctly ...

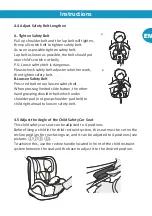
Страница 7: ...fety belt When pressing limited slide button the other hand grasping shoulder belt which under shoulder pad not grasp shoulder pad belt to child right ahead to loosen safety belt B A 4 5 Adjust the Angle of the Child Safety Car Seat This child safety car seat can be adjusted to 4 positions Before fixing a child in the child restraint system the seat must be set on the recline position for rear fac...

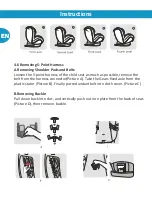
Страница 8: ...ossible remove the belt from the harness connector Picture A Take the Gears fixed axle from the plastic stator Picture B Finally put redundant belt into cloth cover Picture C B Removing Buckle Pull down buckle to clot and vertically push out iron plate from the back of seat Picture D then remove buckle Instructions EN EN ...

Страница 9: ...rectly inserted in the belt slots of the cover 5 INSTALLED IN CAR 5 1 Installed in Car with Belt 5 1 1 Group I 9 18kg Place the child seat forward facing on the vehicle seat in the direc on of travel Pull the diagonal belt sec on through belt guidance Place the lap belt sec on in the red belt guidance Pull out safety belt from the back to the side lap belt sec on respec vely from the red guidance ...

Страница 10: ...ON The diagonal seat belt section must run diagonally backward You can adjust the course of the belt with your vehicle s adjustable belt deflector on both sides 5 2 Installed in Car with ISOFIX 5 2 1 Group I 9 18KG Put the ISOFIX insert guide into the two ISOFIX attachment points of your vehicle NOTE The ISOFIX attachment points are located between the surface and the backrest of the vehicle seat ...

Страница 11: ...ravel Put the ISOFIX insert guide into the two ISOFIX attachment points of your vehicle NOTE The ISOFIX attachment points are located between the surface and the backrest of the vehicle seat Press the ISOFIX button to pull out the two locking arms from the base bottom Pull the locking arm to and from until you hear an audible CLICK which indicates hey are fully engaged And on both sides of the loc...

Страница 12: ...er and Belt Step 1 Pull out the top tether and press the release button pull the top tether long enough to hang the lanch on the back of the car seat Fixed the lanch on the fixed point are shown in the picture one of the three positions Make sure the hook is tightened up Step 2 First pull out the belt from the belt ALR Diagonal belt through guidance and lap belt through the belt slot then put toge...

Страница 13: ...preferably away from direct sunlight CLEANING THE BUCKLE Food drink or other debris may collect inside the harness buckle which can affect proper functioning Wash in warm water until clean Be sure you can hear an audible click to make sure the buckle is working properly CLEANING THE HARNESS AND SHELL Sponge clean using warm water and mild soap do not use any other cleaning agents STORAGE Store in ...

Страница 14: ...warranty is only applicable to the original owner and is not transferable The warranty is only applicable to products that have not been adapted by the user In the case of any defects the owner is required to return the product to the retailer The manufacturer is not liable for any damages other than those to products supplied or manufactured Main technical parameters Length 490mm Width 460mm Heig...

Страница 15: ...εγκεκριμένες σύμφωνα με τον UN ECE Regula on Νο16 ή άλλο ισοδύναμο πρότυπο Σημείωση σχετικά με το σύστημα συγκράτησης παιδιών ISOFIX Ομάδα 1 Θέση προς τα εμπρός 1 Πρόκειται για σύστημα στερέωσης παιδιών ISOFIX Εγκρίνεται σύμφωνα με τον Κανονισμό Αριθ 44 04 για γενική χρήση σε οχήματα με ISOFIX και σύστημα αγκυρώσεων 2 Θα τοποθετηθεί σε οχήματα με θέσεις εγκεκριμένες ως θέσεις ISOFIX όπως περιγράφε...

Страница 16: ...έλων αυτοκινήτων Σε περίπτωση αμφιβολίας συμβου λευτείτε το σύστημα συγκράτησης παιδιών κατασκευαστή ή τον λιανοπωλητή οποιαδήποτε στιγμή Ρυθμιστής ύψους προσκέφαλου Κάλυμμα θέσης Μαξιλαράκια ώμων Ζώνη ώμων Κόκκινο κουμπί Μαξιλαράκι καβάλου Κουμπί ρύθμισης Προσκέφαλο Οδηγός ζώνης 2 Οδηγός ζώνης 1 Βάση Λαβή ανάκλισης Σημείο σύνδεσης ISOFIX Οδηγός εισαγωγής ISOFIX Κουμπί ISOFIX Λαβές κλειδώματος ISO...

Страница 17: ...αρτήματα που έχουν υποστεί ζημιά ή που λείπουν ΜΗΝ χρησιμοποιείτε ιμάντες ασφαλείας που είναι φθαρμένοι ή κομμένοι ΜΗΝ χρησιμοποιείτε ποτέ το κάθισμα αυτοκινήτου χωρίς το κάλυμμα ΜΗΝ αντικαθιστάτε το κάλυμμα του παιδικού καθίσματος ή τους ιμάντες με άλλα εκτός από αυτά που σας προτείνουμε καθώς αυτά τα εξαρτήματα αποτελούν αναπόσπαστο κομμάτι της απόδοσης των παιδικών καθισμάτων ΠΟΤΕ μην χρησιμοπο...

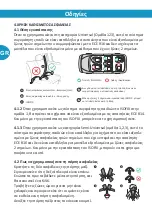
Страница 18: ...ναι κατάλληλο για οχήματα που είναι εξοπλι σμένα με ζώνες ασφαλείας τριών σημείων που έχουν περάσει την απαίτηση ECE R16 και δεν είναι κατάλληλα για μοντέλα εξοπλισμένα με ζώνες ασφαλείας 2 σημείων Και μόνο με την εγκατάσταση του ISOFIX μπορούν να τα χρησιμο ποιήσουν σε αυτό 4 2 Πως να χρησιμοποιήσετε τη πόρπη ασφαλείας Κρατήστε τις δύο ασφάλειες της πόρπης μαζί Σιγουρευτείτε ότι η δεξιά πλευρά εί...

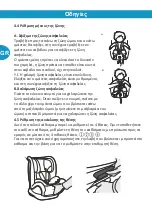
Страница 19: ... ύψους που βρίσκεται στην πλάτη του καθίσματος Στη συνέχεια από το μπροστινό μέρος του παιδικού καθίσματος τραβήξτε τους ιμάντες ώμου μέσα από τις υποδοχές και τα βάζετε κάτω από το κάλυμμα του υφάσματος Αφού τα αφαιρέσετε ρυθμίστε το προσκέφαλο στο επιθυμητό ύψος που ται ριάζει στο παιδί σας και απελευθερώστε τον ρυθμιστή ΠΡΟΣΟΧΗ Ένα σωστά προσαρμοσμένο στήριγμα προσκέφαλου εξασφαλίζει τη βέλτιστ...

Страница 20: ...ίξτε τη ζώνη ασφαλείας B Χαλάρωση ζώνη ασφαλείας Πιέστε το κόκκινο κουμπί για να χαλαρώσετε την ζώνη ασφαλείας Όταν πιέζετε το κουμπί πιάστε με το άλλο χέρι τον ιμάντα ώμου που βρίσκεται κάτω από το μαξιλαράκι ώμου μην πιάνετε το μαξιλαράκι του ώμου στο παιδί μπροστά για να χαλαρώσει η ζώνη ασφαλείας B A 4 5 Ρύθμιση της ανάκλισης της θέσης Αυτό το παιδικό κάθισμα μπορεί να ρυθμιστεί σε 4 θέσεις Πρ...

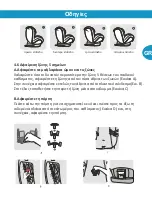
Страница 21: ...των ζωνών Εικόνα A Στην συνέχεια αφαιρέστε εντελώς τον άξονα από το πλαστικό σύνδεσμο Εικ Β Στο τέλος τοποθετήστε την περιττή ζώνη μέσα στο κάλυμμα Εικόνα C B Αφαιρέστε τη πόρπη Πιέστε κάτω την πόρπη για να σχηματιστεί κενό και πιέστε προς τα έξω τη σιδερένια πλάκα από το κάτω μέρος του καθίσματος Εικόνα D και στη συνέχεια αφαιρέστε την πόρπη πρώτο επίπεδο δεύτερο επίπεδο τρίτο επίπεδο τέταρτο επί...

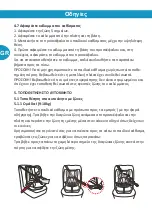
Страница 22: ... πλάκα έχει συνδεθεί σωστά ΠΡΟΣΟΧΗ Βεβαιωθείτε ότι οι ιμάντες συγκράτησης δεν είναι στριμωγμένοι και ότι έχουν έχει τοποθετηθεί σωστά στις εγκοπές ζώνης του καλύμματος 5 ΤΟΠΟΘΕΤΗΣΗ ΣΤΟ ΑΥΤΟΚΙΝΗΤΟ 5 1 Τοποθέτηση στο αυτοκίνητο με ζώνες 5 1 1 Ομάδα I 9 18kg Τοποθετήστε το παιδικό κάθισμα με πρόσωπο προς τα εμπρός με την φορά οδήγησης Τραβήξτε την διαγώνια ζώνη ανάμεσα στο προσκέφαλο και την πλάτη κα...

Страница 23: ... ΠΡΟΣΟΧΗ Το διαγώνιο τμήμα της ζώνης ασφαλείας πρέπει να κινείται διαγώνια προς τα πίσω Μπορείτε να ρυθμίσετε την πορεία του ιμάντα με τον ρυθμιζόμε νο προσαρμογέα του ιμάντα του οχήματος σας δυο πλευρες 5 2 Τοποθέτηση στο αυτοκίνητο με ISOFIX 5 2 1 Ομάδα I 9 18KG Τοποθετήστε τον οδηγό ISOFIX στα σημεία σύνδεσης του οχήματος σας ΠΡΟΣΟΧΗ Τα σημεία σύνδεσης του ISOFIX είναι τοποθετημένα ανάμεσα στο ...

Страница 24: ...στο κάθισμα του οχήματος φορά ταξιδιού Τοποθετήστε τον οδηγό ISOFIX στα σημεία σύνδεσης του οχήματος σας ΠΡΟΣΟΧΗ Τα σημεία σύνδεσης του ISOFIX είναι τοποθετημένα ανάμεσα στην επιφάνεια και τη πλάτη του καθίσματος αυτοκινήτου Πιέστε τον ρυθμιστή ISOFIX και τραβήξτε και τους δύο βραχίονες και τοποθετήστε στη βάση ISOFIX του οχήματος μέχρι να ακούσετε κλικ Και στους δύο βραχίονες το κουμπί θα γίνει π...

Страница 25: ...Τραβήξτε προς τα έξω το Top Tether και πιέστε το κουμπί απελευθέ ρωσης τραβήξτε το Top Tether τόσο ώστε να μακρύνει αρκετά για να περάσει το μάνδαλο πίσω από το κάθισμα Σφίξτε το μάνδαλο στο σταθερό σημείο όπως φαίνεται στην εικόνα μια από τις τρεις θέσεις Σιγουρευτείτε ότι το μάνδαλο έχει σφίξει καλά Βήμα 2 Πρώτα τραβήξτε έξω τη ζώνη του οχήματος Περάστε τη διαγώνια ζώνη από τον κόκκινο οδηγό στο...

Страница 26: ...ΤΗΣ ΠΟΡΠΗΣ Φαγητό ποτό ή άλλα ψίχουλα μπορεί να μαζευτούν μέσα στην πόρπη και να δυσκολέψουν την σωστή λειτουργία της Πλύνετε με ζεστό νερό μέχρι να καθαρίσει Σιγουρευτείτε ότι ακούγεται το ΚΛΙΚ όταν την χρησιμοποιείτε και ότι δουλεύει σωστά ΚΑΘΑΡΙΣΜΟΣ ΖΩΝΗΣ ΚΑΙ ΣΚΕΛΕΤΟΥ Με ένα καθαρό σφουγγάρι και ζεστό νερό με ήπιο σαπούνι περάστε όλες τις επιφάνειες που χρειάζονται καθάρισμα Μην χρησιμοποιείτε ...

Страница 27: ...αστή και δεν μεταβιβάζεται Η εγγύηση ισχύει μόνο για τα προϊόντα που δεν έχουν αλλοιωθεί από τον χρήστη Σε περίπτωση ελαττωμάτων ο ιδιοκτήτης υποχρεούται να επιστρέψει το προϊόν στον έμπορο λιανικής πώλησης Ο κατασκευαστής δεν φέρει καμία ευθύνη για τυχόν ζημιές εκτός από αυτές που αφορούν προϊόντα που παραδίδονται ή κατασκευάζονται από την Bebe Stars Τεχνικά Χαρακτηριστικά Βάθος 490mm Πλάτος 460m...

Страница 28: ...our customer service department Αν αντιμετωπίζετε κάποιο πρόβλημα με το προϊόν ή χρειάζεστε βοήθεια παρακαλώ επικοινωνήστε με τον τοπικό αντιπρόσωπό μας ή με το τμήμα εξυπηρέτησης πελατών μας THANK YOU ΕΥΧΑΡΙΣΤΟΥΜΕ Customer service Εξυπηρέτηση πελατών Thank you for choosing Bebe Stars products Ευχαριστούμε για την προτίμηση σας στα παιδικά προϊόντα Bebe Stars ...

Отзывы: