background image

MDE-4784D FlexPay™ Encrypting PIN Pad Start-up and Service Manual · December 2011

Page 15

CRIND Diagnostics

Start-up and Service

CRIND Diagnostics

Encore 500 Series and Eclipse Dispensers

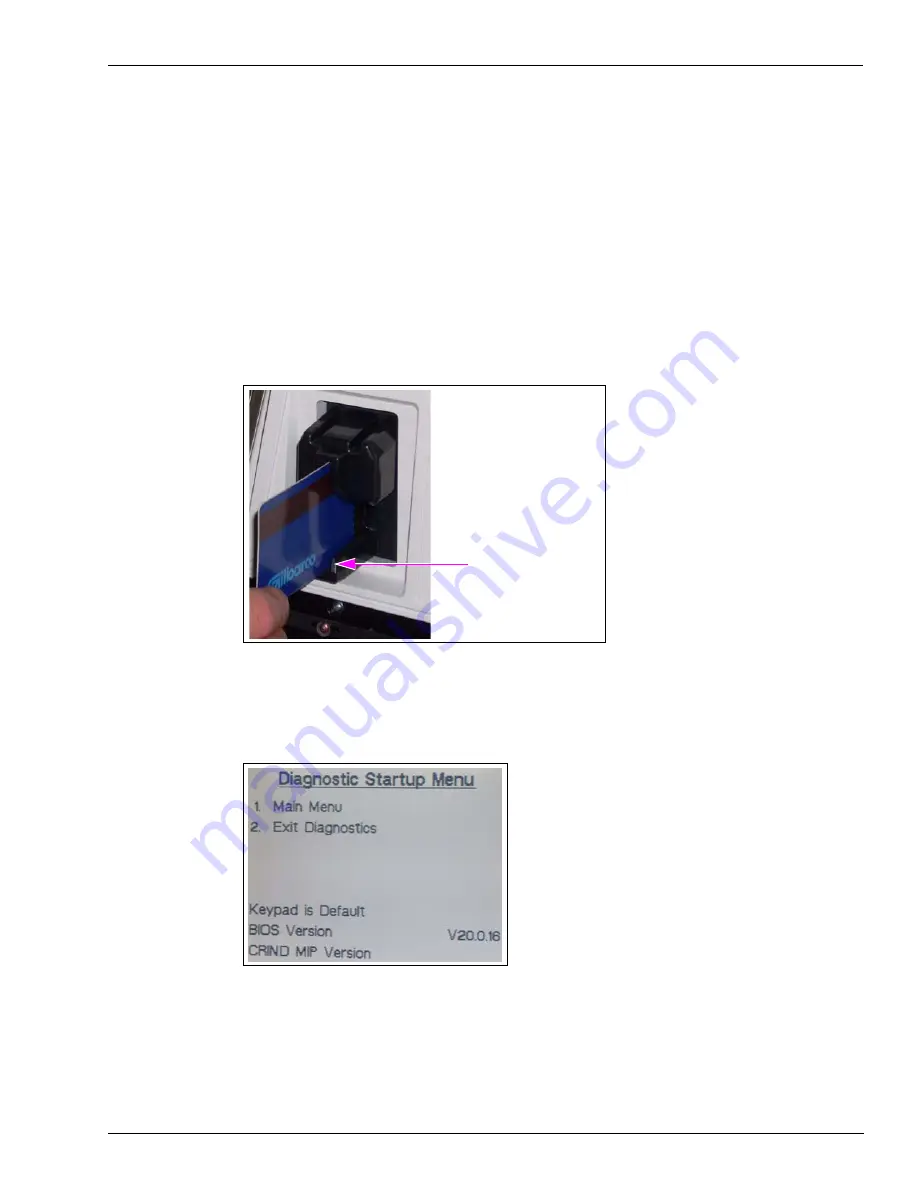
Entering Diagnostic Mode Using the CRIND Diagnostic Card

To enter the Diagnostic Mode, proceed as follows:

1

Swipe the CRIND Diagnostic Card (see 

Figure 3-1

).

Figure 3-1: Entering the Diagnostic Mode

CRIND Diagnostic Card

The CRIND Diagnostic Startup Menu appears.

Figure 3-2: CRIND Diagnostic Startup Menu

Содержание FlexPay Encrypting PIN Pad

Страница 1: ...FlexPay Encrypting PIN Pad EPP Start up and Service Manual MDE 4784D...

Страница 2: ...67 Transac System 1000 and PAM 1000 E105106 Dell DHM Minitower E165027 G SITE and Passport Systems National Conference of Weights and Measures NCWM Certificate of Conformance CoC Gilbarco pumps and di...

Страница 3: ...tem Health Report 19 Method 1 19 Method 2 20 Connecting a Laptop to the FlexPay EPP 25 Using the M08743A001 FlexPay EPP Programming Cable 26 Using the M08743A002 Standalone FlexPay EPP Programming Cab...

Страница 4: ...1 M10662B001 60 Changes in the Bezel POD for FlexPay EPP 2 1 61 Troubleshooting Communication Issues 62 FlexPay EPP Mapping Tool Issues 62 Encore 500 Series and Eclipse Dispensers 62 The Advantage Ser...

Страница 5: ...er This manual is intended for Authorized Service Contractors ASCs who are trained to service the FlexPay EPP Overview FlexPay EPPs meet Payment Card Industry PCI requirements for debit transactions t...

Страница 6: ...ds PIN block encrypted in acquirer DUKPT Key Supports Auxiliary Function Keypad interface Aux iliary Function Keypad Supports up to eight low cost add on function keys Advanced GSM GSM used for CRIND...

Страница 7: ...o POS system changes Integrated into current dispenser design for seamless look Side shield protection for all models Backwards compatible with POS and current CRIND hardware Required Tools The follow...

Страница 8: ...xPay EPP SCR MDE 4900 Secure Card Reader SCR2 Kit Installation Instructions for Encore 500 S FlexPay EPP SCR Encore and Eclipse MDE 4927 Secure Card Reader SCR V2 Kit Installation Instructions for Enc...

Страница 9: ...bbreviations and Acronyms Introduction IC Integrated Circuit MOC Major Oil Company PCA Printed Circuit Assembly PCI Payment Card Industry POS Point Of Sale SDES Single Data Encryption Standard TDES Tr...

Страница 10: ...Introduction Abbreviations and Acronyms Page 6 MDE 4784D FlexPay Encrypting PIN Pad Start up and Service Manual December 2011 This page is intentionally left blank...

Страница 11: ...to your safety and the safety of others to understand the procedures before beginning work Follow the Regulations Applicable information is available in National Fire Protection Association NFPA 30A C...

Страница 12: ...cident for example address front back of building and so on Nature of accident for example possible heart attack run over by car burns and so on Age of victim for example baby teenager middle age elde...

Страница 13: ...er and do not always stop product flow Take precautions to avoid igniting fuel Do not allow starting of vehicles in the area Do not allow open flames smoking or power tools in the area Do not expose y...

Страница 14: ...Important Safety Information Page 10 MDE 4784D FlexPay Encrypting PIN Pad Start up and Service Manual December 2011 This page is intentionally left blank...

Страница 15: ...afety information found in MDE 3804 Encore Eclipse Start Up Service Manual Inform the Manager that the power will be removed and remove all power supplied to the dispenser at the breaker located in th...

Страница 16: ...nostic Card on page 18 8 Bring the POS back online by re connecting the Two wire cable or by de isolating at the D Box 9 After the download is complete run a Keypad test For Encore 500 and Eclipse uni...

Страница 17: ...or destroyed and a new FlexPay EPP must be installed This is to ensure that a cardholder s personal data is not compromised Service Tool A FlexPay EPP Service Tool is provided by Gilbarco and can be...

Страница 18: ...Encore 300 and The Advantage Series dispensers IMPORTANT INFORMATION In Encore 500 Series and Eclipse dispensers SmartPad TX and RX LEDs are present on each side located underneath the Heartbeat LED...

Страница 19: ...s Encore 500 Series and Eclipse Dispensers Entering Diagnostic Mode Using the CRIND Diagnostic Card To enter the Diagnostic Mode proceed as follows 1 Swipe the CRIND Diagnostic Card see Figure 3 1 Fig...

Страница 20: ...est proceed as follows 1 On the CRIND Diagnostic Startup Menu press 1 The CRIND Diagnostic Main Menu appears Figure 3 3 CRIND Diagnostic Main Menu 2 On the CRIND Diagnostic Main Menu press 2 The Devic...

Страница 21: ...t exit the Menu Other keys may have to be pressed Refer to Note below 4 Press any key on the FlexPay EPP The row column information for the key is displayed on the screen see Figure 3 6 Figure 3 6 Key...

Страница 22: ...essages are displayed in sequence POWERUP TESTING This message is displayed approximately for 8 seconds while the system verifies internal hardware operation BIOS VER xx x This message is displayed ap...

Страница 23: ...AGNOSTICS appears indicating that you have exited the Diagnostic Mode System Health Report Note This section is applicable only to Eclipse and Encore Series dispensers There are two methods to print t...

Страница 24: ...er 2011 Method 2 To print the System Health Report proceed as follows Note This method will disable both sides of the dispenser 1 Swipe the CRIND Diagnostic Card see Figure 3 7 Figure 3 7 Entering the...

Страница 25: ...gnostic Main Menu press 5 The System Health Report is printed The System Health Report consists of four sections for example see Figure 3 10 on page 22 to Figure 3 13 on page 25 Software Config Report...

Страница 26: ...Start up and Service System Health Report Page 22 MDE 4784D FlexPay Encrypting PIN Pad Start up and Service Manual December 2011 Figure 3 10 System Health Report Example The type of Keypad in use...

Страница 27: ...4784D FlexPay Encrypting PIN Pad Start up and Service Manual December 2011 Page 23 System Health Report Start up and Service Figure 3 11 System Health Report Example Continued The State of the SmartP...

Страница 28: ...Start up and Service System Health Report Page 24 MDE 4784D FlexPay Encrypting PIN Pad Start up and Service Manual December 2011 Figure 3 12 System Health Report Example Continued...

Страница 29: ...ed Connecting a Laptop to the FlexPay EPP To map keys using the FlexPay EPP Mapping Tool and to perform service routines using the FlexPay EPP Service Tool connect a laptop to the FlexPay EPP There ar...

Страница 30: ...to the port on the laptop and a 6 position connector which connects to the pigtail connector at the rear of the FlexPay EPP Use this cable when the FlexPay EPP is already installed in the dispenser In...

Страница 31: ...FlexPay EPP Note If the laptop used by the ASC does not contain a 9 pin Serial Connector the ASC will require a Serial to USB converter Use this cable when the FlexPay EPP is not installed The PIN Pad...

Страница 32: ...ting Position The place where a button is selected One key has one hitting position so a double space button will have two hitting positions as it comprises of two keys Backward Compatibility Version...

Страница 33: ...Download the latest version of the dialog_singleclick exe file onto your laptop for example C drive 2 Locate the dialog_singleclick exe file application on your laptop and double click the dialog_sing...

Страница 34: ...Figure 3 18 The files are unzipped successfully Figure 3 18 Unzip Successful Message Window a Click OK The Winzip Self Extractor KeyMapLoader_10 2 8 exe window appears see Figure 3 19 Figure 3 19 Win...

Страница 35: ...apping Tool Start up and Service If the unzip operation fails a message appears that states that the output file cannot be created see Figure 3 21 Figure 3 21 Error Message a Click OK Navigate to the...

Страница 36: ...crypting PIN Pad Start up and Service Manual December 2011 b Right click the KeyMapLoader folder and click Search see Figure 3 23 Figure 3 23 Searching the KeyMapLoader Folder c Enter in the All or pa...

Страница 37: ...Service Manual December 2011 Page 33 Using the FlexPay EPP Mapping Tool Start up and Service d Select any file and then press CTRL and A simultaneously All the files in the window will be highlighted...

Страница 38: ...4784D FlexPay Encrypting PIN Pad Start up and Service Manual December 2011 e Select any file right click and click Properties see Figure 3 26 Note If you have accidentally deselected all files then r...

Страница 39: ...t the Read only option if the option is selected Click OK see Figure 3 27 Figure 3 27 Properties Window The Confirm Attributes Changes window appears g Select Apply changes to the selected items subfo...

Страница 40: ...he FlexPay EPP Mapping Tool proceed as follows 1 Double click the KeyMapLoader exe icon on your laptop An Open File Security Warning window appears see Figure 3 29 Figure 3 29 Open File Security Warni...

Страница 41: ...existing map Figure 3 31 Config Window File Filters 4 Click Rebuild All to reset all viewing filters based on the files in the key map after you select one of the files from the directory in which ke...

Страница 42: ...ary Function Keypad Modify buttons font and color This field is preset and cannot be modified 7 Click OK to accept the updated settings or Cancel to exit the Config window Creating a New Key Map Color...

Страница 43: ...e FlexPay EPP Mapping Tool application using the programming connector 2 Power on the FlexPay EPP 3 Determine the keypad for which the key map must be replaced Figure 3 32 Sample Keypad 4 Click Upload...

Страница 44: ...ecember 2011 5 If there is no key map file available manually select the required template for the FlexPay EPP connected and edit the key captions if required see Figure 3 34 Figure 3 34 Keypad Templa...

Страница 45: ...ASH HERE Figure 3 36 Key Caption Key Caption Field Note At any time if the text of a key caption is erased the corresponding mapping relation will be deleted automatically 8 To create a double space b...

Страница 46: ...e Manual December 2011 9 Enter the same caption as in step 7 on page 41 Figure 3 38 Key Code Key Code Field Note For a double space button two different codes are displayed in the Key Code field when...

Страница 47: ...d under Old Keypad the HELP button will split to display Help ADA The ADA function will automatically be assigned to the ADA portion of the Help ADA button Only the Help portion of the Help ADA button...

Страница 48: ...g PIN Pad Start up and Service Manual December 2011 Figure 3 41 ADA Function Default Value for ADA 11 Reference the Auxiliary keypad on the unit with the FlexPay EPP and select the key to be mapped wi...

Страница 49: ...nd color of the key if required Note This information can be gathered from the new keypad Figure 3 43 Entering the New Key Caption Key Caption Field Notes 1 The Aux Column and Row fields indicate the...

Страница 50: ...Mapping Keys 15 Select the required old key to which the new key must be mapped Note If there is no old key that can be mapped enter the required key code in the Key code field If the old key has been...

Страница 51: ...l be enabled only when the _T Prod ID field is filled The system automatically removes and letters which are illegal to be used in a file name The system automatically replaces and with and and with a...

Страница 52: ...lick Save Figure 3 47 Saving the Key Map Continued If the key map file has been successfully sent to the FlexPay EPP a txt file for the key map appears which displays 0 SYNTAX errors see Figure 3 48 o...

Страница 53: ...exPay EPP Mapping Tool Start up and Service 21 Click OK Note The tool will report an error if the FlexPay EPP is offline power has been turned off or if the FlexPay EPP has been connected using the wr...

Страница 54: ...the screen If there is no map existing under the aut directory that matches the FlexPay EPP map the Loading Key Map from EPP window appears as shown in Figure 3 50 Figure 3 50 Loading Key Map from EPP...

Страница 55: ...tion 3 Click Open Existing Map to select a key map file The Open window appears Note The button layout of the auxiliary keys cannot be changed when Open Existing Map is selected Figure 3 51 Selecting...

Страница 56: ...eps 3 on page 51 to 8 to program other FlexPay EPPs if required Verifying FlexPay EPP Cable Connections Figure 3 52 Verifying FlexPay EPP Cable Connections i ii FlexPay EPP Cable connected to the Flex...

Страница 57: ...g the FlexPay EPP Kit If an incompatible version of the CRIND Logic Board exists the latest CRIND Logic Board M03651A001 will be shipped as part of the FlexPay EPP Kit IMPORTANT INFORMATION Verifying...

Страница 58: ...ity Electrostatic discharge can damage electronic parts When removing PCAs or handling sensitive parts Touch an unpainted metal surface to discharge any static electricity buildup Use a wrist strap co...

Страница 59: ...IND FlexPay EPP with Gilbarco CRIND Generic and MOC without any controller POS changes in TDES mode The POS Forecourt software communicates with the Advanced GSM through standard PC COM Port operation...

Страница 60: ...Attempt Debit at CRIND Device Go to STEP 2 STEP 1 Debit Unsuccessful Debit Successful DONE STEP 2 Check GSM for Diagnostic Code Request New Start up from Network Attempt Debit at CRIND Device Debit U...

Страница 61: ...in Encore 500 Series and Eclipse dispensers proceed as follows 1 Inform the Manager that the power will be removed and remove all power supplied to the unit at the breaker located in the building Blo...

Страница 62: ...gnostic Card Refer to Entering Diagnostic Mode Using the CRIND Diagnostic Card on page 15 11 Purge the memory 12 When the unit comes up enter the Diagnostic Mode again program the CRIND IDs CRIND Mode...

Страница 63: ...hat all power to the unit is switched off before opening the door to the unit and during kit installation WARNING 2 Cone off the dispenser to traffic 3 Open the Payment door 4 Remove all cables from t...

Страница 64: ...P 2 1 has the following new features when compared to FlexPay EPP 1 3 There are four Activation switches two per side that are used to activate the PIN Pad for more security see Figure 3 57 Figure 3 5...

Страница 65: ...1 3 The bezels PODs for FlexPay EPP 2 1 are manufactured with a few changes to accommodate the FlexPay EPP 2 1 and Activation switches The new bezels PODs for the various dopiness types are shown in...

Страница 66: ...pting PIN Pad Start up and Service Manual December 2011 Troubleshooting Communication Issues FlexPay EPP Mapping Tool Issues The old keypad is mapped with one or more of the following keys Yes No Help...

Страница 67: ...to P3102 for Side A and P3101 for Side B If they are not power down the dispenser and connect the cables to the correct ports Upon restoring power perform a coldstart Note Ensure that you enable all p...

Страница 68: ...latest CRIND software version has been installed 6 Purge persistent memory 7 After you purge memory enable all peripheral devices The message Please See Cashier is displayed after the PIN is entered...

Страница 69: ...ypad If the keys still do not beep replace the FlexPay EPP When you are connecting cables to the CRIND Logic Board you notice that a P282 Connector is not present CRIND Logic Boards T17764 G1 and T177...

Страница 70: ...are connected properly 3 Ensure that the mapping cable is not plugged into the FlexPay EPP The FlexPay EPP appears to be operating the opposite side of the dispenser To troubleshoot this problem proce...

Страница 71: ...pt to enter PIN Yes BEGIN Debit does not work Step 1 No Swipe Debit Card Enter PIN Is response to continue fueling EPP is functioning correctly Yes No Was the correct PIN used No Re enter PIN Yes No P...

Страница 72: ...Health Report Does it show a SmartPad Tamper No Unplug Aux keypad and Press 0 9 Enter and Clear keys on FlexPay EPP Do you receive a beep after pressing each key No Yes Do you receive a beep after pre...

Страница 73: ...d Complete WRMA Part Card attach to bad FlexPay EPP and replace FlexPay EPP Yes Debit not working step 3 No Connect FlexPay EPP to RKL Tool and press OK Try to RKL Customerkey again Did RKL process wo...

Страница 74: ...y EPP In dispenser Connect FlexPay EPP to RKL Tool and press OK Solid Red LED Yes 99 of the time when there is a solid red LED you will see a tamper when using the RKL Tool Ensure that you are using t...

Страница 75: ...pad BEGIN 1 or more keys on the PIN Pad will not beep when pressed No Yes Retest Debit Unplug Aux keypad and try pressing keys again Yes No Complete WRMA Part Card attach to bad FlexPay EPP and replac...

Страница 76: ...0 dispenser only Keys on the FlexPay EPP do not beep when pressed Run debit transaction to verify working Retest Debit Complete WRMA Part Card attach to bad FlexPay EPP and replace FlexPay EPP Yes No...

Страница 77: ...es Encore 300 dispenser only Is the zero key the only non working key Does the CRIND firmware have the zero 0 key fix No Update the firmware BEGIN Zero key on FlexPay PIN Pad will not work No Yes Run...

Страница 78: ...ide Debit Pay Outside Credit and so on When pressing mappable keys you get a beep with no function or incorrect function Mappable keys do not work Yes Use mapping tool clone function to pull map from...

Страница 79: ...P from bracket dispenser and reinstall Ensure that you tighten all 4 screws Does the message still indicate Not Activated Ensure that there is nothing physically inhibiting the FlexPay EPP from seatin...

Страница 80: ...FlexPay EPP from bracket dispenser and reinstall Ensure that you tighten all 4 screws Does message still indicate Not Activated Ensure that there is nothing physically inhibiting the FlexPay EPP from...

Страница 81: ...ad Start up and Service Manual December 2011 Page 77 The Advantage Series Side A and Side B Wiring 4 Wiring This chapter provides the FlexPay EPP Wiring diagrams for different Gilbarco dispensers The...

Страница 82: ...Wiring Encore S Series Side A and Side B Page 78 MDE 4784D FlexPay Encrypting PIN Pad Start up and Service Manual December 2011 Encore S Series Side A and Side B M08430B001 M08430B001...

Страница 83: ...Eclipse Side 1 and Side 2 Wiring MDE 4784D FlexPay Encrypting PIN Pad Start up and Service Manual December 2011 Page 79 Eclipse Side 1 and Side 2...

Страница 84: ...Wiring Encore 300 Page 80 MDE 4784D FlexPay Encrypting PIN Pad Start up and Service Manual December 2011 Encore 300...

Страница 85: ...Encore 500 Side A and Side B Wiring MDE 4784D FlexPay Encrypting PIN Pad Start up and Service Manual December 2011 Page 81 Encore 500 Side A and Side B...

Страница 86: ...Post Office Box 22087 Greensboro North Carolina 27420 Phone 336 547 5000 http www gilbarco com Printed in the U S A MDE 4784D FlexPay Encrypting PIN Pad Start up and Service Manual December 2011 Phill...

Отзывы: