background image


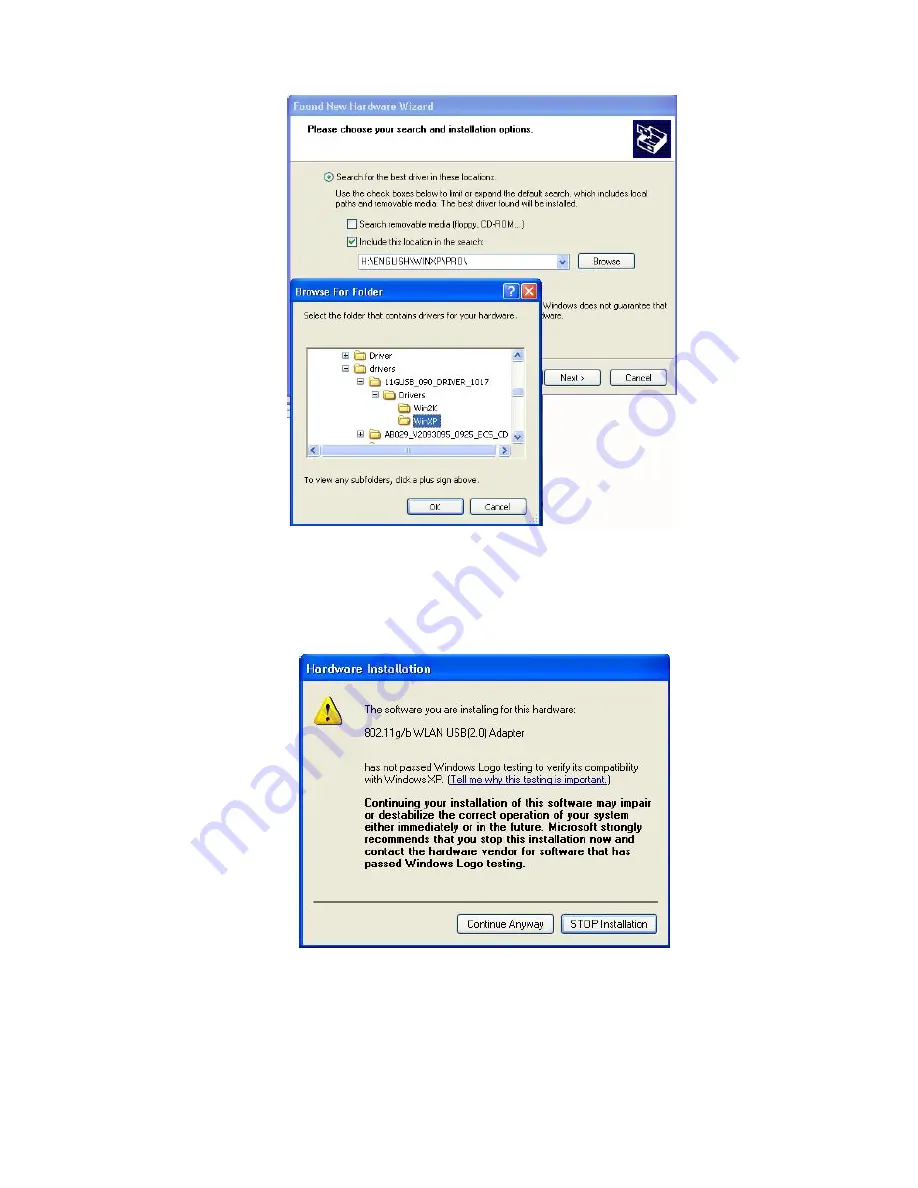
Figure 5-6: Choose the Folder Named 

Install


6.


Choose


Continue Anyway 

in the prompted 

Hardware Installation

 dialog box to 

proceed.


Figure 5-7: The 

Hardware Installation 

Dialog Box 

7.     When the following dialog box appears, your system is starting to install the software. 


40

Содержание WF747-Ul

Страница 1: ...Wireless 802 11 g b USB 2 0 adapter WF 747 UI User Manual ...

Страница 2: ... 15 of the FCC Rules These limits are designed to provide reasonable protection against radio interference in a commercial environment This equipment can generate use and radiate radio frequency energy and if not installed and used in accordance with the instructions in this manual may cause harmful interference to radio communications Operation of this equipment in a residential area is likely to...

Страница 3: ...1 Chapter 3 CONFIGURATIONS FOR WINDOWS XP 12 3 1 To Connect an Available Network via Wireless Zero Configuration 13 3 2 To Configure the Wireless Networks Properties 13 3 3 To Access to Certain Wireless Network Type 18 Chapter 4 WIRELESS G CONFIGURATION TOOL BASIC 19 4 1 Tray Icon 19 4 2 Right Click Menu of the Tray Icon 19 4 3 Program Controls 21 4 4 The Advanced Properties 32 APPENDIX A TROUBLES...

Страница 4: ...to peer configurations and the later is offering fully distributed data connectivity via micro cells and roaming To obtain most benefits your Wireless 802 11g b USB 2 0 ADAPTER provides please read this manual carefully before using it 1 1 Features With the Wireless 802 11g b USB 2 0 ADAPTER you can establish a wireless connection without the hassles and cost of cabling operate Ad Hoc or Infrastru...

Страница 5: ...32 MB RAM or above A CD ROM drive 300 MHz processor or higher Microsoft Windows 2000 or Windows XP USB Port version 2 0 1 4 Your Wireless 802 11g b USB 2 0 ADAPTER Your Wireless 802 11g b USB 2 0 ADAPTER should be located in the USB port of your computer and it looks like the following picture Figure 1 4 1 Wireless 802 11g b USB 2 0 ADAPTER 5 ...

Страница 6: ... b USB 2 0 ADAPTER operated appropriately please read and go along with the instructions below carefully Here we take Windows XP as an example a Plug your Wireless 802 11g b USB 2 0 ADAPTER into a USB 2 0 port on your PC b Your system will detect the device and the Found New Hardware Wizard dialog box will appear Choose Cancel to proceed Figure 2 1 1 The Found New Hardware Wizard Dialog Box c Inse...

Страница 7: ...opy the drivers found Figure 2 1 2 The 11Mbps Wireless LAN Window e Windows will notify you that the driver has not passed the Windows Logo testing Because the USB Adapter has been tested to work with Windows XP please choose Continue Anyway in the Hardware Installation dialog box 7 ...

Страница 8: ...he Reboot screen Now you shall find the Wireless G Configuration Tool tray icon appeared in the system tray The installation is entirely finished at the moment Double click the icon to launch the application and open the Wireless Settings dialog box in which you may freely arrange your network connection afterwards For more details about Wireless G Configuration Tool please refer to WLAN G Configu...

Страница 9: ...ion to assist you in networking activities It is recommended to utilize the attached Wireless G Configuration Tool to enjoy more benefits it will bring Thus to employ your Wireless G Configuration Tool under Windows XP please proceed to the next step to change the default settings of Windows Zero Configuration to Wireless G Configuration Tool Figure 2 2 1 The Wireless G Configuration Tool Tray Ico...

Страница 10: ...ab in the Wireless Network Connection Properties dialog box and remove the tick from the Use Windows to configure my wireless network settings checkbox Figure 2 2 4 The Wireless Network Connection Properties Dialog Box c Click OK Now you have successfully removed the Windows Zero Configuration 10 ...

Страница 11: ... installed please follow the procedures below 1 Right click the My Computer desktop icon and choose Properties from the opened menu 2 In the System Properties dialog box click the Hardware Device tab and then choose the Device Manager Button 3 In the opened window expand Network adapters to find the USB Adapter 802 11g b WLAN USB 2 0 Adapter Right click over the item and choose Properties 4 From t...

Страница 12: ... to assist you in some basic configurations of wireless network connection The service starts right after the completion of the installation of Wireless 802 11g b USB 2 0 ADAPTER and you will find the icon automatically appears in your system tray like the following picture shows Figure 3 1 The Wireless Network Connection Icon Please refer to the desired topics below to look for more details about...

Страница 13: ...tton to build the connection Otherwise you will need to manually enter the identical key in the Network Key field before clicking Connect Figure 3 1 1 This is connect to Wireless Network dialog box 4 If the connection is established there will be a pop up message shown beside the Wireless Network Connection icon on the system tray You could obtain the information on the status of connection from t...

Страница 14: ...h three other tabs are found including General Authentication and Advanced The Wireless Networks tab includes almost the main settings for the networking connection Thus please check the descriptions below to learn more about the tab Figure 3 2 2 The Wireless Network Connection Properties Dialog Box Note For more detailed information about each tab please refer to the Windows XP Online Help 14 ...

Страница 15: ...Available networks and then selecting the Add button After clicking Add the Wireless Network Properties dialog box will appear as Figure 3 2 3 displays Note that to delete any item under the preferred networks area simply click on it and then select the Remove button Additionally you may adjust the items in the list by clicking the desired item and then choosing the Move up or Move down button It ...

Страница 16: ...he network you intend to connect to in the Network key filed Prior to typing texts as the network key you may wish to define the Key format and Key length Click OK when you are finished and you will return to the Wireless Network Connection Properties dialog box Figure 3 2 4 Enter WEP Note For more details of this tab you may click the link setting up wireless network configuration at the bottom o...

Страница 17: ...Figure 3 2 5 Setting up wireless network configuration 17 ...

Страница 18: ...Advanced Dialog Box The Advanced dialog box provides three options any available network Access point networks only and Computer to computer networks only Choose one of them according to your need and click Close to finish Then you will find under the Available networks area in the Wireless Network Connection Properties dialog box only the specified networks are displayed Note If you wish to use t...

Страница 19: ...dvantages Wireless G Configuration Tool brings 4 1 Tray Icon As long as you finish installing Wireless G Configuration Tool on your computer system you will see its icon shown at the right bottom corner of your screen When you move the mouse cursor over it the information on the current link quality is provided in the tips Furthermore the color of the icon varies with the current state of your net...

Страница 20: ... Tool icon displayed in the system tray choose this command to open the Remove Wireless Status Icon dialog box and then choose Yes to have the icon disappeared The icon will reappear next time when you restart the computer If you intend to remove it permanently put a tick in the checkbox next to the Remove Status Icon Permanently option To launch the utility hereafter click Start on the taskbar ch...

Страница 21: ...of the Wireless Settings dialog box To obtain more information about the tab please refer to The IBSS Tab in the Program Controls section below Country Domain Choosing this command will launch the Domain tab of the Wireless Settings dialog box Detailed information about this tab is presented in The Domain Tab of the Program Controls section Version Information Choosing this command will launch the...

Страница 22: ... Wireless Settings Dialog Box Check the desired items below to obtain more details about these tabs The Status Tab In the Wireless Settings dialog box click the Status tab to appear the following display Here presents the status of your current connection To close the window click OK Note Choosing the Wireless Network Status command from the right click menu of Wireless G Configuration Tool tray i...

Страница 23: ...e Enable Radio button here instead Click Enable Radio to regain the link then State Here displays the MAC Address of the current associated entry which could be a connected access point in the Infrastructure mode or computers joining in the Peer to Peer network AdHoc The WLAN USB adapter is operating in Peer to Peer mode This field also displays the virtual MAC address used by computers participat...

Страница 24: ...e Infrastructure mode They are inapplicable in the Ad Hoc mode since data will be transferred from many different computers Signal Strength You may learn the received signal strength of the base band processor of the beacon signal from the Signal Strength bar beside and it s also presented in terms of percentage As the signal gets stronger the signal percentage rate gets higher It is noted that th...

Страница 25: ...t one profile named Default When selecting any link from the list under the Site Survey tab you have already automatically established a new profile for it under the Configuration tab Network Name Also known as SSID Service Set Identifier must be unique to distinguish itself as a particular wireless network while all wireless points in this network area share the same SSID Type the identical SSID ...

Страница 26: ...same as the associated access point Thus there s no need to manually set up the value Transmit Rate This command allows you to indicate the rate of transferring the data packet from the associated access point or any nodes within the range There are four options for you Auto 1 2 Mb 5 5 Mb 11 Mb and Fully Automatic Specify the rate from the provided options according to the speed of your wireless n...

Страница 27: ...s Manually option you may directly enter up to 4 WEP keys for use in WEP encryption To generate the WEP keys please define the key entry method as Alphanumeric or Hexadecimal for hexadecimal characters only digits 0 9 and letters A F are valid Then edit the texts in the blank fields below from Key 1 to Key 4 as the encryption codes Note that these codes keys shall be identical between the wireless...

Страница 28: ...re of performance After finish configuring the Encryption features remember to click Apply to initiate the new settings The Site Survey Tab First of all while entering this tab please do choose the Rescan button to reinitiate the scanning process and update the list Later the result of scanning will be renewed and displayed afterwards From the offered information you may learn the general informat...

Страница 29: ...ions within the range so that each can communicate with each other Or you may simply click Defaults to automatically determine the channel number for you When done click Apply to activate the new configuration On the other hand while in the Access Point mode you will find the channel number is the same as the associated access point Thus there s no need to manually set the value Figure 4 3 6 The I...

Страница 30: ...vides information about the channels frequencies and power levels permitted in your location Once it finds such an access point the WLAN USB adapter conform its operations to these standards The WLAN USB adapter will not communicate with an access point that does not provide this information nor will it join or create a peer to peer network On the other hand if you choose Flexible in this field yo...

Страница 31: ...te Choosing the Version Information command from the right click menu of Wireless G Configuration Tool tray icon will launch this tab too Figure 4 3 8 The About Tab Network Driver Displays the current version and released date of the Wireless 802 11g b USB 2 0 Adapter s driver Configuration Utility Displays the current version and released date of Wireless G Configuration Tool NIC Firmware This di...

Страница 32: ... that appear in the list displayed by the device manager may differ depending on the adapter installed in your computer To display these properties complete the following steps 1 Right click the My Computer desktop icon and choose Properties from the opened menu 2 Choose the Hardware tab in the System Properties dialog box and click Device Manager 3 In the opened window expand Network adapters to ...

Страница 33: ...and type the value for the property according to your needs Choosing Not Present under the Value field will disable a value The following section explains the items in the Property list displayed by this tab Configuration Profile Specify a pre defined profile with standard parameters from here The provided profiles include B only for operation in 802 11b environments only B WIFI for operation in 8...

Страница 34: ...ry condition XP only on the host Power Save Mode decreases the amount of power consumed by the adapter by powering off the radio for short periods Enabling Power Save Mode trades off performance for battery life Auto Dynamic specifies Disable mode when on AC power and Dynamic mode when on battery Auto Maximum specifies Disable mode when on AC power and Maximum mode when on battery Note Auto Dynami...

Страница 35: ...35 The Long Short Retry Limit The Long Retry Limit or Short Retry Limit is the maximum number of retransmission of a data packet because of the failure of receiving CTS or ACK ...

Страница 36: ...losed and then go along with the procedures below to entirely uninstall Wireless G Configuration Tool and the Adapter driver 1 Right click the My Computer desktop icon and choose Properties from the opened menu 2 In the System Properties dialog box click the Hardware tab and then choose the Device Manager Button 3 In the opened window expand Network adapters to find the USB Adapter 802 11g b WLAN ...

Страница 37: ...choose Control Panel from the Settings menu 6 Select Add or Remove Programs to open the dialog box shown as below Figure 5 3 Add or Remove Programs Dialog Box 7 Click the Change Remove button under WLAN 1802 11G USB 8 Please follow the on screen instruction to complete the removal 37 ...

Страница 38: ... b USB 2 0 ADAPTER 6 When finished open the Device Manager window again to verify if the installation is approved The yellow exclamation mark shall be removed for this time Upgrade WLAN G Configuration Tool and the Adapter s Driver To upgrade the drivers for WLAN G Configuration Tool and the Wireless 802 11g b USB 2 0 ADAPTER follow the procedures below Please note that the details might be slight...

Страница 39: ...igure 5 5 The Hardware Update Wizard Dialog Box 5 In the next dialog box choose to define the path on the supplied CD and then select the Browse button From the Browse for Folder dialog box find the directory named Drivers from the CD ROM After choosing the folder according to the system you are running click OK And then choose the Next button in the previous dialog box 39 ...

Страница 40: ...ed Install 6 Choose Continue Anyway in the prompted Hardware Installation dialog box to proceed Figure 5 7 The Hardware Installation Dialog Box 7 When the following dialog box appears your system is starting to install the software 40 ...

Страница 41: ...Figure 5 8 Installing the Software 8 In a few seconds later you will see the following dialog box appeared Click Finish to end up upgrading Figure 5 9 The Complete Screen 41 ...

Страница 42: ...ltage 5 0 V 5 Data Rate 1Mpbs 2Mbps 5 5Mbps 6Mbps 9Mbps 11Mbps 12Mbps 18Mbps 24Mbps 36Mbps 48Mbps 54Mbps Transmit Power 802 11b 17dBm 802 11g 6 9Mbps 17dBm 12 18Mbps 15dBm 24Mbps 4dBm 36Mbps 14dBm 48Mbps 12dBm 54Mbps 12dBm Receive Sensitivity 802 11b 8 FER 1Mbps 91dBm 8 FER 2Mbps 88dBm 8 FER 5 5Mbps 85dBm 8 FER 11Mbps 83dBm 802 11g 10 PER 6Mbps 88dBm 10 PER 9Mbps 87dBm 10 PER 12Mbps 84dBm 10 PER 1...

Страница 43: ...enna Type Single Chip Antenna Media Access Control RF activity Supplied Driver CSMA CA with ACK Warranty 1 year Temperature Range 0 65 C Operating Humidity Max 95 Non condensing Operating Range Open Space up to 400meters Indoor up to 100meters The transmission speed varies in the surrounding environment ...

Страница 44: ... widely used at small networking requirements like between a few computers or devices at departmental scales IEEE IEEE the Institute of Electrical and Electronics Engineers is the world s largest technical professional society and is consisted of more than 366 000 members in approximately 150 countries As a leading authority on areas ranging from for computer engineering biomedical technology and ...

Страница 45: ...a good solution that allows users to quickly and easily connect and add peripherals to computers Through the USB interface there s even no need to turn the computer off while adding new peripherals mentioned above to a computer Due to its convenience and simplicity USB has won worldwide popularity and most peripherals for computers these days are designed for the USB standard WEP Wired Equivalent ...

Страница 46: ...IR OR REPLACEMENT OF THE PRODUCT IN QUESTION AT GFE S OPTION THE FOREGOING WARRANTIES AND REMEDIES ARE EXCLUSIVE AND ARE IN LIEU OF ALL OTHER WARRANTIES OR CONDITIONS EXPRESS OR IMPLIED EITHER IN FACT OR BY OPERATION OF LAW STATUTORY OR OTHERWISE INCLUDING WARRANTIES OR CONDITIONS OF MERCHANTABILITY AND FITNESS FOR A PARTICULAR PURPOSE GFE NEITHER ASSUMES NOR AUTHORIZES ANY OTHER PERSON TO ASSUME ...

Отзывы: