Gigabyte Sil3112 Скачать руководство пользователя страница 5

SATA Hard Drive Configurations (Sil3112)

- 5 -

Figure 4

Figure 5

Step 2:
After you enter the 

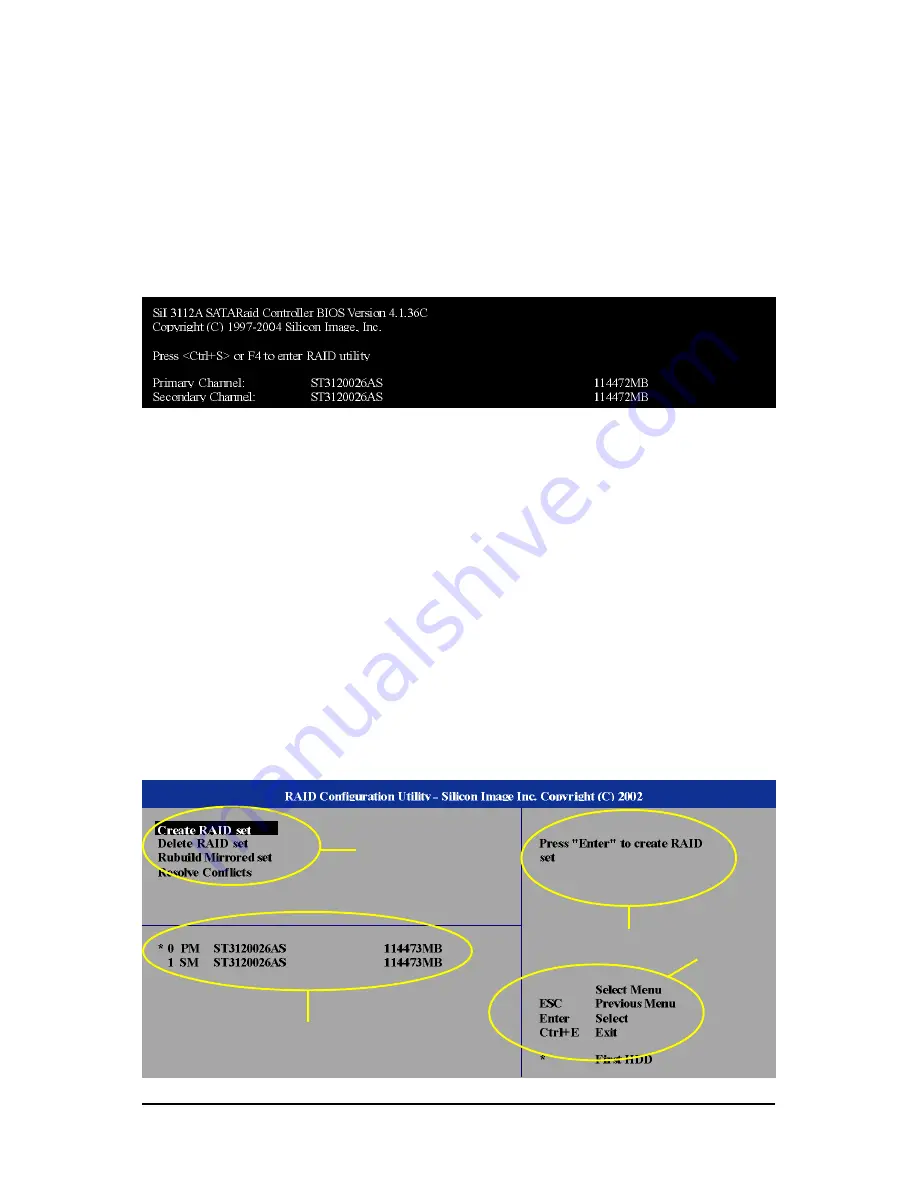
RAID Configuration Utility, 

a screen similar to that below will appear (Figure 5).

Main Menu: 

The Main Menu in the upper left corner allows you to use the UP or DOWN ARROW key

to highlight through choices. Highlight an item that you want to execute and press ENTER.

The 

Create RAID set

 selection allows user to create a new RAID Set. If there is a previously created

RAID set on the hard drives, it is recommended that you back up the data and remove the old RAID
set before creating a new RAID set.
The 

Delete RAID set

 selection allows users to delete an existing RAID set.

The 

Rebuild Mirrored set

 is used to initiate the copying of data from an existing drive to a replacement

drive that has been installed in a RAID 1 set after the failure of one of the members.
The 

Resolve Conflicts

 is used to automatically find the member drives of a RAID set which has

been disrupted (physical drives swapped around, for example) and restore the RAID set to proper
operation.

(3) Configuring RAID set in RAID BIOS

Enter the RAID BIOS setup utility to configure a RAID array. Skip this step and proceed to Section 4 if
you do not want to create RAID.

Step 1:
After the Power-On Self Test (POST) memory test begins and before the operating system boot begins,
look for a message which says "Press <Ctrl+S> or <F4> to enter RAID utility"(Figure 4). Hit the
CTRL+ S or F4 key(s) to enter the RAID BIOS setup utility. If you cannot enter the RAID BIOS correctly,
assure that your SATA drives are properly installed.

Main Menu

Hard Drives Properties

Function keys

Help Window

Содержание Sil3112

Страница 1: ...ge Sil3112 2 1 Installing SATA hard drive s in your system 2 2 Configuring SATA controller mode and boot sequence in BIOS Setup 3 3 Configuring RAID set in RAID BIOS 5 4 Making a SATA controller drive...

Страница 2: ...performance it is recommended that you use two hard drives with identical model and capacity If you do not want to create RAID with the SATA controller you may prepare only one hard drive b An empty f...

Страница 3: ...nd set BIOS boot sequence for the SATA hard drive s Step 1 Turn on your computer and press Del to enter BIOS Setup during POST Power On Self Test In BIOS Setup menu go to Integrated Peripherals and as...

Страница 4: ...al Help F5 Previous Values F6 Fail Safe Defaults F7 Optimized Defaults Figure 3 Step 2 Select Hard Disk Boot Priority under the Advanced BIOS Features menu In the Hard Disk Boot Priority submenu selec...

Страница 5: ...g of data from an existing drive to a replacement drive that has been installed in a RAID 1 set after the failure of one of the members The Resolve Conflicts is used to automatically find the member d...

Страница 6: ...ss ENTER The options include Striped RAID 0 and Mirrored RAID 1 Step 4 After the selection of a RAID type select Auto configuration or Manual configuration Figure 7 If Auto configuration is selected B...

Страница 7: ...en will list the RAID set information including RAID type chunk size and toal array size Figure 8 If you want to remove one or more RAID sets select Delete RAID set item Figure 9 in Main Menu Press EN...

Страница 8: ...irst of all you need to copy the driver for the SATA controller from the motherboard driver CD to a floppy disk The instructions below explain how to copy the driver Step 1 Find an available system an...

Страница 9: ...pty floppy disk If you want to create RAID array s press 4 to select the 4 SilRAID item If you do not want to create RAID array press 3 to select 3 SiIBASE Then it will take about one minute to copy t...

Страница 10: ...th the SATA controller driver and configured BIOS settings you are ready to install Windows 2000 XP onto your SATA hard drive with the driver The following is an example of Windows XP installation Ste...

Страница 11: ...the SATA driver from the floppy disk If you have copied the SATA non RAID driver a screen similar to that below will appear Use the ARROW keys to select Silicon Image SiI 3x12 SATALink Controller for...

Страница 12: ...ter the SATA controller driver installation is completed you should see a screen silimar to Figure 19 below It indicates that you have installed the SATA controller driver succesfully You can proceed...

Отзывы: