background image

15

14

15

14

3.1 How to restore to the Factory Restore Point

1.  Power  on  your  computer.  If  it  is  already  running,  reboot  (re-
start/reset) it.
2. As soon as anything (logo, graphic, text) appears on the screen 
after boot-up, press and hold down the F9 key. (Typically, F9 is the 
“hot key” that starts Recover Pro. Contact your PC manufacturer if 
this hot key does not work.)

The  cME  Console  screen  displays. This  is  the  access  screen  for 
applications in the cME.
Your Phoenix cME Console opening screen may not match the one 
pictured here. The number of available applications varies.

• Normally, your mouse will be functional when running FirstWare 
Recover Pro, and you can click to select options. If the mouse is not 
functioning, press the Tab key until the desired option is highlighted, 
and then press Enter to select it.

►How to Rrun the cME Version of Recover Pro◄

Once you have accessed the cME version of Recover Pro, follow 

these instructions.

1. On the selection screen, select 

Factory Restore

. The Select 

Recover Type screen displays.

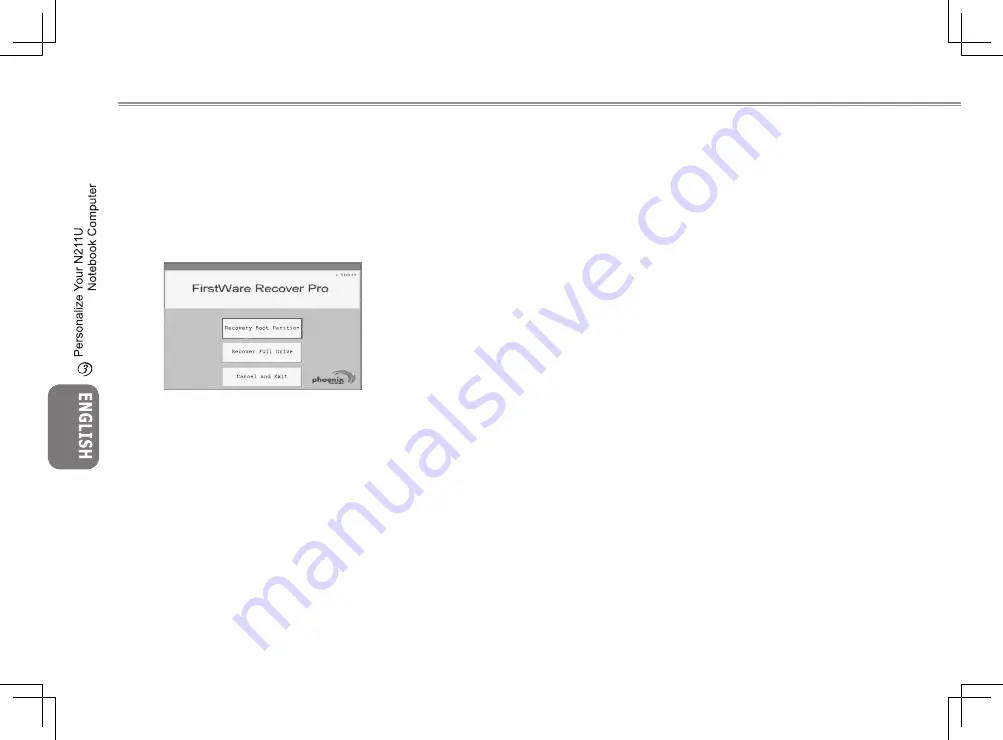
2. Select a recovery option.

• Click the desired option, or
• Press the Tab key until the desired option is highlighted; press 

the space bar.

Recover Boot Partition

—Select this option if you know that your 

hard drive is divided into partitions and you want to recover only 
the boot partition of the hard drive. The Recover Boot Partition op-
tion may not be available to all users.

Recover Full Drive

—Select this option if your drive is not parti-

tioned and/or you want to recover the entire drive. The entire pri-
mary drive (usually C:) will be recovered. 

Cancel and Exit

—Select this option if you do not want to run First-

Ware Recover Pro at this time.

• If you are unsure which option to choose and want to minimize 

the number of deleted files, first select Recover Boot Partition.

• If, after selecting the first option, the recovery process does not 

successfully restore your operating system, run FirstWare Re-
cover  Pro  again,  and  select  the  second  option,  Recover  Full 
Drive.

• It is recommended that you not choose Recover Boot Partition if 

the drive does not already contain a partition.

After you select an option, a confirmation dialog (identical or simi-
lar to the one shown here) displays.

Содержание N211U

Страница 1: ......

Страница 2: ...se re or electric shock by shorting out interior components Use only the AC adapter and batteries that are approved for use with your notebook Use of another type of battery or AC adapter may risk re...

Страница 3: ...tempera ture before turning on power When you disconnect a cable pull on its connector or on its strain relief loop not on the cable itself As you pull out the connector keep it evenly aligned to avoi...

Страница 4: ...MC Part 3 Limits Section 3 Limitation of voltage uctuations and icker in low voltage supply systems for equipment with rated current up to and including 16 A EN 60950 Safety of Information Technology...

Страница 5: ...sticated architecture to provide you with a personal computer that is compact powerful and easy to use Designed for a wide range of general business and personal productivity applications this noteboo...

Страница 6: ...g the Keyboard 10 2 7 Using the TouchPad 11 2 8 Storage 12 Chapter 3 Personalize Your N211U Notebook Computer 3 1 How to restore to the Factory Restore Point 14 3 2 BIOS Setup 16 3 3 How to Upgrade th...

Страница 7: ...1 1 N211U NOTEBOOK USER S MANUAL Chapter 1 The Grand Tour This chapter will show you the basic components of the computer and brie y explain how they function The Grand Tour...

Страница 8: ...and activate items on the screen 5 Touchpad buttons Function like the left and right buttons on a external mouse 6 Microphone in jack Connects to an external microphone 7 Speaker Headphone Jack Conne...

Страница 9: ...l Drive Eject Button Eject the optical drive tray from the drive 5 PC Card Slot Accepts one Type II 16 bit PC card or 32 bit CardBus PC card 6 IEEE 1394 Port Connects to IEEE 1394 devices 7 4 in 1 Car...

Страница 10: ...ipped with a choice of Lithium Ion Li Ion battery pack 2 Speakers Left and right speakers delivers stereo audio output 3 Fan Vent It provides air flow to cool the internal components CAUTION Do not bl...

Страница 11: ...meric mode is turned on by pressing Num LK You can use the embedded numeric keyboard for numeric data input Press Num LK again to turn off the embedded numeric keyboard Caps Lock Lights up when the al...

Страница 12: ...on basic operation including connecting the AC adaptor turning the computer on off using touch pad keyboard hot keys battery and so on If you are new to computers and to the operating system this chap...

Страница 13: ...mended Li Ion Battery is vulnerable do not charge it with other power adapter or it may cause fire or explosion Replacing the Battery Over time the battery s capacity gradually decreases We recom mend...

Страница 14: ...indicator glows blue after the computer is turned on Turning off the power If you are not going to use N211U notebook computer for a while it is best to turn off the power of the notebook computer for...

Страница 15: ...ers check with your dealer first if they have already installed all the drivers along with the operating system If not follow the procedures below 1 You can find one bundled Driver CD shown as follow...

Страница 16: ...rly all the functions of desktop keyboard can be executed on the computer Fn F3 Toggles display on off Fn F4 Suspend to RAM HDD Fn F5 Toggles between LCD CRT displays Fn F6 Decreases LCD brightness Fn...

Страница 17: ...lect menu items or just click the touchpad once Double Click Move the pointer over the item with your finger on the pad and tap the left button twice to select menu items or just click the touchpad tw...

Страница 18: ...ti You would normally use the drive for installing operating system and software application programs To insert and remove a disc on the drive 1 Press the button on the front of the drive to open the...

Страница 19: ...the BIOS setup utility N211U Notebook Computer has a BIOS setup utility which allows you to con gure important system settings including settings for various optional functions of the computer You wil...

Страница 20: ...ype screen displays 2 Select a recovery option Click the desired option or Press the Tab key until the desired option is highlighted press the space bar Recover Boot Partition Select this option if yo...

Страница 21: ...re Recover Pro to complete the recovery varies from approximately 5 or 10 minutes to more than one hour depending on the size of the recovery image and system perfor mance The more applications and ut...

Страница 22: ...ve among selections then press Enter to make a selection Change Option Tab Select Field F1 General Help F10 Save and Exit ESC Press Esc to exit any section If you wish to exit the BIOS utility without...

Страница 23: ...on F1 General Help F10 Save and Exit ESC Exit V02 53 Copyright 1985 2002 American Megatrends Inc BIOS SETUP UTILITY Main Advanced Boot Security Exit 1st Boot Device CDROM SM QSI DVD R 2nd Boot Device...

Страница 24: ...es and Exit Discard changes and Exit Discard Changes Load Optimal Defaults Load Failsafe Defaults Exit system setup after saving the changes F10 key can be used for this operation Select Screen Select...

Страница 25: ...3 BIOS Update N211U notebook computer uses EPROM Flash BIOS chip that allows you to easily upgrade the BIOS program When you update the BIOS any customized settings you made are lost Please go to Gig...

Страница 26: ...e the BIOS ROM le you download form GBT websit and press Open 6 Click on Setup icon please use the default settting and click Flash to start BIOS Flash The status of the execution will be shown in the...

Страница 27: ...o adjust the resolution Normally you should use the resolution the LCD or monitor was designed for Note Using a lower resolution than the screen was designed for will reduce the area of the display Us...

Страница 28: ...ee video output the first time you use an external monitor Chang the output in the Display properties dialog box After successfully switching modes you may use the video function keys Note Light or da...

Страница 29: ...1U NOTEBOOK USER S MANUAL Chapter 4 Connecting to Periph erals This chapter describes how to connect peripheral devices to your N211U notebook computer with step by step instructions Connecting to Per...

Страница 30: ...rt on the right side of your notebook and connect the video signal cable from the external monitor or the VGA adapter to the monitor port 2 Connect the power cable from the external monitor to a power...

Страница 31: ...ries box in notebook shipping carton Each end of the cable has a RJ 45 connector 2 Connect one end of the cable into the network wall outlet or HUB 3 Connect the other end of the cable into the comput...

Страница 32: ...puter s PC card slot supports PCMCIA Type II and 32 bit CardBus Installing a Card 1 The top side of a PC card is usually identi ed with a label Insert the card into the slot with the label side up and...

Страница 33: ...27 27 N211U NOTEBOOK USER S MANUAL Chapter 5 Troubleshooting In this chapter we list some normal problems that you might meet in the future and tell you how to resolve these problems Troubleshooting...

Страница 34: ...n refer to Windows documentation The internal fax modem dial tone sound is too low How can I increase the volume There are two methods to adjust the volume of the internal fax modem dial tone Method 1...

Страница 35: ...ed after the battery has returned to a normal condition My computer alerts CMOS Battery Low what can I do If you keep your computer in no power situation unplug the computer from the power outlet and...

Страница 36: ...mation on technical and hardware speci cations of N211U notebook computer Please note that the informa tion mentioned here may not be exactly the same with your note book computer as speci cation is s...

Страница 37: ...playing at 12 1 XGA 1024X768 resolution Simulataneous LCD and CRT display support Dual indenpendent display Connectivity Intergrated 10 100 Mbps Fast Ethernet connection Build in 56Kbps fax data moder...

Страница 38: ...32 32 Weight with battery and optical drive 12 1 display model about 1 9 Kg 4 19 lbs Dimensions 225 W x275 D x30 8 32 8mm Power 65W AC adapter 19V 3 42A...

Страница 39: ...33 33 N211U NOTEBOOK USER S MANUAL Appendix B Service Center This appendix gives information about world wide service of your N211U notebook computer...

Страница 40: ...h FAX 49 40 25492343 Sales 49 1803 428329 Tech WEB Address http www gigabyte de Japan NIPPON GIGA BYTE CORPORATION TEL 81 3 5791 5438 FAX 81 3 5791 5439 WEB Address http www gigabyte co jp China G B T...

Страница 41: ...Y FRANCE S A R L Add 47 allee des impressionnistes immeuble Gauguin 93420 Villepinte France TEL 00800 GIGABYTE WEB Address http www gigabyte fr Russia Moscow Representative Of ce Of Giga Byte Technol...

Отзывы: