background image

2 1

Hardware Installation Process

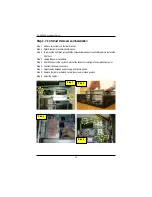
Step 2-9: Reinstall Chassis Cover

Front Cover:
Step 1 Insert the front edge from 15 degree.
Step 2 Close the cover in un-lock position.
Step 3 Slide it toward to screw lock position.

Rear Cover:
Step 1 Close the cover in un-lock position.
Step 2 Slide it to lock position.
Step 3 Attach the two thumbscres to the back of chassis. Secure the screw to lock position.

Step 3

Step 2

Step 2

Step 3

Step 2

Содержание GS-SR295

Страница 1: ...System Installation Guide GS SR295 Rack Mount Server DualXeonTM Nocona ProcessorMotherboard Rev 1 1 25A08 02950 F00 ...

Страница 2: ...ion 14 Step 2 6 PCI X ZCR Expansion Card Installation Optional 16 Step 2 7 FAN Duct Removal and Installation 18 Step 2 8 Hard Disk Drive Installation 20 Step 2 9 Reinstall Chassis Cover 21 Chapter 3Appearance of GS SR295 22 3 1 Front View of GS SR295 22 3 2 Rear View of GS SR295 23 3 3 SCSI Backplane Layout and Description 24 3 4 Switch and LED Indicators Description 25 3 5 HDD LED Indicators Desc...

Страница 3: ...nstructions Do not use this product near water or a heat source Set up the product on a stable work surface or so as to ensure stability of the system Openingsinthecaseareprovidedforventilation Donotblockorcovertheseopenings Makesureyou provide adequate space around the system for ventilation when you set up your work area Never insert objects of any kind into the ventilation openings To avoid ele...

Страница 4: ... at his own expense Properly shielded and grounded cables and connectors must be used in order to meet FCC emission limits Neither the provider nor the manufacturer are responsible for any radio or television interference caused by using other than recommended cables and connectors or by unauthorized changes or modificationstothisequipment Unauthorizedchangesormodificationscouldvoidtheuser sauthor...

Страница 5: ...ofCommunicationslabelidentifiescertifiedequipment Thiscertification meansthattheequipmentmeetscertaintelecommunicationsnetworkprotective operationalandsafety requirements TheDepartmentdoesnotguaranteetheequipmentwilloperatetotheusersatisfaction Beforeinstallingthisequipment usersensurethatitispermissibletobeconnectedtothefacilitiesofthe localTelecommunicationsCompany Theequipmentmustalsobeinstalle...

Страница 6: ... motherboards and expansion cards contain very delicate Integrated Circuit IC chips To protect them against damage from static electricity you should follow some precautions whenever you work on your computer 1 Unplug your computer when working on the inside 2 Use a grounded wrist strap before handling computer components If you do not have one touch both of your hands to a safely grounded object ...

Страница 7: ... for the GS SR295 your system This installation guide will assist you in installing all the essential components for the sever system Foryourprotection pleasereadandundertandallofthesafetyandoperatinginstructionsregardingyour Gigabyte Server and retain for future reference The procedures in this guidebook assume that your are a system or network administrator experienced in installing similar hard...

Страница 8: ... Expansion Slot y Supports 2 x full height full length 64bit 100MHz PCI X slots y Supports 2x full height full length 64bit 100MHz PCI X slots Supports1x full height full length64bit 100MHzPCI Xslotwhen ZCR riser card is inserted y Supports 1 x low profile half length 64bit 100MHz PCI slot y Supports 1 x low profile half length 64bit 133MHz PCI slot y Supports 1 x PCI X Adaptec ZCR slot Optional D...

Страница 9: ...IOS Multi boot BBS 1 0 Compliant4Mb Flash Memory SpecialFeatures y ACPI 1 1 DMI PXE Plug and Play A C Power Recovery Server Management Functions BMC Chip y NS IPMI 1 5 controller FailureDetection y IPMI 1 5 specification of Server management EventLogging y 32KB Nonvolatile Memory to Log System Failure Events RemoteManagement y Follow the IPMI 1 5 specification of Server management Environment Ambi...

Страница 10: ...d b e f g h i j k a Chassis front cover g Riser card bracket b Chassis rear cover h System Fans x 3 c Single Redundant Power supply i SCSI HDD Trays x 8 d GA 9ILDR Motherboard j Front LEDs Power Button e Dual Sockets 604 k CD ROM Floppy Drives f Backplane board ...

Страница 11: ...ront Cover Step 1 Push down the two buttons located at two sides of the chassis Step 2 Slide toward to remove the front cover Rear Cover Step 1 Remove the two thumbscrews from back side of the system Step 2 Slide it toward to remove the rear cover Front Cover Rear Cover Step 1 Step 1 Step 2 Step 1 Step 2 Note Before installing CPU you must remove the FAN duct For FAN duct removal please see Sub se...

Страница 12: ...sure the CPU type and speed that are supported by the motherboard Step 1 Step 1 Rise the lever bar on the socket Step 2 Aligning the pins of the processor with the socket insert the processor into the socket Step3 Close the lever completely Step 2 Step 3 Pin1 indicator ...

Страница 13: ...processor scoket Lock the heat sink to the motherboard with four screws Step 2 4 Memory Installation Step 1 The DIMM slot has a notch the DIMM memory module only fit in one direction Step 2 Align the memory notch to the module and push the memory into the DIMM socket Notch Step 2 Step 1 Step 1 Step 2 NOTE DIMM must be populated in order starting at the nearest slot from the ATX power ...

Страница 14: ... Installing the PCI Riser card Align the expansion card with the guide groove Slide the expansion board into the slot until the board firmly seats Repeat Step 2 3 to install remainingadd oncards Note When you install ZCR card the second full heightfull length slot can not work properly Step 4 Replace the riser bracket into the system module see the arrow direction mark and push down vertically Ste...

Страница 15: ...15 Hardware Installation Process Step 4 ...

Страница 16: ...ocated at down left hand side Position I of the ZCR card Secure the screw holder with screws Step 5 ZCR card assemble completed Step 6 Push riser card into the ZCR slot and fasten the card with screws Point B Step 7 Attach the ZCR card to the system Lock it on the stand off with screw Point D Step 8 Reverse Step 1 2 to lock the riser bracket firmly Installation completed Step 2 6 PCI X ZCR Expansi...

Страница 17: ...17 Hardware Installation Process Position I Position II Step 5 Step 3 4 Step 6 Step 7 ...

Страница 18: ...hescrew holderandunscrewthumbscrewstoremovethe FAN duct Step 4 Unplug the power connectors Step 5 Attach Fan duct to the system Note that the fan duct must align to the emplacement point Step 6 Conntectthepowerconnectors Step 7 Adjust cables between power supply and thumb screws Step 8 Replace the riser bracket and secure the screws to locked position Step 9 Adjust the cables Step 1 Step 2 Step 3 ...

Страница 19: ...19 Hardware Installation Process Step 5 Step 6 Step 6 Step 7 Step 8 Step 9 ...

Страница 20: ...e the trail from the chassis Step 3 Insert the hard disk into the trail Step 4 Secure each hard disk drive with 4 screws Step 5 After securing the hard disk drive with the screws hold the hard drive handle at open position place the tray into chassis and push the hard disk drive tray handle to the locked position Step 2 Step 4 Step 3 Step 1 Step 5 ...

Страница 21: ...15degree Step 2 Close the cover in un lock position Step 3 Slide it toward to screw lock position Rear Cover Step 1 Close the cover in un lock position Step 2 Slide it to lock position Step 3 Attach the two thumbscres to the back of chassis Secure the screw to lock position Step 3 Step 2 Step 2 Step 3 Step 2 ...

Страница 22: ...1 Front View of GS SR295 Chapter 3 Appearance of GS SR295 Z Z Y X X X s D D H I S C S p a w S t o H 8 s r o t c e n n o C B S U D E L t n o r F n o t t u B r e w o P t r o p M O C t n o r F e v i r D M O R D C e v i r D y p p o l F Y ...

Страница 23: ...X _ r o t c e n n o C e s u o M d r a o b y e K 2 S P t o l S r e s i R X I C P e l i f o r P w o L t o l S r e s i R h t g n e L l l u F t h g i e H l l u F s t r o P 2 1 N A L t r o P A G V t r o P M O C s r o t c e n n o C B S U r o t c e n n o C r e w o P ...

Страница 24: ...r 3 3 SCSI Backplane Layout and Description a b c d e g h i f X Y Z a 1 _ A C S i r e w o P b 2 _ A C S X 1 N A F c 3 _ A C S Y 2 N A F d 4 _ A C S Z 3 N A F e 5 _ A C S 4 N A F f 6 _ A C S 5 N A F g 7 _ A C S 6 N A F h 8 _ A C S ...

Страница 25: ...ower cable is plugged in Off N A No power SYS Health LED On Amber System is ready but Please degraded some CPU Fault check with Critical PowerModules Failure GSMT User s Critical FANs Failure Manual Voltage Power Supply critical Temperature and Voltage Green Normal operating Off N A No power LAN1 2 LED On Green LAN online Off N A LAN offline Blink Green LAN active ID Localization On Blue Identifie...

Страница 26: ...scription HDD LED 1 g n i t c A r o l o C s u t a t S 1 D E L D D H f f O A N f f o r e w o p D D H 1 D E L D D H n O n e e r G n o r e w o p D D H 2 D E L D D H f f O A N e v i t c a n o n D D H 2 D E L D D H k n i l B n e e r G e v i t c a D D H HDD LED 2 ...

Страница 27: ...27 MotherbaordLayout 3 6 Connector Icon Description n o c I t s e g g u S n o i t p i r c s e D d r a o b y e K A G V e s u o M N A L t r o P l a i r e S B S U ...

Страница 28: ... FP OEM_FP SCSI_ HSINK SE LINK ATX1 ATX2 CLR_C MOS1 CO M1 J19 JP8 JP17 USB1 J25 JP19 F_PANEL1 X2 X2 X2 4 1 GA 9ILDR Motherboard Layout Chapter 4 Motherboard Layout Jumper Setting A B C D E F G H I J K L M N O P Q R S T U V W X Y Z 1 2 4 3 5 6 7 8 9 10 11 12 13 14 15 16 17 18 19 20 ...

Страница 29: ...it 66 100MHz H ITE IT8712F 8 PCIE 3 Supports PCI Express I IDE2 9 PCIE 2 Supports PCI Express J IDE1 10 PCI 1 Supports 64bit 133MHz K SATA0 11 DDRA1 L SATA1 12 DDRB1 M USB2 13 DDRA2 N SCSI2 SCSI connector 14 DDRB2 O SCSI1 SCSI connector 15 DDRA3 P IPMB1 16 DDRB3 Q IPMB2 17 ATX1 SSI power connector R BT1 Battery 18 ATX2 SSI power connector S FD1 Floppy connector 19 WOL Wake On LAN T 295_FP Front Pa...

Страница 30: ... 2 Jumper Setting Introduction 9mm 9mm GND PWR BT N RESE T COU P_IN3 SCSI GIGA__FP OEM_FP SCSI_ HSINK SE LINK ATX1 ATX2 CLR_C MOS1 CO M1 J19 JP8 JP17 USB1 J25 JP19 F_PANEL1 X2 X2 X2 1 2 3 4 1 PLL0 1 3 CLR_CMOS 2 CASEOPEN 4 CMOS_Lock ...

Страница 31: ...1 COM1 J19 JP8 JP17 USB1 J25 JP19 F_PANEL1 X2 X2 X2 2 CASEOPEN Case Open Function 9mm 9mm GND PWR BT N RESE T COU P_IN3 SCSI GIGA__FP OEM_FP SCSI_HSINK SE LINK ATX1 ATX2 CLR_CMOS1 COM1 J19 JP8 JP17 USB1 J25 JP19 F_PANEL1 X2 X2 X2 Open Set memory speed at DDR 266 Close Set memory speed at DDR 333 Open Disablethisfunction Close Enable Case open function Default ...

Страница 32: ...Write Protect Function 9mm 9mm GND PWR BT N RESE T COU P_I N3 SCSI GIGA__FP OEM_FP SCSI_HSINK SE LINK ATX1 ATX2 CLR_CMOS1 COM1 J19 JP8 JP17 USB1 J25 JP19 F_PANEL1 X2 X2 X2 9mm 9mm GND PWR BT N RESE T COU P_IN3 SCSI GIGA__FP OEM_FP SCSI_HSINK SE LINK ATX1 ATX2 CLR_CMOS1 COM1 J19 JP8 JP17 USB1 J25 JP19 F_PANEL1 X2 X2 X2 1 2 close Clear CMOS 2 3 close Normal Default 1 1 1 2 close Top Block Lock 3 4 c...

Страница 33: ...M CNR Communication and Networking Riser DMA Direct Memory Access DMI DesktopManagementInterface DIMM Dual Inline Memory Module DRM DualRetentionMechanism DRAM Dynamic Random Access Memory DDR DoubleDataRate ECP Extended Capabilities Port ESCD Extended System Configuration Data ECC Error Checking and Correcting EMC ElectromagneticCompatibility EPP EnhancedParallelPort ESD ElectrostaticDischarge FD...

Страница 34: ...MTH Memory Translator Hub MPT MemoryProtocolTranslator NIC Network Interface Card OS Operating System OEM OriginalEquipmentManufacturer PAC PCI A G P Controller POST Power On Self Test PCI PeripheralComponentInterconnect RIMM Rambus in line Memory Module SCI SpecialCircumstanceInstructions SECC Single Edge Contact Cartridge SRAM Static RandomAccess Memory SMP Symmetric Multi Processing SMI SystemM...

Отзывы: