Appendix
- 85 -
English
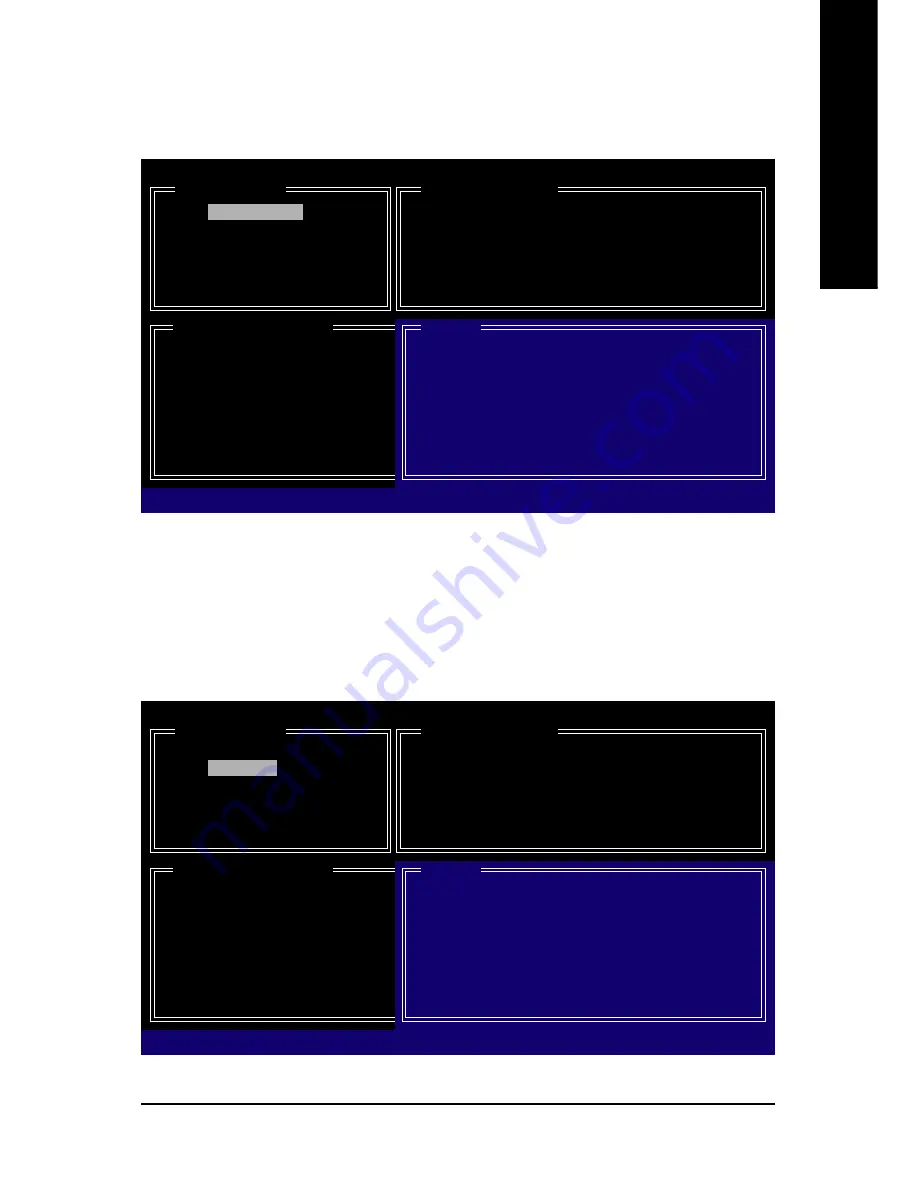
Figure 5
Create a RAID Array:
In the main screen, press <Enter> on the
Create RAID Disk Drive
item. Then the
Create New RAID
screen appears (Figure 4).
GIGABYTE Technology Corp. PCIE-to-SATAII/IDE RAID Controller BBIOSv1.06.59
[ Create New RAID ]
Name:
GRAID_
Level: 0-Stripe
Disks:
Select Disk
Block: 128 KB
Size:
240 GB
Confirm Creation
[ RAID Disk Drive List ]
[
IJ
]-Move Cursor
[DEL,BS]-Delete Character
[ENTER]-Next
[ESC]-Abort
[ Hard Disk Drive List ]
Model Name
Available
Type/Status
HDD0: ST3120026AS
120 GB
Non-RAID
HDD1: ST3120026AS
120 GB
Non-RAID
[ Help ]
Enter RAID Name
Enter a string between 1 to 16 characters
in length for the created RAID drive to be
identified by system BIOS or OS.
Figure 4
GIGABYTE Technology Corp. PCIE-to-SATAII/IDE RAID Controller BIOSv1.06.59
[ Create New RAID ]
Name: GRAID
Level:
0-Stripe
Disks:
Select Disk
Block: 128 KB
Size:
240 GB
Confirm Creation
[ RAID Disk Drive List ]
[
KL
]-Switch RAID Level
[ENTER]-Next
[ESC]-Abort
[ Hard Disk Drive List ]
Model Name
Available
Type/Status
HDD0: ST3120026AS
120 GB
Non-RAID
HDD1: ST3120026AS
120 GB
Non-RAID
[ Help ]
Select RAID Level
RAID 0
-
Data striped for performance
RAID 1
-
Data mirrored for redundancy
JBOD
-
Data concatenated for huge
temporarily disk required
The
Create New RAID
block displays all the items that need to be set for creating an array (Figure 5).
Steps:
1. Enter Array Name:
Under the
Name
item, enter an array name with 1~16 letters (letters cannot be
special characters) and press <Enter>.
2. Select RAID Mode:
Under the
Level
item, use up or down arrow key to select RAID 0 (Stripe),
RAID 1 (Mirror), or JBOD (Figure 5). Then press <Enter> to move onto the next step.
Содержание GA-X38T-DQ6
Страница 2: ...Motherboard GA X38T DQ6 Sept 7 2007 Motherboard GA X38T DQ6 Sept 7 2007 ...
Страница 36: ...GA X38T DQ6 Motherboard 36 English ...
Страница 64: ...GA X38T DQ6 Motherboard 64 English ...
Страница 113: ...Appendix 113 English ...
Страница 114: ...GA X38T DQ6 Motherboard 114 English ...


