background image

Page 21

FUSE REPLACEMENT

Unplug the power cord from the device. Once the cord has been removed, locate the fuse holder located at 

the IEC connector. Insert a flathead screwdriver at the fuse holder and gently lift to remove the bracket from 

the slot. Remove the bad fuse and replace it with a new one. (It is possible that the fuse holder includes a 

housing for a replacement fuse, be sure to change the active fuse)

WARNING: ALWAYS USE A FUSE OF THE SAME VALUE!

Caution:

 If after replacing the fuse, the fuse continues to burn,

Contact customer service for further instructions.
Continuing to use the device can 

CAUSE SERIOUS DAMAGE.

CLEANING

Due to smoke and dust residues, the internal and external optics should be cleaned regularly to optimize the 

light output.

• 

Clean the outer casing with a conventional cleaner and a micro-fiber cloth.

• 

Clean the vents and fans with a brush.

• 

Clean the external optics with an optical cleaner or glass cleaner and a micro-fiber cloth regularly 

(depending on the atmosphere of the place).

• 

Clean internal optics with optical cleaner or glass cleaner and a micro-fiber cloth every 30-60 days.

• 

Be sure to dry all parts before reconnecting the device to the mains.

In order to improve the products, technical changes can be made without prior information.

This is the reason why the technical characteristics and physical appearance of products may change.

To benefit from the latest updates of our products, please log on to: www.ghost-france.com

Содержание lumy

Страница 1: ...MANUEL MANUAL Page 2 Page 13 ...

Страница 2: ...n parfaites conditions l utilisateur doit suivre les instructions de sécurité et d utilisation décrites dans ce présent document Notez que les dysfonctionnements liés à la modification de l appareil ne sont pas couverts par la garantie Cet appareil ne contient aucune partie remplaçable par l utilisateur pour toute intervention contactez votre revendeur Soyez prudent risque photo biologique Attenti...

Страница 3: ...at compact s intégrera facilement pour un grand nombre d applications Spécifications Techniques Alimentation 100 230V 50 60 Hz Consommation 30W Source 6 x 4W LEDS RVBW Optique 15 Mode Auto Audio Maitre Esclave DMX 7 chs Connecteurs DMX XLR 3 pins Dimensions 130 x 130 x 130 mm Poids 0 7Kg ...

Страница 4: ...tir du sous menu actif Up Pour défiler vers le haut dans le menu ou incrémenter la valeur de la fonction active Down Pour défiler vers le bas dans le menu ou décrémenter la valeur de la fonction active Enter Pour entrer dans le menu ou confirmer la fonction ou la valeur active ...

Страница 5: ...ique est validé même après extinction et ré allumage le projecteur reprend son dernier état validé MENU Menu Description Sous Menu Description Axxx Réglage de l adresse DMX A000 A512 Sélection de l adresse DMX de départ du projecteur Auxx Mode statique Au1 Au15 Sélection d une couleur fixe FFxx Mode Jump FF1 FF99 de lent à rapide CCxx Mode Fade CC1 CC99 de lent à rapide EExx Mode Pulse EE1 EE99 de...

Страница 6: ...ches UP DOWN Appuyer sur ENTER pour valider la sélection EE01 le plus lent et EE99 le plus rapide FXXX Sélection du mode Strobe Appuyer sur la touche MENU jusqu à ce que FXXX s affiche Appuyer sur ENTER L afficheur indique F001 jusqu à F255 Sélectionner la vitesse souhaité avec les touches UP DOWN Appuyer sur ENTER pour valider la sélection F001 le plus lent et F255 le plus rapide AUTO Sélection d...

Страница 7: ...ontre sa présence est très vivement conseillée dans des espaces perturbés Scène grandes longueur de ligne studio TV etc Sa valeur est généralement de 120 Ohms Le bouchon est une prise XLR mâle dans laquelle est soudé entre 2 et 3 une résistance de120 Ohms de W Ce bouchon évite la réflexion des informations transmises lors de l utilisation de grandes longueurs de câbles RACCORDEMENT ÉLECTRIQUE Au m...

Страница 8: ...COULEUR ROUGE 3 000 255 COULEUR VERTE 4 000 255 COULEUR BLEU 5 000 255 COULEUR BLANCHE 6 STROBOSCOPE 000 009 PAS DE FONCTION 010 255 STROBE DE RAPIDE À LENT 7 MODE AUTOMATIQUE 000 050 PAS DE FONCTION 051 100 MODE JUMP 101 150 MODE FADE 151 200 MODE PULSE 201 250 MODE AUTO 251 255 MODE AUDIO ...

Страница 9: ... de fumée et de poussière il convient de nettoyer régulièrement les optiques internes et externes pour optimiser le flux lumineux Nettoyer le boîtier externe avec un nettoyant classique et un chiffon micro fibres Nettoyer les évents et les ventilateurs avec une brosse Nettoyer les optiques externes avec un nettoyant optique ou un nettoyant à vitres et un chiffon micro fibres régulièrement selon l ...

Страница 10: ...Page 10 NOTES ...

Страница 11: ...NOTES ...

Страница 12: ...GHOST 22 rue Édouard Buffard Z A C de la Charbonnière MONTEVRAIN 77771 Marne La Vallée Cedex 4 Tél 33 0 820 230 007 ...

Страница 13: ......

Страница 14: ...en device is not used or before cleaning Only handle the power cord holding it by the plug Never pull out the plug by tugging the power cord Make sure that the device is not exposed to extreme heat or dust Make sure that the available voltage is not higher than stated on the rear panel Make sure that the power cord is never crimped or damaged Check the device and the power cord from time to time M...

Страница 15: ...ll easily fit everywhere for a large choice of applications Technical specifications Power 100 230V 50 60 Hz Power consumption 30W Light Source 6 x 4W RGBW LED Optics 15 Mode Auto Audio Master Slave DMX 7 Chs DMX Connectors XLR 3pins Dimensions 130 x 130 x 130 mm Weight 0 7Kg ...

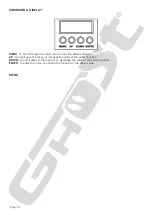
Страница 16: ...menu or exit the active sub menu UP To scroll up in the menu or increase the value of the active function DOWN To scroll down in the menu or to decrease the value of the active function ENTER To enter the menu or confirm the function or the active value MENU ...

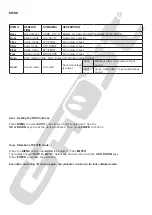
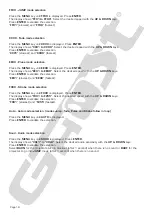
Страница 17: ...Soud Sound mode vol1 vol9 Sound sensitivi ty adjust bAon Blackout after 1 seconde without sound bAof Jump mode after 1 seconde without sound Axxx Setting the DMX address Press MENU to select AXXX press Enter to start adjustment Use the UP or DOWN keys to set the desired address Then press ENTER to confirm Auxx Selection of STATIC mode Press the MENU button until AUXX is displayed Press ENTER The d...

Страница 18: ...s ENTER to validate the selection EE01 slowest and EE99 fastest FXXX Strobe mode selection Press the MENU key until FXXX is displayed Press ENTER The display shows F001 to F255 Select the desired speed with the UP DOWN keys Press ENTER to validate the selection F001 slowest and F255 fastest Auto Auto mode selection modes Jump fade Pulse and Strobe follow in loop Press the MENU key until AUTO is di...

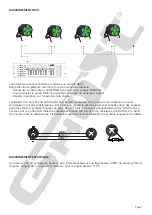
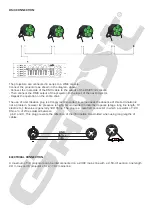
Страница 19: ...a problem however its presence is highly recommended in disturbed spaces stage long line length TV studio etc Its value is generally 120 Ohms The plug is a male XLR connector in which a resistor of 120 Ohms of W is soldered between pin 2 and 3 This plug prevents the reflection of the information transmitted when using long lengths of cables ELECTRICAL CONNECTION A maximum of 12 projectors can be i...

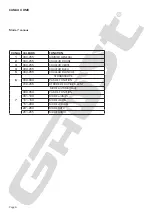
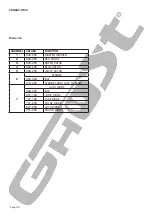
Страница 20: ...TER DIMMER 2 000 255 RED COLOR 3 000 255 GREEN COLOR 4 000 255 BLUE COLOR 5 000 255 WHITE COLOR 6 STROBE 000 009 IDLE 010 255 STROBE FROM FAST TO SLOW 7 AUTO MODE 000 050 IDLE 051 100 JUMP MODE 101 150 FADE MODE 151 200 PULSE MODE 201 250 AUTO MODE 251 255 SOUND MODE ...

Страница 21: ...ING Due to smoke and dust residues the internal and external optics should be cleaned regularly to optimize the light output Clean the outer casing with a conventional cleaner and a micro fiber cloth Clean the vents and fans with a brush Clean the external optics with an optical cleaner or glass cleaner and a micro fiber cloth regularly depending on the atmosphere of the place Clean internal optic...

Страница 22: ...NOTES ...

Страница 23: ...NOTES ...

Страница 24: ...GHOST 22 rue Édouard Buffard Z A C de la Charbonnière MONTEVRAIN 77771 Marne La Vallée Cedex 4 Tél 33 0 820 230 007 ...

Отзывы: