background image


G H A R I E N I   b e d s  

16 


Replace the water every six months, but no later than once a year. 

  Check the water cushions for leaks after filling them with water.  


  Water conditioner (enclosed) must be added to the water.  


The  water  cushions  have  a  pocket  (over  the  water  cushion),  into  which  the 
enclosed upper heating mat can be inserted. 


The  upper  heating  mat  has  two  connection  pipes;  the  longer  of  the  two  pipes 
must point toward the foot end. 


After  the  upper  heating  mat  has  been  slid  over  the  water  cushions,  both 
connections  of  the  upper  heating  mat  must  be  connected  to  the  connection 
bushes of the lower heating mat (ill. 10). 


The  heating  only  works  when  both  heating  mats  (upper/lower)  have 
been connected.


  Only  use  the  heating  mats  in  combination  with  the  filled  water  cushions, 

otherwise there is a risk of the lower heating mat overheating.   


The  heating  cables  must  be  run  under  the  water  cushions,  on  their  sides, 
without there being any tension on the cables.  


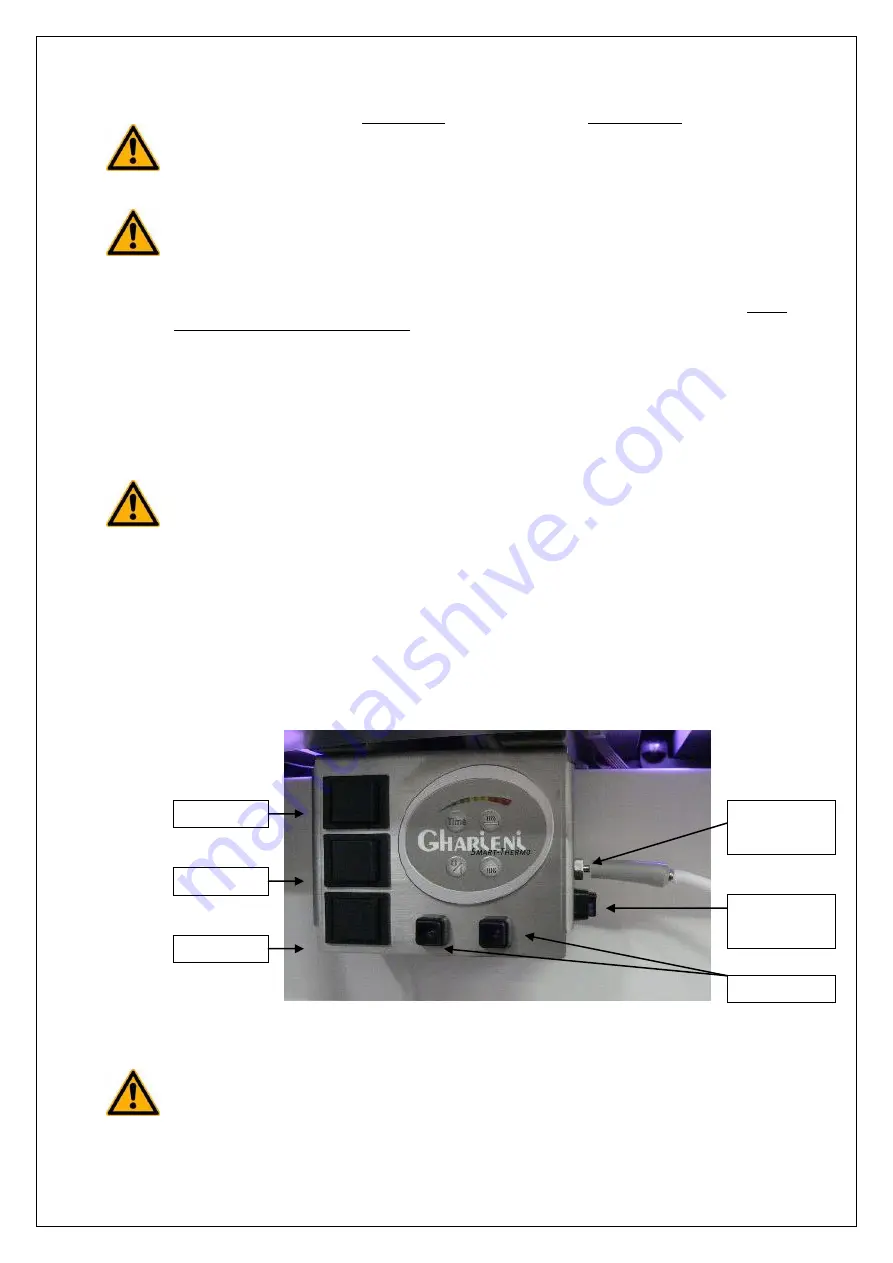
Both heating mats can be controlled from the heating control panel (ill.14). The 
heating parameters can be set according to your own preferences. 


Check the actual temperature before using the bed and unplug the bed from the 
mains supply if it will not be used for some time (e.g. during the night). 


          Ill. 14   

Control panel 


  Do not use the THERMO option in the following situations: with customers who 

have a pacemaker, who are pregnant, who suffer from thrombosis or from pains 
whose cause has not been identified. Only use the option on healthy people. 

Airback-1 

Airback-2 

Airback-3 

Light button 

Compressed 
air button 

Compressed 
air outlet 

Содержание AMPHIBIA

Страница 1: ...INSTRUCTIONS FOR USE AMPHIBIA TREATMENT BED Gharieni GmbH Gutenbergstra e 40 D 47443 Moers Tel 49 0 2841 88300 163 Fax 49 0 2841 88300 999 Service Hotline 49 0 2841 88300 40 E mail service gharieni de...

Страница 2: ...7 2 0 GENERAL 7 2 1 BEFORE FIRST USE TRANSPORT UNPACKING 8 2 2 TRANSPORT AIDS 8 2 3 INSTALLATION CONNECTION 9 2 3 1 SPACE REQUIRED 10 2 4 PARTS ENCLOSED 10 2 5 POWER SUPPLY 10 3 0 THE AMPHIBIA BED 10...

Страница 3: ...CESSORIES AYURVEDA MAT 19 6 0 OPTIONS 20 6 1 FOOT SWITCH 20 6 2 PROTECTIVE COVER WITH INSPECTION OPENINGS 20 6 3 AYURVEDA LINER 21 7 0 CLEANING AND MAINTENANCE 21 7 1 UPHOLSTERY CLEANING DISINFECTION...

Страница 4: ...collection site for recycling electronic and electrical devices Do not remove this symbol from the product 1 0 S a f e t y i n s t r u c t i o n s Danger of electric current Make sure that the power o...

Страница 5: ...original spare parts when making repairs 1 1 I n t e n d e d u s e The Gharieni MLW Amphibia is a versatile wellness treatment bed It can be used for cosmetic treatments or full body massages When th...

Страница 6: ...alled for personal safety They must not be removed modified or by passed REMEDY ANY DEFECTS IMMEDIATELY OR HAVE THEM REMEDIED IMMEDIATELY 1 5 D a n g e r s d u e t o m e c h a n i c a l e n e r g y Be...

Страница 7: ...environmental and waste disposal regulations of the country of use If you have any queries as regards disposal contact the local authorities responsible for waste disposal your dealer or Gharieni Gmb...

Страница 8: ...n cover You can then lift the sleeve up and put it aside 2 2 T r a n s p o r t a i d s Do not hold the bed by its upper structure headrest backrest armrests or leg rest to lift it If subjected to a fo...

Страница 9: ...ing the bed Caution collision of the inner shell with the outer shell After removing the carrying aids you must push the inner shell of the bed down again so that it rests on the steel structure of th...

Страница 10: ...has the right voltage 230 V 3 0 T h e A m p h i b i a b e d The Amphibia bed can be used either with water or foam cushions point 3 1 The treatment bed has four electric adjusting motors see General i...

Страница 11: ...sure that there is nothing between the parts of the bed which might get clamped 1 Height up Height down 2 Backrest up Backrest down 3 a Inclination up Inclination down b Store 4 Leg rest up Leg rest...

Страница 12: ...cm This height enables the customer to comfortably sit or lie on the bed from the side The height adjustment is operated electrically Press the corresponding function key on the hand switch first row...

Страница 13: ...ide and exert slight pressure to adjust the armrests downwards Pull the armrest up by hand to raise it override function This makes the bed extremely suitable for back massages ill 8 ill 8 4 5 S e a t...

Страница 14: ...a bed has a special construction enabling runners to be extended in order to move the bed Proceed as follows First move the backrest up as described using the hand switch Remove the cover from under t...

Страница 15: ...d be neither folded nor slipped down Risk of overheating no ok 5 1 F i l l i n g t h e w a t e r c u s h i o n s The water cushions can be removed individually and filled with water The cubic capacity...

Страница 16: ...nnected Only use the heating mats in combination with the filled water cushions otherwise there is a risk of the lower heating mat overheating The heating cables must be run under the water cushions o...

Страница 17: ...tch on the heating system The LEDs will flash The indicator flashes to indicate that the upper heating mat is ready for use This means that the heating mat is still off Step 2 Press the HMU upper heat...

Страница 18: ...g is approx 28 C 6 LEDs lit up If all 10 of the LEDs have lit up the temperature setting is 32 C You can switch off the heating by means of the On Off button the LEDs will flash 5 6 D i s p l a y i n...

Страница 19: ...ing to the same principle Ill 16 5 8 L i g h t i n g To set the lighting modes the control panel features one button for the upper and one for the lower lights ill 14 The following functions can be se...

Страница 20: ...rest Observe the Up and Down indications in the picture for the directions of movement Three of the four memory positions M1 M2 and M3 can be called up by foot switch operation by pressing the foot op...

Страница 21: ...th compressed air ill 14 approx 3 min by pressing the compressed air button Two valves which can be sealed to inflate or deflate the rim are located at the foot end ill 19b A hose is enclosed to conne...

Страница 22: ...ntent less than 30 Since we make use of different forms of upholstery which may consist of different materials we need details of the specific situation in order to tell you whether a given disinfecta...

Страница 23: ...ctly Check that the plug connection is correct Hand switch defective Remove the hand switch Fuse in the transformer defective Replace it by a new fuse Control box system fully down Replace 2 An indivi...

Страница 24: ...output 24 V Fuse 3 A slow acting Activation duration drive 10 max 2 min 18 min Mains lead 2 5 metres straight black Hand switch Coiled cable grey IP category I Safety class against electric shock typ...

Страница 25: ...2006 95 EG EMV Richtlinie 2004 108 EG Maschinenrichtlinie 2006 4 2 EG is produced in accordance with the requirement specified in Low Voltage Directive LVD 2006 95 EG electromagnetic compatibility 20...

Страница 26: ...G H A R I E N I b e d s 26 1 0 0 A p p e n d i x 1...

Отзывы: