background image

G-Cam/EWPC-2271 

Installation 


26 

D

e

u

tsch


6.6. Configuration in GEUTEBRÜCK GscSetup 

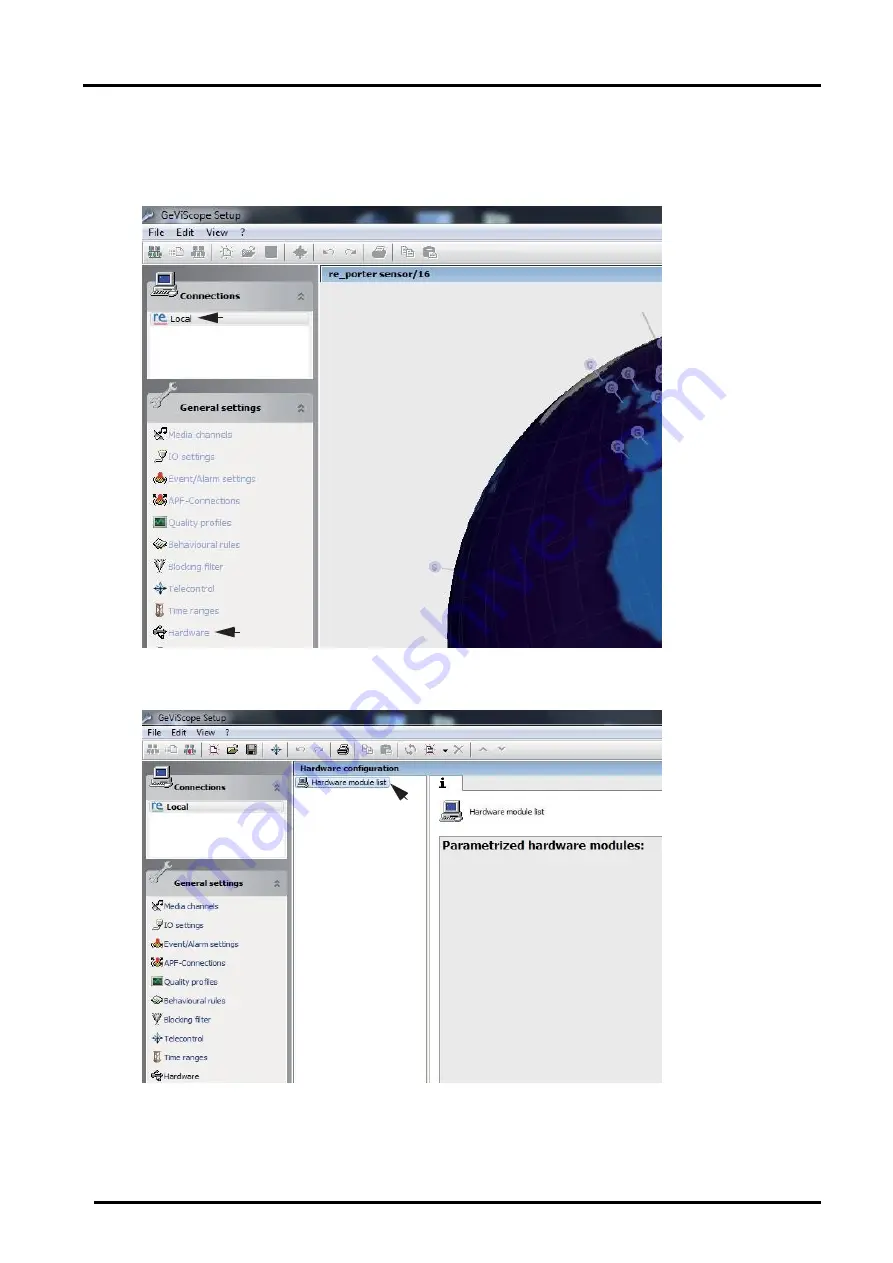
Start the software "

GscSetup

" by double clicking on the desktop icon. 


Double click on "

local

" (

1

). Click on "

Hardware

" (

2

). 

The 

“Hardware module list” will open. 


With a right click on "

Hardware module list

" (

1

) you will open a pop up window. 

Click on button "

Add

". A second pop up window appears. 

Содержание G-Cam/EWPC-2271

Страница 1: ...G Cam EWPC 2271 Full HD IR Bullet IP Camera Installation...

Страница 2: ......

Страница 3: ...ith DVRs could be disturbed heavily and can cause unliked and often alarms In some cases mechanical problems or defects can be the result of such vibrations like overheating of focus motors caused by...

Страница 4: ...ecycling of electrical and electronic equipment By proper waste handling of this product please ensure that it has no negative consequences for the environment and human health which could otherwise b...

Страница 5: ...l specifications Do not use strong or abrasive detergents when cleaning the camera body Use a dry cloth to clean the camera when it is dirty In case the dirt is hard to remove use a mild detergent and...

Страница 6: ...ributes 15 5 CONNECTIONS 15 6 CONFIGURATION 19 6 1 Set up network environment 19 Generic IP Environment 19 Custom IP Environment 20 6 2 View video on web page 21 6 2 1 View video using IPAdmin Tool 21...

Страница 7: ...deo H 264 Baseline Main High Profile MPEG 4 Part 10 AVC MJPEG Motion JPEG Max 30fps in 1080p Text Overlay Analog video output Network 10 100 Base T Ethernet Integration Software Development Kit SDK av...

Страница 8: ...The packaging contains The above contents are subject to change without prior notice Camera DC Power Adaptor Plugs Screws M4x30 and Plastic Anchors Hex Wrench 3mm Video Output Cable Silicon Waterproof...

Страница 9: ...pressing the button Reset button Use the button to restart the device or to reset it to Factory Default Refer to 6 3 Reboot and 6 4 Factory Default for more details microSD memory card slot Camera sup...

Страница 10: ...lling the camera 4 1 1 Installation without bracket Installation Template Unit mm Installation template s image size scale in this installation guide is not 1 1 The correct size template design paper...

Страница 11: ...S for the proper connections 6 Place the camera body on the installation surface by matching three alignment holes with already inserted plastic anchors 7 Tighten the plastic anchors with the screws M...

Страница 12: ...uce high frequency noise level The instructions and the image below explain how to install the ferrite core on the cable 1 Open the ferrite core by lifting the clip 2 Make one loop with the cable thro...

Страница 13: ...ion with adapter 5 02085 G Cam EBDA 200 only INSTALL TEMPLATE Anchor bolt tightening posinon 192 Center Cutting line WMB 3000 CMB 3000 This guide illustrates how to assemble the corner mount adapter a...

Страница 14: ...age to the video output cable socket and connect it to an analogue video test monitor to check if the camera angle has been set as intended If the angle is appropriate disconnect the camera from the a...

Страница 15: ...work connection Once the device is on the network and the webpage is open go to Setup Video Audio Zoom Focus Then the features shown below will appear 1 Adjust zoom and focus by clicking arrow buttons...

Страница 16: ...ers can configure the image attributes The menu of the image attributes is available at Video Appearance via the path Setup Video Audio Camera The following features can be adjusted Brightness Contras...

Страница 17: ...sound Refrain from connecting a headphone or an earphone directly to the camera Microphone In Max 2 Vp p 20K 90dB Loudspeaker Out 60mW 16 95dB Mic Amp Speaker ETHERNET MICRO SD DC12V DO DI 1 Out Out...

Страница 18: ...hrough the camera s webpage Input voltage range 0VDC minimum to 5 VDC maximum max 50mA Do not exceed the maximum input voltage or relay rate Alarm DO connection Only the relay type is supported Relay...

Страница 19: ...a hub or a router in the network When the device is connected in network the orange LED blinks while green LED Refer to Appendix B Power over Ethernet for more information Power Connection The camera...

Страница 20: ...y view the live streaming images on a web page using the device s default IP address 1 Convert the device s MAC address to the IP address Refer to the Hexadecimal Decimal Conversion chart at the end o...

Страница 21: ...rea 1 Find the device from the IPAdminTool s list and highlight the device s name 2 Right click the mouse select IP Address The IP Setup window appears 3 Modify the last two digits of the device s IP...

Страница 22: ...ons Depending on system OS and Internet Explorer version installation experience may differ from one another Figures described above are from Windows 7 Internet Explorer 9 environment 6 2 1 View video...

Страница 23: ...input box This page opens after clicking on Setup on the home page Whether directly accessing the streaming video by typing the IP address on a web page or taking steps through IPAdminTool ActiveX is...

Страница 24: ...button for more than 2 seconds Otherwise the camera may be switched to its factory default settings On the webpage 1 Go to Setup Maintenance Reboot on the camera s webpage 2 Click Reboot A dialog box...

Страница 25: ...the camera s webpage 2 Select the items among network settings user account information and time zone setting to keep from the factory default 3 Click Reset All Settings A dialog box will appear to as...

Страница 26: ...uired for system booting are damaged There are conflicts in the system settings How to recover your system from Safe Mode The messages above will appear on the webpage when your device has been reboot...

Страница 27: ...p Start the software GscSetup by double clicking on the desktop icon Double click on local 1 Click on Hardware 2 The Hardware module list will open With a right click on Hardware module list 1 you wil...

Страница 28: ...hosen module 1 appears as IP Camera Plugin 001 in the Hardware module list see next figure The name can be changed e g G Cam_E001 Camera 1 Click the icon on the toolbar to send your choice to the serv...

Страница 29: ...els 1 A list of the available media channels appears Click the icon Add 2 on the toolbar to add a new media channel Mark the new media channel with click 3 Choose IP camera plugin E2 IPC in the menu M...

Страница 30: ...make advanced settings like the streaming behaviour see following screenshots Please note that the configurations made here will overwrite the webbrowser configurations PTZF Move doesn t apply to Box...

Страница 31: ...ease note that the configurations made here will overwrite the webbrowser configurations Close the GSCSetup software Start the GSCView software with a double click on the desktop icon GSCView By click...

Страница 32: ...an be ordered using General settings Options in G Set After clicking on Options the options dialog opens with the first tab which shows an overview of the available options The dialog shows the four t...

Страница 33: ...n the G Set configuration menu Step 1 Connection to a server To connect G Core with a local or remote server Double click on a connection available under Connections in the selection menu or In the Co...

Страница 34: ...ect the desired camera by clicking the tick box changes to green and edit the general information and the camera specific data NOTE If you want to control a PTZ camera the tick box PTZ in the menu Cha...

Страница 35: ...defined for your cameras Please confirm your settings by clicking the button Save Finish IMPORTANT For settings to take effect they must be sent to the server by clicking the icon You can find the tra...

Страница 36: ...CBR Baseline main high profile MPEG 4 Part 10 AVC MJPEG Picture rate full resolution MJPEG 30 fps H 264 30 fps Resolution 1920 x 1080 1280 x 720 960 x 540 640 x 360 Video Streaming Single Dual Protoco...

Страница 37: ...Technical alterations reserved 22 02 2021 www geutebrueck com...

Страница 38: ...in such places where AC powers cannot be reached or is expensive to wire Power Comparison Property 802 3af 802 3at Available Power 12 95 W 25 50 W Max Power by PSE 15 40 W 34 20 W Max Current 350 mA 6...

Страница 39: ...G Cam EWPC 2271 Installation 38 APPENDIX C DIMENSIONS Unit mm...

Страница 40: ...5 0E 14 33 51 58 88 7D 125 A2 162 C7 199 EC 236 0F 15 34 52 59 89 7E 126 A3 163 C8 200 ED 237 10 16 35 53 5A 90 7F 127 A4 164 C9 201 EE 238 11 17 36 54 5B 91 80 128 A5 165 CA 202 EF 239 12 18 37 55 5C...

Страница 41: ...s and classifies moving and stationary targets and features a full suite of rule based filters including enter exit appear disappear stopped objects directionality constraints object counting loiterin...

Страница 42: ...r disappar filters Stopping filter Abandoned Objectfilter Removed filter Tallgating filter Logical rules People tracker Colour filter Heat map Using the intuitive web based configuration application i...

Страница 43: ......

Страница 44: ...G Cam EWPC 2271_IA_EN 22 02 2021 Technical alterations reserved GEUTEBR CK GmbH Im Nassen 7 9 D 53578 Windhagen Tel 49 0 2645 137 0 F ax 999 E mail info geutebrueck com Web www geutebrueck com...

Отзывы: