CAMERA TRACKING CONFERENCE SYSTEM
35
CAMERA TRACKING CONFERENCE SYSTEM
36
Meeting Mode:
Meeting:
Card: to hold the meeting with IC card.
Cardless: to hold the meeting without IC card
Unit Speaker: To turn on/off speaker
Buzzer: To turn on/off buzzer in the main controller.
Priority Tone: To turn on/off the tone when using chairman priority.
Speaking QTY: to setup the maximum of speaking units.
Speaking QTY: to setup the maximum QTY of speaking units(including
Chairman).
Chairman QTY: to setup the maximum QTY of speaking chairman unit.
Note: Chairman QTY can be more than speaking QTY.
Advanced Setup
Defaulted password is blank.
Discussion Mode: Camera tracks the last turned on unit.
Auto Mode: Camera tracks the speaking unit.
Chairman Mode: Only Chairman unit can be turned on.
All On Mode: All the units can be turned on. No limitation for speaking QTY.
Queue: Select first in first out or last in last out for the queue.
Voice Control: to turn ON/OFF sound control function. If click sound
control(ON), mic unit will be turned on when speaking to the mic.
Priority Setup: Manual Recover, Auto Recover
Manual Recover: Delegate units will be off when pressing the chairman
priority once. Delegate units need to be turned on manually by pressing
the ON/OFF button.
Auto Recover: Delegate units will be off when long pressing the chairman
priority button. Delegate units will be on again when releasing the priority
button.
Auto Off: to turn off the microphone automatically if the chairman or
delegate do not speak in certain time. 0S means this function is not
activated
Time Off: to turn off the microphone compulsively by the set certain time.
All unit addressing: addressing all unit by entering a starting number. For
instance starting from number 1,click “setup”, by pressing the turn on
button on each unit, the units will be set in default subsequent number.
The first one is unit number 1, followed by unit number 2, unit number will
increase in an ascending order till all units are set, and reboot main
controller.
(Normally the process of unit addressing will be done
during installation, no need to setup during operation)
Certain Unit Addressing: Addressing for additional unit. For example, when
there are 100 units for the system, input “101” & connect a new unit to the
system then click Setup. The new unit address will be “101” accordingly.
Note: All the units' cables must be disconnected when setting.
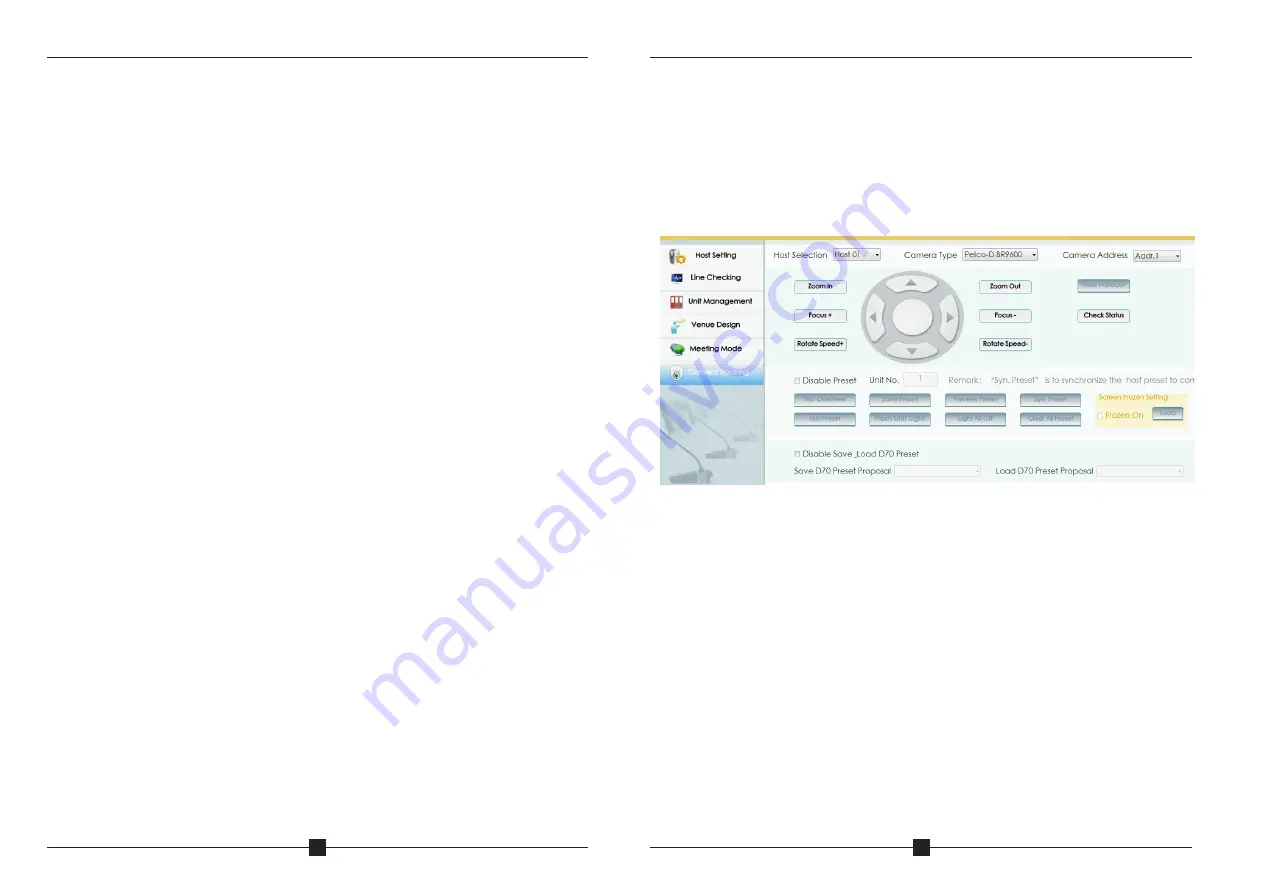
Camera Tracking
Host ID setup: Firstly connect only one controller to PC, then revise host ID
and restart controller.
C a m e r a t y p e : P e l c o - D / P e l c o - P / S o n y ( b a u d r a t e : 9 6 0 0 ) / Ya a n ( b a u d
rate:4800);
Camera address: Select needed camera to operate.
Different ID should be allocated when more than one main controller are
cascaded. When only one main controller is in use, main controller ID should
set as 1.
Setup preset point:
For example, the camera is set to focus on the position of unit number 1,
enter desired preset number (here is 1) at the unit column, click button “Save
Preset” to save setup. Following the routine to complete the rest preset point
setup. System default preset point number is zero (0), when all units off,
camera will set to track this specific position, normally it is the full view of the
meeting room. When clicking “Unit Light On”, the light loop of currently
operated units will flash during preset point setup, to allow operator to focus
on the unit easily. After saving the setup, clicking button “Test Preset” to
check if the preset point of specific unit is set correctly.


