background image

7

NRS 2-3

MAX

MIN

OFF

ON

8

7

9 10 11 12 13 14 15

17

16

6

5

4

3

2

1

Technical Data  

– continued –

Dimensions

Fig. 1

67.7

80

80

88

207

 6

NRS 2-3

MAX

MIN

OFF

ON

69

45.3 (9TE)

28.5

(TE = division units)

( TE = 5.08 mm) 

Содержание NRS 2-3

Страница 1: ... NRS 2 3 Installation Instructions 810414 02 Level Switch Type NRS 2 3 GESTRA Steam Systems ...

Страница 2: ...y Notes Scope of supply 5 System description 5 Function 5 Designs 5 Design b 10 Design c d 10 Tools 10 Installation Electrical Connection Design b 11 Wiring diagram for design b 11 Design c d 12 Wiring diagram for design c d 12 Attention 12 Key to wiring diagram 13 NRS 2 3 6 Dimensions 7 Technical Data NRS 2 3 8 Key 9 Functional Elements ...

Страница 3: ...mp ON 14 Adjusting switchpoint Pump OFF 14 Adjusting switchpoint High Level 15 Note 15 Table switchpoints 15 Contents continued Commissioning Page Danger 16 Note 16 Correct switchpoints 16 Check power 16 Operation Danger 17 Fault finding list for troubleshooting 17 Operational Malfunctions Declaration of conformity 18 Annex ...

Страница 4: ... be performed by entrusted personnel who through adequate training have achieved a recognised level of competence ATEX Atmosphère Explosible The equipment constitutes a simple item of electrical equipment as defined in DIN EN 50020 section 5 4 According to the European Directive ATEX 94 9 EC the equipment may only be used in potentially explosive atmospheres if it is provided with approved Zener b...

Страница 5: ...vel voltage across V3 is lower than the reference voltage relay 3 is de energized and the red LED A illuminated If the level voltage across V3 is higher than the reference voltage relay 3 is energized and the red LED A extinguishes V2 works as switching controller e g for the boiler feed pump If the level voltage across V2 is lower than the reference voltage relay 2 will switch on the pump The yel...

Страница 6: ...e measuring range of level transmitter Indicators and adjustors 1 red LED high level 1 red LED low level 1 yellow LED pump on 1 green LED pump off 4 adjustors for high level low level and pump on off Protection IP 10 to DIN EN 60529 Max admissible ambient temperature 0 C to 70 C Case 19 slide in unit with front panel to DIN 41494 part 5 and rear 32 way Euro card connector to DIN 41612 installed in...

Страница 7: ... NRS 2 3 MAX MIN OFF ON 8 7 9 10 11 12 13 14 15 17 16 6 5 4 3 2 1 Technical Data continued Dimensions Fig 1 67 7 80 180 88 207 6 NRS 2 3 MAX MIN OFF ON 169 45 3 9TE 128 5 TE division units 1 TE 5 08 mm ...

Страница 8: ... IP 10 NRS 2 3 MAX MIN OFF ON 8 7 9 10 11 12 13 14 15 17 16 6 5 4 3 2 1 NRS 2 3 MAX MIN OFF ON Functional Elements NRS 2 3 Fig 2 K L J F E A B C D I H MAX 95 MAX 70 C ...

Страница 9: ... LED Pump off D LED High Level E Adjustor for high level F Adjustor for pump off H Adjustor for pump on I Adjustor for low level J Fixing screws K Screw type terminal strip L 32way Euro card connector Functional Elements continued Key ...

Страница 10: ...nting panel and align 3 Insert matching screws and fasten Design c d 1 Install guide rails and screw type connector into 19 mounting panel 2 Insert 19 slide in unit into the guide rails until it hits the stop 3 Fasten the fixing screws J Tools n Screwdriver for slotted screws size 2 mm 5 mm completely insulated to VDE 0680 ...

Страница 11: ...ia the two screw type terminal strips Use screened two core cable conductor size 0 5 mm2 max cable length 150 m for the supply of the level transmitter Wiring diagram for design b 4 3 2 5 1 Fig 3 Example of fill control with second level indicator G 2 5 A ...

Страница 12: ...sign c d 4 3 2 5 1 Fig 4 Attention Protect the control circuit with a 2 5 A slow blow fuse Connect screen only to the assigned terminal of the switch The screen must not make any other electrical contact When switching off inductive loads voltage spikes are produced that may impair the operation of control and measuring systems Inductive loads should therefore be provided with commercial arc suppr...

Страница 13: ...Level transmitter output 4 20 mA 2 High level 3 Water level controller fill control 4 Low level LED red green 5 Connection for another device e g NRR 2 3 Key to wiring diagram Electrical Connection continued ...

Страница 14: ...t stop slowly to the right just until the red LED A lights up Adjusting switchpoint Low Level 1 Raise the water level in the tank until the desired switchpoint for the feedpump is reached 2 Turn the adjustors F and H to the left stop 3 Turn the adjustor H from the left stop to the right until the yellow LED B lights up 4 Turn the adjustor F to the right stop The green LED C is not illuminated Adju...

Страница 15: ...llowing table Switchpoint above the lowest water level Low level mm Pump on mm Pump off mm High level mm Table switchpoints Note You can directly change the switchpoints over the whole measuring range of the level transmitter by using the adjustors I for low level H for pump on and E for high level To avoid confusion of the switchpoints during commissioning we recommend that the above mentioned se...

Страница 16: ...the adjustor H to the right or the adjustor I for low level to the left Signal high level too frequently Raise the switchpoint high level or lower the switchpoint pump off Turn the adjustor E to the right or the adjustor F to the left If it is not possible to make this rectification install a time relay to delay the signal low level by 2 to 20 sec Correct switchpoints Check power Danger The termin...

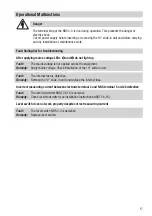
Страница 17: ...current between electrode terminal 2 and NRS terminal 5 or A22 defective Fault The level transmitter NRGT 26 1S is defective Remedy Check level transmitter see installation instructions NRGT 26 1S Level switch does not work properly despite correct measuring current Fault The level switch NRS 2 3 is defective Remedy Replace level switch Danger The terminal strip of the NRS 2 3 is live during opera...

Страница 18: ...ich are based on the following harmonised standards LV standard EN 60947 5 1 1991 73 23 EC version 93 68 EC EMC standard EN 50 081 2 EN 50 082 2 This declaration is no longer valid if modifications are made to the equipment without consultation with us Bremen 28th April 1997 GESTRA AG Quality Assurance Representative Walter Meyer Head of the Design Dept Dipl Ing Uwe Bledschun Academically qualifie...

Страница 19: ...19 For your notes ...

Страница 20: ...997 GESTRA AG Bremen Printed in Germany Agencies all over the world www gestra de GESTRA AG Münchener Straße 77 28215 Bremen Germany Telefon 49 421 3503 0 Telefax 49 421 3503 393 E Mail info de gestra com Web www gestra de ...

Отзывы: