background image

16

MANUTENZIONE - MAINTENANCE - ENTRETIEN - WARTUNG - 

MANUTENCIÓN - ОБСЛУЖИВАНИЕ - ΣΥΝΤΗΡΗΣΗ - 

保养

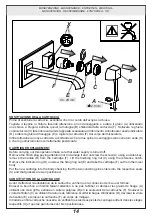
PULIZIA / SOSTITUZIONE DELL’AERATORE

Prima di effettuare tale operazione assicurarsi che l’acqua della rete idrica sia chiusa.

Nel caso l’erogazione non fosse fluida svitare l’aeratore utilizzando la chiave in dotazione ed estrarlo dalla 

propria sede. Se l’aeratore fosse otturato è sufficiente sciacquarlo con acqua corrente, senza utilizzare 

detergenti. Nel caso fosse danneggiato è possibile sostituirlo e rimontare il tutto nella sequenza inversa.

AERATOR CLEANING / REPLACING

Before carrying out this operation make sure that water supply is turned off. 

If the supply is not fluid unscrew the aerator using the wrench supplied and remove it from its seat. If the 

aerator is clogged just rinse it with running water, without using detergents. If it is damaged just replace it 

and assemble everything in the opposite sequence.

NETTOYAGE / SUBSTITUTION DE L’AERATEUR

Avant d’effectuer la substitution de la cartouche, vérifier que la connexion de l’eau est fermée. 

Si le débit n’est pas fluide dévisser l’aérateur utilisant la clé fournie et l’extraire de son siège. Si l’aérateur 

est obstrué il suffit de le rincer à l’eau courante, sans utiliser de détergents. S’il est abîmé on peut le 

remplacer et tout remonter dans la séquence inverse.

REINIGUNG / AUSTAUSCH DES BELÜFTERS

Bevor man die Kartusche austauscht muß man sich vergewissern, dass das Wasserversorgungsnetz 

geschlossen ist. 

Falls die Strömung ungenügend flüssig ist, schrauben Sie den Belüfter über den mitgelieferten Schlüssel 

ab und entfernen Sie ihn von seinem Sitz. Falls der Belüfter verstopft ist, genügt es, ihn mit fließendem 

Wasser auszuspülen, ohne Waschmittel anzuwenden. Falls er beschädigt ist, ersetzen Sie ihn, und 

danach montieren Sie die ganzen Bestandteile in umgekehrter Reihenfolge wieder.

Содержание MIMI 44865

Страница 1: ...a Vercelli Italy Phone 39 0163 454111 Facsimile 39 0163 459273 www gessi com gessi gessi it PROGRAMMA MISCELAZIONE BAGNO BATH MIXING PROGRAM PROGRAMME DU MITIGEUR POUR LA SALLE DE BAIN BAD MISCHUNGSPR...

Страница 2: ......

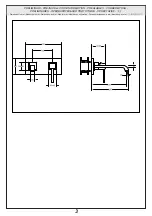
Страница 3: ...3 PRELIMINARI PRE INSTALLATION INFORMATION PR ALABLES VORBEREITUNG PRELIMINARES Dimensioni in mm Measures in mm Dimensions en mm Ma im mm Medidas en mil metros mm...

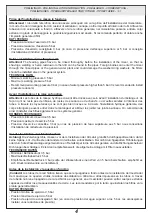
Страница 4: ...tubes A travers les tuyauteries qui ne sont pas bien rinc es ou travers l installation hydrique g n rale des corps trangers peuvent entrer dans le m langeur et ab mer les joints les joints anneau On...

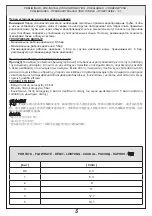
Страница 5: ...IMINARI PRE INSTALLATION INFORMATION PR ALABLES VORBEREITUNG PRELIMINARES 0 5 5 3 5 0 5 bar 5 bar 3 bar 5 bar 0 5 5 3 5 PORTATA FLOW RATE D BIT LEISTUNG CAUDAL bar l min 0 5 4 5 1 6 3 2 9 3 11 4 12 7...

Страница 6: ...6 PRELIMINARI PRE INSTALLATION INFORMATION PR ALABLES VORBEREITUNG PRELIMINARES A B C D E F G H M L...

Страница 7: ...A Plaque de finition B Levier complet C Enceinte cartouche D Bouche de d bit E Rondelle de finition F Raccordement pour corps interne G Bague indicateur H Virole en finition L Plaque de fixation M Vis...

Страница 8: ...8 INSTALLAZIONE INSTALLATION INSTALLATION INSTALLATION INSTALACI N Fig 3 Fig 1 Fig 4 Fig 2 3 mm 3 mm 3 mm...

Страница 9: ...9 INSTALLAZIONE INSTALLATION INSTALLATION INSTALLATION INSTALACI N Fig 7 Fig 5 Fig 8 Fig 6 3 mm 3 mm 2 mm...

Страница 10: ...0 INSTALLAZIONE INSTALLATION INSTALLATION INSTALLATION INSTALACI N Fig 11 Fig 9 Fig 12 Fig 10 Non in dotazione Not supplied Non fournie Nicht mitgelieferte Excluida del suministro GRASSO GREASE 2 5 mm...

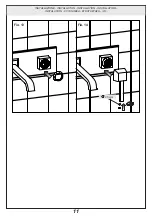
Страница 11: ...11 INSTALLAZIONE INSTALLATION INSTALLATION INSTALLATION INSTALACI N Fig 13 Fig 14 2 5 mm...

Страница 12: ...12 FUNZIONAMENTO WORKING FONCTIONNEMENT FUNKTIONST TIGKEIT FUNCIONAMIENTO Fig 15 Fig 16 OFF ON HOT MIX COLD...

Страница 13: ...Complete lever 2 Cartridge fastening ring nut 3 Cartridge 4 Aerator Pi ces de rechange 1 Levier complet 2 Virole de fixation cartouche 3 Cartouche 4 Mousseur Ersatzteile 1 Bediengriff komplett 2 Vers...

Страница 14: ...nd unscrew the screw A using an Allen key remove the handle B from the cartridge F Lift the finishing ring nut C using the reference notch Remove the indicator ring D unscrew the fixing ring nut E and...

Страница 15: ...Schlie lich eine neue Kartusche einsetzen wobei man sich vergewissert dass sich die beiden Zentrierstifte in ihrem Sitz X befinden und das die Dichtungen korrekt positioniert sind SUSTITUCI N DEL CART...

Страница 16: ...is damaged just replace it and assemble everything in the opposite sequence NETTOYAGE SUBSTITUTION DE L AERATEUR Avant d effectuer la substitution de la cartouche v rifier que la connexion de l eau es...

Страница 17: ...cerrada En el caso de que la erogaci n no fuese fluida destornillen el aireador utilizando la llave incluida en el suministro y extr iganlo de su propio asiento Si el aireador resultara atascado es s...

Страница 18: ...18 NOTE NOTES NOTES ANMERKUNG NOTAS...

Страница 19: ......

Страница 20: ...ET 42972 R0...

Отзывы: