background image

P.10

P.11

5. Operation Instructions

5. Operation Instructions

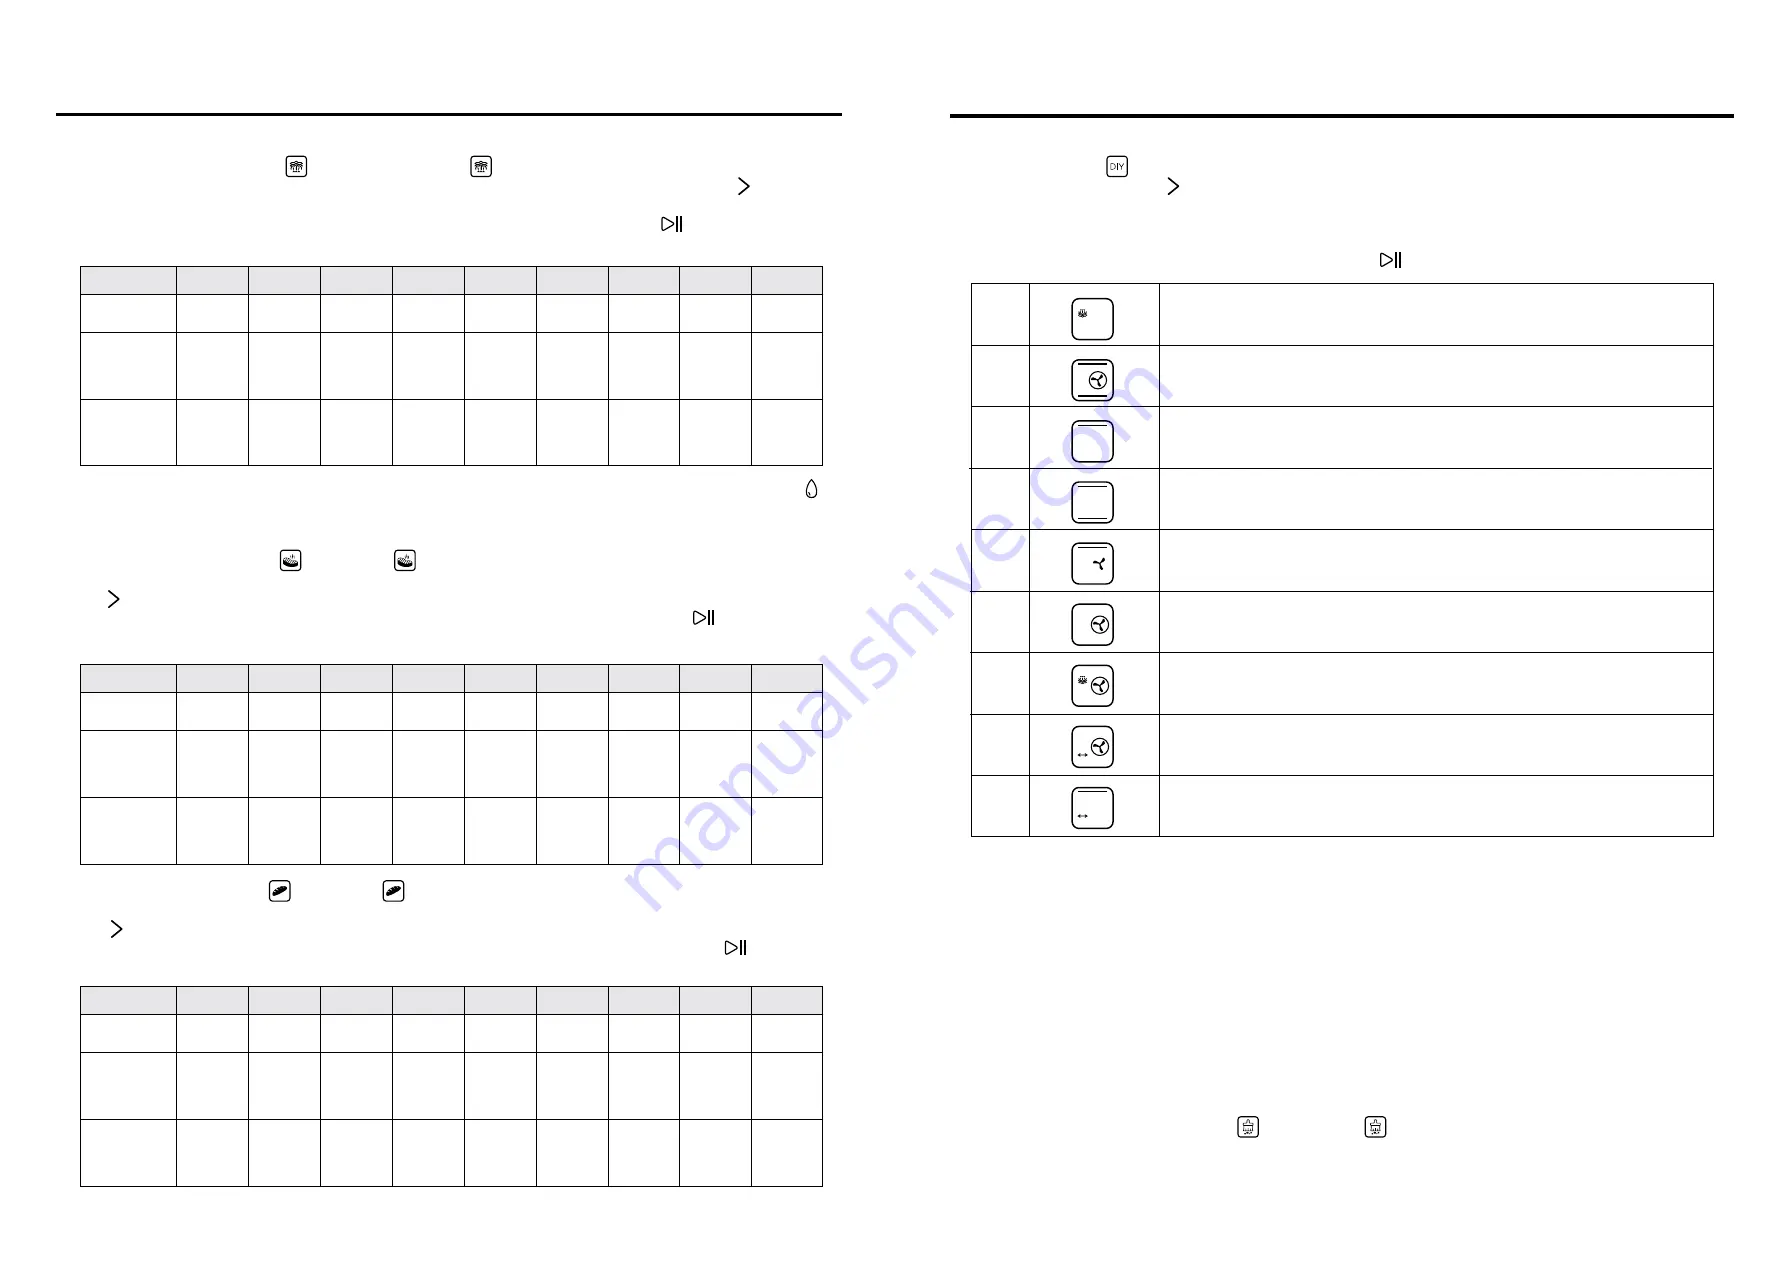
6) When this menu “Steam”       is selected, icon is ON      . The temperature display column will show  

    “E-1” while the time display column will show the working time.  Press the selection key “     ” the  

    temperature display column will show“E-1”, “E-2”, “E-3” … “E-9”.. “E-1” (order cycle), and the        

    corresponding time column will show the required time. Press the ENTER key “   ”, the machine will   

    start and the timer begins count down.

9) When the menu       is selected, the “steam” function icon in the upper left corner will switch ON.   

    Press the selection key “     ”to enter the function selection mode.  The display column at the left side  

    of the screen will show the corresponding function icon, as shown in the following figure. There are  

    9 DIY regular function modes.  Each light corresponds to an oven function, the selection key chooses   

    the different oven functions.  The selected function icon will flash, after the desired function is      

    selected, it can be confirmed by press the ENTER key “ 

 ” .  

The DIY function adjusts the time and temperature.

Steam mode:

The preset temperature is 100 degrees and the adjustable temperature range is 50-110 ° C, each 

interval 5 ° C.
The preset time is 30 minutes and the adjustable time range is 6 hours and 59 minutes.

Other modes:

The preset temperature is 180 degrees and the adjustable temperature range is 100-230 ° C, each 

interval 10 ° C.
The preset time is 30 minutes and the adjustable time range is 3 hours and 59 minutes.

10) When the menu “Descaling” is       selected, the       icon is ON.  (Working time is not adjustable  

       set at 50 minutes, the function cannot be paused)

7) When the menu “Roast”        is selected,        icon is ON. The temperature display column will show  

    “F-1” while the time display column will show the required working time.  Press the selection key  

    “     ”, the temperature display column will show “F-1”,“F-2”, “F-3” … “F-9”.. “F-1” (order cycle), and  

    the corresponding time column will show the required time.  Press the ENTER key “   ”, the machine  

    will start and the timer begins count down.

Note:

 Fill the tank to its maximum capacity before using the steam function. The water tank indicator  

          indicates the water level. When the water tank is full of water, it will light up. When the water tank    

          is short of water, it will flash. All the buttons will be locked and will not resume after adding water.

8) When the menu “Bake”       is selected,       icon is ON. The temperature display column will show  

    “H-1”, while the time display column will show the required working time.  Press the selection key  

    “      ”, the temperature display column will show “H-1”,“H-2”, “H-3” … “H-9”.. “H-1”(order cycle)     

    and the corresponding time column will show the required time.  Press the ENTER key “   ” , the  

    machine will start and the timer begins count down.

Code

Food Style

Heating 

Time 

(Minute)

Steam 

Vegetable 

Steam

Rice

Steam

Fish

Steam 

Shrimp


Steam 

Crab


Steam 

Eggs


Steam 

Chicken

Steam 

Papaya


Steam 

Potatoes

Heating 

Temperature

E - 1       E - 2          E - 3 

E - 4       E - 5         E - 6 

E - 7       E - 8          E - 9

16

100

50

100

20

100

15

100

30

100

16

100

30

100

35

100

30

100

Code

Food Style

Heating 

Time 

(Minute)

Roast 

Chicken 

Roast 

Beef

Roast 

Potatoes

Roast 

Salmon


Roast 

Chicken 

Legs


Roast 

Saury


Roast 

Chips

Roast 

Shrimp


Roast 

Sausages

Heating 

Temperature

F - 1       F - 2          F - 3 

F - 4       F - 5         F - 6 

F - 7       F - 8          F - 9

35

230

12

230

35

200

20

220

26

200

20

220

12

180

15

180

10

200

Code

Food Style

Heating 

Time 

(Minute)

Baguette 

Bread 

Wheat 

Bread

Pizza

Yogurt 

Cheese 

Cake


Chiffon 

Cake

Chocolate 

Cake


Cookies

Puff


Egg Tart

Heating 

Temperature

H - 1       H - 2        H - 3 

H - 4      H - 5         H - 6 

H - 7       H - 8        H - 9

16

180

20

180

22

180

60

150

50

150

50

150

14

180

30

180

22

180

1

3

2

4

5

6

7

8

9

Steam Mode 

(Convection mode + Upper grill mode + Lower grill mode) 

Upper grill mode

Dual grill mode

Upper grill mode + Convection fan 

Back grill convection mode (Back grill mode + Convection fan)

Steam + Back grill convection mode

Turning Fork + Back grill convection mode 

Upper grill mode + Turning fork

Содержание SGV-3921F

Страница 1: ...U 6SSL GPNB 6SSL Please read these instructions and warranty information carefully before use and keep them handy for future reference Online Warranty Registration 2 in 1 Free Standing Steam Oven SGV 3921F SGV 3921R U S E R M A N U A L ...

Страница 2: ...door with a soft and wet cloth rather than any sharp cleaning tools to prevent the damage to the oven door glass 8 The appliance cannot be operated when connected to an external timer or an independent remote control system 9 Please do not share an outlet with other high power electrical devices to avoid a fire caused by the overload of the circuit 10 Please check whether all cooking utensils are ...

Страница 3: ...roduct 9 Do not place this product on or near the tablecloths curtains and other flammable materials 10 A free space of at least 10cm shall be reserved on the back and two sides and over the product when the product is placed Do not place any item on the product 11 The product in use must be watched 12 A high temperature steam or high temperature airflow will be released when you open its door dur...

Страница 4: ...In any programs standby mode press this key to enter the preset mode and preset icon is ON 2 After any programs working end Press this key to enter the time delay function sates and the time delay icon is ON BACK Key Press this key to return to the previous setting mode before start working and press it again to return again Selection Key Left Arrow 1 Select 9 DIY regular function modes and 10 spe...

Страница 5: ...ycle Thecorresponding time column will show the requiredtime Press the ENTER key 5 Dry fruits or bake nuts When this menu is selected icon is ON the temperature display column will show L 1 and the time display column will display the required working time Press the selection key the temperature display column will show L 2 L 3 L 4 L 9 L 1 order cycle The corresponding time column will show the re...

Страница 6: ...will show F 1 F 2 F 3 F 9 F 1 order cycle and the corresponding time column will show the required time Press the ENTER key the machine will start and the timer begins count down Note Fill the tank to its maximum capacity before using the steam function The water tank indicator indicates the water level When the water tank is full of water it will light up When the water tank is short of water it ...

Страница 7: ...eted Timer and temperature adjustment during operation During the Cooking Baking Roasting Process if you want to adjust the cooking time or temperature the operation is as follows 1 Press Setting key until the Time delay icon on the screen is ON At this time the minute display will flash The minute functions can be adjusted by pressing the selection key setting hour is not available for delay time...

Страница 8: ... steam emission is slower than before or not as smooth or if the steam is found to have white powdery residues try adding citric acid or white vinegar to the storage tank and then start the steam oven to remove the scale from the pipe After performing these steps normal operation should resume If the amount of water scale is too high perform this procedure repeatedly After the procedure s it is re...

Страница 9: ... D 498 mm 39 L 1 使用前注意事項 2 安全注意事項 3 產品結構 4 控制面板 5 操作說明 6 清潔與維護 7 故障排除 8 技術規格 9 保用條款 18 19 20 21 23 28 29 30 31 目錄 Specifications are subject to change without prior notice If there is any inconsistency or ambiguity between Chinese and English version the English version shall prevail Refer to www germanpool com for the most updated version of the User Manual ...

Страница 10: ...造成使用者燙傷 15 每次使用蒸氣焗爐後 必須取出並清空水箱 從設備中排出殘留的水 16 不要將食物放在密封容器中加熱 例如密封瓶 盒裝牛奶等 因為它可能會爆開 必須撕開包裝 並將食物放入其他容器中加熱 17 請將蒸氣焗爐放在850毫米以上的檯上 警告 1 請勿把產品外殼放在水中沖洗 因為外殼中有電氣元件 2 不要讓水或其他液體進入產品 以避免觸電 3 本產品可供8歲及以上兒童及身體 感官或精神能力下降 缺乏經驗和知識的人使用 如他們已接 受監督或指示 並了解所涉及的危害 兒童不可玩耍 清潔和維護本產品 4 連接到電源之前 請檢查產品電壓是否與電源電壓相符 5 插頭 電源線或產品如有破損 請勿使用本產品 6 如果電源線損壞 必須由製造商或合格的維修技師更換 以避免危險 7 請確保兒童不得玩耍本產品 8 請勿用濕手使用插頭或操作產品 9 請勿將本產品放在桌布 窗簾和其他易燃材料附近 10 放...

Страница 11: ...按鍵 功能鍵 功能鍵 爐燈 童鎖鍵 1 觸按一次 爐燈亮起 再次觸按 爐燈關閉 2 工作結束後 爐燈亮3分鐘 3 爐門打開時 爐燈將亮3分鐘 4 按住三秒鐘即可轉為童鎖鍵 待機模式時 按一次鎖定 再按開鎖 設置鍵 預設和延時 1 在任何程序待機模式下 按此鍵進入預設模式 和預設圖標亮起 2 任何程序結束後 按此鍵進入延時功能 延時圖標亮起 返回鍵 在啟動工作前按此鍵一次 可返回上一個設置模式 如此類推 選擇鍵 向左 1 倒序選擇9種DIY功能模式和10種預設模式 2 減少時間 3 減少溫度 開關 取消鍵 待機狀態時 按此鍵開機點亮所有圖標 啟動或工作狀態下 按此鍵退 出運行模式 返回待機狀態 選擇鍵 向右 1 順序選擇9種DIY功能模式和10種預設模式 2 增加時間 3 增加溫度 輸入鍵 1 啟動 2 暫停 3 輸入 1 2 3 4 5 6 7 DY 7 6 I C ...

Страница 12: ...成 顯示面板將顯 示 END 蜂鳴器將發出10次蜂鳴聲 表示預熱已完成 您可以繼續烘烤操作 3 乳酪 默認溫度為45 時間為8小時 均不可調節 4 氣炸 9個程式可以選擇 選擇此菜單時 顯示面板將顯示 P 1 和所需的工作時間 按選擇 鍵 將顯示 P 2 P 3 P 9 和相應所需的時間 循環顯示 按輸入鍵 蒸 氣焗爐開始工作 計時器開始倒計時 5 乾果或堅果 9個程式可以選擇 選擇此菜單時 顯示面板將顯示 L 1 和所需的工作時 間 按選擇鍵 將顯示 L 2 L 3 L 9 和相應所需的時間 循環顯示 按輸入鍵 蒸氣焗爐開始工作 計時器開始倒計時 C 程式 菜式 加熱時間 分鐘 豬扒 雞翼 雞肉串 洋蔥肉丸 皮塔餅 薯片 麵包塊 迷你薄餅 煙肉 加熱溫度 C P 1 P 2 P 3 P 4 P 5 P 6 P 7 P 8 P 9 20 210 23 200 18 180 18 180 7...

Страница 13: ...選擇 鍵 將顯示 H 2 H 3 H 9 和相應所需的時間 循環顯示 按輸入鍵 蒸 氣焗爐開始工作 計時器開始倒計時 E 1 E 2 E 3 E 4 E 5 E 6 E 7 E 8 E 9 16 100 50 100 20 100 15 100 30 100 16 100 30 100 35 100 30 100 F 1 F 2 F 3 F 4 F 5 F 6 F 7 F 8 F 9 35 230 12 230 35 230 20 230 26 200 20 220 12 180 15 180 10 200 H 1 H 2 H 3 H 4 H 5 H 6 H 7 H 8 H 9 16 180 20 180 22 180 60 150 50 150 50 150 14 180 30 180 22 180 5 操作說明 9 DIY模式 選擇DIY模式後 左上角的 蒸氣 圖標亮起 按選擇鍵 進入...

Страница 14: ...示 例如 5 操作說明 4 運行期間的操作 暫停工作 在操作過程中 按下輸入鍵 工作將暫停 倒計時暫停 顯示界面閃爍 表示蒸氣焗 爐處於暫停狀態 再次按輸入鍵 可恢復運行 直到烹飪完成 運行期間調節時間和溫度 在烹飪過程中 如果您想調整烹飪時間或溫度 操作如下 1 按住設置 鍵直到延時圖標 亮起 此時 分鐘顯示將閃爍 按選擇鍵 和 可以調節分鐘 小時無法調節 2 調整分鐘後 按輸入鍵 進入溫度調節 如果您不需要調節溫度 請按 直接開始操作 5 工作完成 1 工作結束後 顯示面板出現 END 並且蜂鳴器會發出10次嗶聲 表示烹飪已完成 之後 你可 以打開門取出食物 系統在五分鐘後自動進入待機狀態 2 工作結束後 暫停或停止工作 或待機狀態時 只要爐的內部溫度超過50 顯示屏將顯示高溫 提示圖標 風扇會繼續工作3分鐘 3 使用蒸氣功能之後 清除水垢提示 會閃爍1分鐘 提醒用戶取出水箱 排出蒸發...

Страница 15: ...數至10分鐘 時 應再一次更換水 清除水垢程序 1 當發現蒸氣速度比之前緩慢或不順 或者發現噴出的蒸氣帶有白色粉末 可嘗試在儲水箱中加入 檸檬酸或白醋 再啟動蒸氣焗爐以清除管道中的水垢 完成後便可回復正常運作 如水垢過多 可以反覆除水垢 完成除水垢後 建議使用純淨水運行一次 2 假如產品完全沒有噴出蒸氣 很有可能喉管已因積聚過多水垢而嚴重淤塞 蒸氣完全無法通過 應儘快聯絡維修人員進行維修 3 建議用戶應每個半至兩個月進行一次上述的清水垢程序 7 故障排除 錯誤 Er1 Er2 Er3 Er4 Er7 Er8 顯示屏沒有 顯示 爐燈不亮 散熱風扇不 工作 按鍵失靈 不出蒸氣 蒸氣焗爐不 工作 爐門漏氣 可能原因 頂部傳感器開路 頂部傳感器短路 底部傳感器開路 底部傳感器短路 底部傳感器開路 底部傳感器短路 1 電源插頭堵塞 2 接觸不良 1 爐燈損壞 2 接觸不良 1 接觸不良 2 風扇損壞...

Страница 16: ...l purchaser 1 未能出示購買發票正本者 將不獲免費維修服務 2 用戶應依照說明書的指示操作 本保用並不包括 上門安裝 檢驗 維修或更換零件之人工以及 一切運輸費用 因天然與人為意外造成的損壞 包括運輸及其他 電源接合不當 不依說明書而錯誤或疏忽使用本 機所引致之損壞 3 於下列情況下 用戶之保用資格將被取消 購買發票有任何非認可之刪改 產品被用作商業或工業用途 產品經非認可之技術人員改裝或加裝任何配件 機身編號被擅自塗改 破壞或刪除 4 總代理有權選擇維修或更換配件或其損壞部份 5 產品一經被轉讓 其保用即被視作無效 機身號碼 Serial No 購買商號 Purchased From 發票號碼 Invoice No 購買日期 Purchase Date 型號 Model No 另請填妥以下表格並與正本發票一併保存 以便維修時核對資料 用戶提供之所有資料必須正確無誤 否則免費保...

Страница 17: ...ax 86 757 2980 8318 8th Xinxiang Road Wusha Industrial Park Daliang Shunde Foshan Guangdong 3 F Edificio Industrial Pou Fung 145 Rua de Francisco Xavier Pereira Macau Tel 853 2875 2699 Fax 853 2875 2661 Macau All rights reserved Copying reproducing or using the contents of this manual is not allowed without prior authorization from German Pool violators will be prosecuted HONG KONG TOP BRAND TEN Y...

Отзывы: