background image


38 

3.10  Configuring the IP Address 

The GV-Hot Swap Surveillance System V6 supports remote monitoring, control and 

configuration over a network connection. The following default IP addresses will automatically 

be assigned. 


192.168.0.200 

(All models)


192.168.0.201 

(Only available for GV-Hot Swap NVR / VMS / Recording Server System)


192.168.0.202

 (Only available for GV-Hot Swap Recording Server System) 


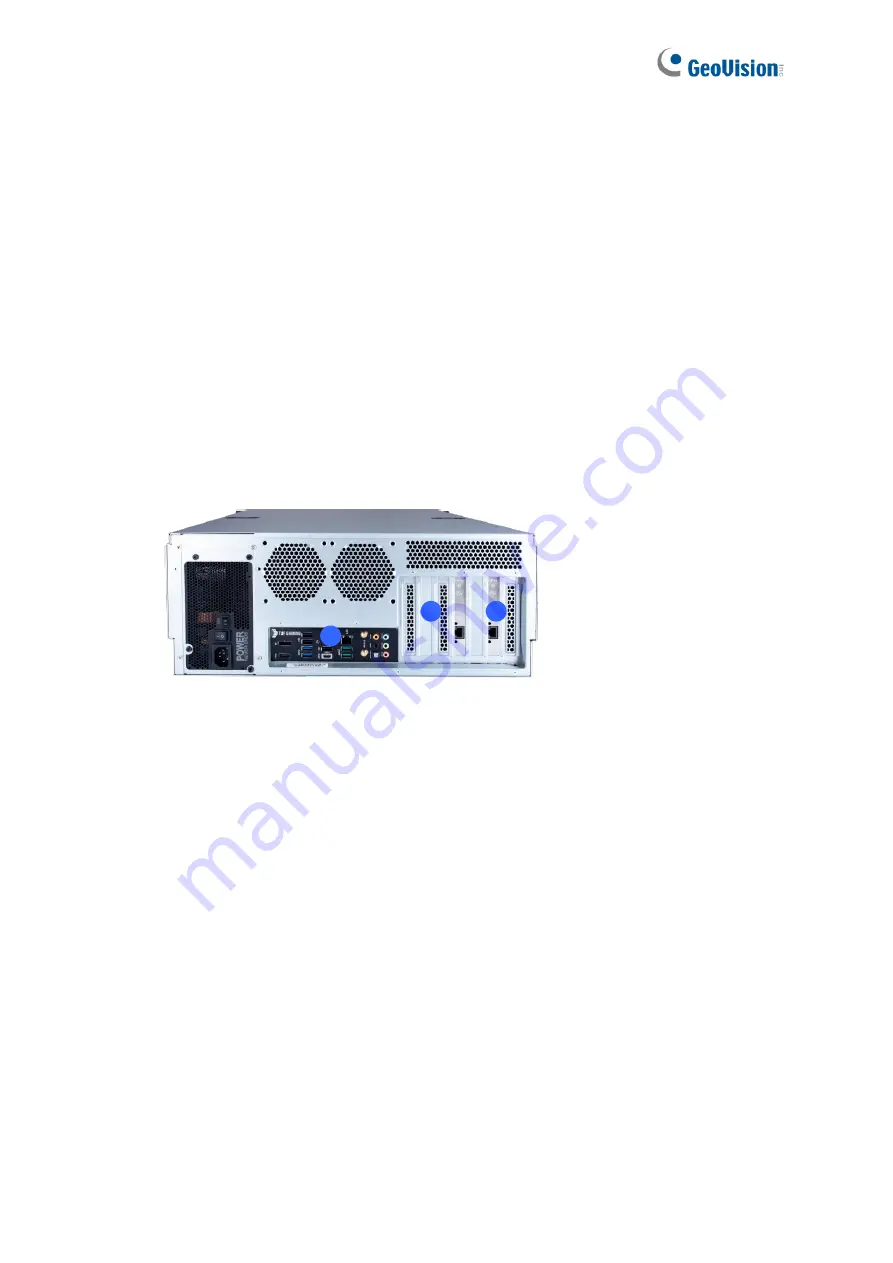
The system supports up to 3 Ethernet ports. The number of Local Area Connection is 

assigned from the left to the


right. Here we use the 4U (20-bay) model of GV-Hot Swap 

Recording Server System as illustration. 

Local Area Connection 1

Default IP: 192.168.0. 200

Default Subnet Mask: 255.255.252.0

Local Area Connection 2

Default IP: 192.168.0. 201

Local Area Connection 3

Default IP: 192.168.0. 202

1

3

2


Figure 3-27


Содержание GV-VMSH Pro

Страница 1: ...GV Hot Swap Surveillance System V6 User s Manual HV6 UM A ...

Страница 2: ...tal or consequential damages arising from the use of the information or products contained herein Features and specifications are subject to change without notice GeoVision Inc 9F No 246 Sec 1 Neihu Rd Neihu District Taipei Taiwan Tel 886 2 8797 8377 Fax 886 2 8797 8335 http www geovision com tw Trademarks used in this manual GeoVision the GeoVision logo and GV series products are trademarks of Ge...

Страница 3: ...em V6 Chapter 1 Introduction Identifies the GV Hot Swap Surveillance System V6 s accessories and options Chapter 2 Overview Identifies the GV Hot Swap Surveillance System V6 s components Chapter 3 Getting Started Provides step by step instructions on setting up the GV Hot Swap Surveillance System V6 Chapter 4 Troubleshooting Suggests courses of action if the GV Hot Swap Surveillance System V6 does...

Страница 4: ...ew 7 2 1 1 4U 20 Bay Models 7 2 1 2 2U 12 8 Bay Models 8 2 2 LED Panel View 10 2 2 1 4U 20 Bay 2U 12 Bay Models 10 2 3 Rear View 11 Chapter 3 Getting Started 12 3 1 Basic Installation 12 3 2 Turning on the Power 13 3 3 Installing the Hard Drive 15 3 4 Installing the Sliding Rail Kit 16 3 4 1 For 2U 8 12 Bay Models 16 3 4 2 For 4U 20 Bay Models 20 3 5 Windows Setup Installation 22 3 6 Formatting th...

Страница 5: ... Setting Pop up Alert 47 3 12 5 Setting Pop up Positions 48 3 12 6 Setting Live View with Pop up Alert 49 3 13 Extended Installation 50 3 13 1 GV Keyboard V3 50 3 13 2 I O Devices 52 3 13 3 Gigabit Network Cards 53 3 13 4 Redundant Power Supply 54 3 14 System Restoration 56 3 15 Updating GV Hot Swap Surveillance System V6 57 Chapter 4 Troubleshooting 64 Specifications 64 Appendix 66 A Supported IP...

Страница 6: ...e coming soon Notice The back panel of GV Hot Swap Surveillance System V6 is subject to change without prior notice Please see the GV DVR NVR User s Manual GV VMS User s Manual or the GV Recording Server User s Manual for the software operation of GV Hot Swap System V6 ...

Страница 7: ... Drive for details 20 Bay Models 8 Bay Models 12 Bay Models 2 Before recording you need to divide your hard disks into 4 storage groups and each group is assigned with an equal number of cameras See 3 6 Setting Up the Video Storage Location for details 3 The H 265 CPU and GPU decoding are only supported by GV NVR V8 7 0 0 and GV VMS V15 11 0 0 or later versions ...

Страница 8: ... area with unstable voltage make sure to install an automatic voltage regulator AVR or a UPS power supply with AVR function to maintain a constant voltage All damages to the power supply caused by unstable voltage are not included in the 2 year warranty service Do not defeat the safety purpose of the grounding type plug A grounding plug has two blades and a third grounding prong The third prong is...

Страница 9: ... may expose you to dangerous voltage and void the warranty Do not replace batteries with ones of unsuited specifications as which may be subjected to risk of explosion Only dispose batteries in accordance to the battery disposal regulations set in your country and or region ...

Страница 10: ...MSH V6 GV 32 channel digital video recorder Has the options of 4U 20 bay and 2U 12 8 bay hot swap SATA drive bays Extends compatibility to GeoVision IP Devices only GV VMSH V6 up to 32 channel GeoVision IP Devices and third party IP devices digital video recorder Has the options of 4U 20 bay and 2U 12 8 bay hot swap SATA drive Bays GV VMSH Pro V6 GV 64 channel digital video recorder Has the option...

Страница 11: ...in GV NVRH V6 GV VMSH V6 and GV Hot Swap Recording Server System 1 2 Packing List The GV Hot Swap Surveillance System V6 package includes the following items If any of the items are missing or damaged contact your dealer to arrange a replacement Important Please keep the original carton and all packing materials for future shipping need GV Hot Swap System V6 AC Power Cord Sliding Rail Kit for GV H...

Страница 12: ...m third party IP devices Increment for Each License 2 to 32 3rd party IP cameras in increments of 2 Dongle Type Internal 1 3 2 GV Hot Swap VMS System GV VMS V17 for Free 32 GV Channels GV IP Devices Only 32 ch No license required 64 ch GV VMS Pro license required 32 ch per license GV 3rd Party IP Devices 16 ch Trial Version 16 channels of 3rd party IP devices 32 ch 3rd Party license required in in...

Страница 13: ...le or Software License 1 3 3 GV Hot Swap Recording Server System Free License N A Maximum License 256 channels Increment for Each License 1 GV IP video devices only 8 16 32 36 40 44 48 52 56 60 64 68 72 76 80 84 88 92 96 100 104 108 112 116 120 124 128 132 136 140 144 148 152 156 160 164 168 172 176 180 184 188 192 196 200 204 208 212 216 220 224 228 232 236 240 244 248 252 256 IP channels 2 Third...

Страница 14: ...sks For system efficiency we recommend the following enterprise level hard disk drives Avoid using desktop level or green HDD which may affect system efficiency Seagate Enterprise Series WD Gold Level Series WD Ultrastar Series ...

Страница 15: ...nd it can also be connected with PTZ cameras directly for PTZ control This device is not supported by GV Recording Server Gigabit Network Card For 4U models Gigabit Network Card is provided with two options of 1 Gb single port card and 2 port 10 Gb 20 Gb card The number of network cards supported varies based on models and combination of the RAID card For more information contact with our sales re...

Страница 16: ...7 Note The optional accessories will be built in the GV Hot Swap Surveillance System V6 and tested before shipment Opening the case and installing the accessories yourself will void the warranty ...

Страница 17: ...iew 2 1 1 4U 20 Bay Models 4 3 2 1 6 7 5 8 Figure 2 1 No Name No Name 1 USB 2 0 Type A Port USB 3 1 Type A Port 5 HDD Group A 2 Power Button 6 HDD Group B 3 Reset Button 7 HDD Group C 4 LED Panel See 2 2 LED Panel View for details 8 HDD Group D ...

Страница 18: ...ls 2 1 2 1 12 Bay Models 4 5 6 7 8 3 2 1 Figure 2 2 No Name No Name 1 USB 3 1 Type A Port x 2 5 HDD Group A 2 Reset Button 6 HDD Group B 3 Power Button 7 HDD Group C 4 LED Panel See 2 2 LED Panel View for details 8 HDD Group D ...

Страница 19: ...Overview 9 2 2 1 2 2 8 Bay Models HDD 1 HDD 2 HDD 3 HDD 4 HDD 5 HDD 6 HDD 7 HDD 8 Figure 2 3 For details on the other features of the front panel see Figure 2 1 ...

Страница 20: ...model 2 2 1 4U 20 Bay 2U 12 8 Bay Models 1 2 3 4 5 Figure 2 5 No LED Description 1 Power LED The LED shines when the power is on 2 OS HDD Activity LED The LED shines when the OS HDDs are writing or reading data 3 LAN LED Not functional 4 HDD Power LED The LED shines yellow after the HDD is installed 5 HDD Activity LED The LED shines green if the HDD is reading or writing data ...

Страница 21: ...he rear panel x 1 6 Audio Jack x 6 Center Speaker Out Orange Rear Speaker Out Black Optical S PDIF Out Line In Blue Line Out Green Mic In Pink 7 Not functional x 2 8 USB 3 2 Type C x 1 9 USB 3 2 Type A x 4 Note The rear panel view is based on the 20 bay VMS NVR System model The rear panels on the 8 bay and 12 bay models are identical as the figure shown above with the only difference being the num...

Страница 22: ...and the other end to the power outlet using the supplied power cord 3 Connect the monitor using the HDMI DisplayPort cable supplied by the monitor manufacturer 4 Connect one end to the Ethernet port and the other end to Network using the RJ 45 cable 5 Connect speakers to the Audio Line Out port Note The monitor you use must be capable of having a screen resolution of 1280 x 1024 and display color ...

Страница 23: ... on the power follow these steps 1 Turn on the monitor Power On Figure 3 2 2 For 4U 20 bay models turn on the AC power switch on the rear panel first 4U 20 Bay Models Power Switch Figure 3 3 Note The figure of 4U model is for reference only the rear panel may vary due to product enhancement 3 Turn on the main power switch on the front panel Power Button Figure 3 4 ...

Страница 24: ... LAN To add an IP camera to the system see Adding IP Video Devices Chapter 5 in the Quick Start Guide GV Hot Swap VMS System pops up the Automatic Setup dialog box To add an IP camera to the system see Adding IP Video Devices to GV VMS Chapter 6 in the Quick Start Guide GV Hot Swap Recording Server System pops up login Web interface See Chapter 7 in the Quick Start Guide Note The series of self te...

Страница 25: ...5 Formatting the Hard Drive for details 1 Slide the release latch to the right The drawer handle pops up Figure 3 5 2 Pull out the drive drawer 3 Insert the hard drive in the drawer 4 Secure the hard drive with the 4 screws included in the drawer and make sure all screw heads flush with the surface Figure 3 6 5 Put the drawer back in the drive bay of the System and push the latch until it locks Th...

Страница 26: ...ers to mount the GV Hot Swap Surveillance System V6 onto the server rack With its tool less design users can easily place the models for a more organized space allocation 3 4 1 For 2U 8 12 Bay Models 1 Pull the slide open Press the trigger down and pull the chassis inner member out ...

Страница 27: ...r member of the pre performed bayonets on both sides of the chassis Push back the inner member to allow the rail slide to be fixed to the rackmount chassis Make sure the spring clip installation has been completed on the rackmount chassis when finishing the step ...

Страница 28: ...stag into the upper and lower square holes on EIA rail from the back of rail Push the safety lock forward to secure the bracket Make sure to check if the safety lock is in unlocked position before mounting the brackets ...

Страница 29: ...er into the cabinet member as shown below Make sure to check if the ball retainer is in a fully open position before installing the chassis Release the slide from locking position by pressing the trigger down when pushing the chassis back to the cabinet ...

Страница 30: ...20 3 4 2 For 4U 20 Bay Models 1 Install chassis ear kit onto both sides of the model 2 Pull out the inner rail of the sliding rail and secure it on both sides of the model ...

Страница 31: ...server rack and secure the front and rear with screws 4 Pull out the middle part of the rails align the inner rails onto the chassis and slide the chassis into the server tack until the quick release handle on the ear kit snaps into place with the server rack ...

Страница 32: ...ws setup is preparing your computer for first use 1 After the Windows starts this setup screen appears Select your language and click Next to continue Figure 3 7 2 Select your regional settings and time zone and click Next to continue Figure 3 8 ...

Страница 33: ... that you create a password for your account and click Next Figure 3 9 When the above setup process is complete Windows will finalize your settings automatically in the background and restart IMPORTANT In case of any problems causing you unable to access Windows operating system it is highly recommended to back up the OS before you start any settings or operations For details see 3 13 System Resto...

Страница 34: ...hard drives separately for formatting Do not install and format more than one hard drive at a time Depending on the model of your choices install and format the hard drives in alphabetical order as indicated below 20 Bay Models 8 Bay Models 12 Bay Models Figure 3 10 ...

Страница 35: ...r Management window appears 2 On the main page of Disk Management the Initialize Disk dialog box appears for the new drive Click the created disk and select a partition style Figure 3 11 3 Click OK The created disk is successfully initialized 4 On the main page of Disk Management right click in the unallocated space of a new drive and select New Simple Volume Figure 3 12 ...

Страница 36: ...6 5 The New Simple Volume Wizard appears Click Next to continue Figure 3 13 6 The default partition size is the same as the maximum disk space Make changes if necessary Click Next to continue Figure 3 14 ...

Страница 37: ...7 Assign a drive path that is not in use by other devices and click Next to continue Figure 3 15 Note The default drive path starts from D 8 Type a name in the Volume label box ex HDD1 and click Next to continue Figure 3 16 ...

Страница 38: ...When the formatting is complete click Finish to close the wizard Figure 3 17 10 When the drive is successfully initialized partitioned and formatted its status description should display Healthy Figure 3 18 ...

Страница 39: ...he users of GV Hot Swap NVR VMS System create 4 storage groups and assign the specified hard drives and camera channels in the storage group according to the tables below Take the 4U 20 bay 64 channel model as an example you should assign hard drive D E F G H to Storage Group 1 and then assign camera 01 16 to be recorded in Storage Group 1 4U 20 bay GV Hot Swap NVR VMS System Storage Group 1 Stora...

Страница 40: ...ls 12 16 for receiving 256 channels storage groups and assign the specified hard drives and camera channels in the storage group according to the tables below Storage arrangement for receiving 128 channels 4U 20 bay Storage Group 1 Storage Group 2 Storage Group 3 Storage Group 4 Storage Group 5 Storage Group 6 Storage Group 7 Storage Group 8 D E I J N O S T F G K L P Q U V H M R W 128 channel Came...

Страница 41: ...3 Storage Group 14 Storage Group 15 Storage Group 16 L M N O P Q R S 129 256 channel Camera 129 144 Camera 145 160 Camera 161 176 Camera 177 192 Camera 193 208 Camera 209 224 Camera 225 240 Camera 241 256 2U 12 bay Storage Group 1 Storage Group 2 Storage Group 3 Storage Group 4 Storage Group 5 Storage Group 6 D E F G H I 1 132 channel Camera 01 22 Camera 23 44 Camera 45 66 Camera 67 88 Camera 89 1...

Страница 42: ...ton in the top left corner The first storage group is created by default 4 To assign hard drives to a storage group click the Add button above Path and select folders to be assigned to the storage group D Record E Record F Record G Record H Record Figure 3 21 5 Click OK to apply the settings The Record Setting dialog box appears 6 To assign cameras to a storage group select the cameras and select ...

Страница 43: ...te a storage group click the Add Storage Group icon The first storage group is created by default 3 To assign hard drives to a storage group click the Add New Path icon and select folders to be assigned to the storage group 4 To assign cameras to a storage group select cameras under Camera of Selected Storage Note one camera can only be added to one storage group 5 Click OK to apply the settings ...

Страница 44: ... Bullet Camera15 Bullet Camera16 Bullet Camera17 Bullet Camera18 Figure 3 23 2 To create a storage group click the Add button The first storage group is created by default 3 To assign hard drives to a storage group click the Add button above Storage Path and select folders to be assigned to the storage group 4 To assign cameras to a storage group type a range of camera number and click the Select ...

Страница 45: ...creen provides a quick indication of the activity status of hard disk drives Figure 3 24 LED Color Description Gray No HDD is assigned to this LED GV System is not started Green A HDD is assigned to this LED Red The HDD is full Flashing Green GV System is recording Flashing Red The HDD is recycling 1 Go to C GV NVR or C GV VMS folder and double click MediaManTools exe Figure 3 25 ...

Страница 46: ...em 3 By default only the hard disk drive F will be assigned to LED If you want to re assign the hard disk drive or assign other drives to LEDs freely drag and drop the hard disk drive to the desired LED on the tree 4 Click OK to apply the settings and minimize the MediaMan Tools window to display the LED panel on the screen 5 If you want to return to the MediaMan Tools window right click the LED p...

Страница 47: ...ty LED No 2 Figure 2 5 is off 2 Slide the release latch to the right The drawer handle pops up 3 Pull out the drawer slightly and wait until the hard drive spins down 4 Pull out the drawer completely remove the hard drive and then mount a new one 5 Screw the hard drive and make sure all screw heads flush with the surface 6 Put the drawer back in the drive bay and slide the release latch again ...

Страница 48: ... Recording Server System 192 168 0 202 Only available for GV Hot Swap Recording Server System The system supports up to 3 Ethernet ports The number of Local Area Connection is assigned from the left to the right Here we use the 4U 20 bay model of GV Hot Swap Recording Server System as illustration Local Area Connection 1 Default IP 192 168 0 200 Default Subnet Mask 255 255 252 0 Local Area Connect...

Страница 49: ...notification area and select Open Network and Sharing Center Figure 3 28 2 Click Change Adapter Settings from the left hand side menu of the Network and Sharing Centre window 3 Under Network Connections select a network connection you want to configure its IP address Figure 3 29 4 Select Internet Protocol Version 4 TCP IPv4 and then click Properties Figure 3 30 ...

Страница 50: ... an IP address automatically to enable dynamic IP address Figure 3 31 6 Click OK to finish the setting Note For models with multiple Ethernet ports it is recommended to assign IP channels received and clients transmitted into different networks Refer to Appendix B Assigning Network Cards for more details ...

Страница 51: ...Control Panel window click Adjust Screen Resolution under the Appearance and Personalization section This dialogue box appears Figure 3 32 3 Click the Display list If you do not see multiple monitors listed check if your additional monitors are connected with the system properly 4 Select the primary monitor from the list and select Make this my main display 5 Select additional monitors from the li...

Страница 52: ...efine the live view monitor in the MultiCam tab select Monitor 1 from the Select Monitor drop down list 12 Click the desired application tab to move the application to the monitor For example select the ViewLog tab and Monitor 2 from the Select Monitor drop down list 13 Click OK The live view should appear on monitor 1 After you open the ViewLog player it will be displayed on monitor 2 For details...

Страница 53: ...f you have multiple monitors connected select the monitor you want to configure from the drop down list Position Offsets the position of the GV VMS window relative to the upper left corner of the screen The default position is 0 0 A position of 100 60 will place the GV VMS window 100 pixels to the right and 60 pixels below the upper left corner This function is only supported when the GV VMS windo...

Страница 54: ...nned pages with different screen divisions and channels for each monitor Pop up Alert You can be alerted by pop up live videos when motion is detected or I O devices are triggered 3 12 1 Activating Multiple Monitors Use Windows Display Property to activate multiple monitors 1 Follow Steps 1 to 6 in 3 10 Multi View Display to configure the additional monitors 2 Start the GV NVR click the Configure ...

Страница 55: ...ct Digital Matrix Setting This dialog box appears Figure 3 37 2 Use the Display list to select the monitor to be configured 3 Select Screen Division 4 Drag and drop the camera numbers to the desired positions on the divisions To clear the assignment drag and drop the C icon to that position 5 Select Live Mode 6 Repeat above steps to configure other monitors 7 Click OK to apply the settings ...

Страница 56: ...an 4 Select Screen Division 5 Drag and drop the camera numbers to the desired positions on the divisions To clear the assignment drag and drop the C icon to that position 6 Specify Dwell Time for how long this scanned page remains on the monitor 7 Repeat Steps 2 to 5 to configure more scanned pages for the specific monitor 8 Repeat Steps 1 to 7 to configure scanned pages for other monitors 9 In th...

Страница 57: ... Popup Dwell Time Specify the amount of time that a pop up live video remains in the foreground Popup Interruption Interval Specify the interval between camera pop ups This option is useful when several cameras are activated for pop up alert at the same time 3 Use the Display list to select other monitors for setup 4 After above settings click the Matrix icon and return to Figure 3 37 5 Select Eve...

Страница 58: ...le monitors are placed close to each other Example Camera 1 Camera 2 Camera 3 Camera 4 and Camera 5 are assigned for pop up alert on both Monitor 1 and Monitor 2 Monitor 1 is set at 4 screen divisions When the five cameras are triggered at same time the first 4 cameras show up on Monitor 1 and the 5th on Monitor 2 2 Parallel Mode This mode allows the same cameras simultaneously pop up on different...

Страница 59: ...in 3 11 2 Setting Live View 2 To configure pop up alert in the upper left column click Event Popup Figure 3 40 appears 3 Configure Motion Trigger I O Trigger Popup Dwell Time and Popup Interruption Interval for each monitor For details see 3 11 4 Setting Pop up Alert 4 Click the Matrix icon and return to Figure 3 37 Ensure the Live Mode option is selected 5 Click OK The live view mode you configur...

Страница 60: ...Supply 3 13 1 GV Keyboard V3 Note that this function is not supported by GV Hot Swap Recording Server System The optional GV Keyboard V3 is designed to operate the GV Hot Swap NVR VMS System exclusively Using the USB cable supplied with the GV Keyboard V3 plug one end into the GV Keyboard V3 and the other end into any one of the USB ports on the back of the System you can operate the Keyboard imme...

Страница 61: ...ter the System starts up the Keyboard controller dialog box will automatically appear and start service The dialog box will run in the background and closing the dialog box will cause GV Keyboard V3 to disconnect Figure 3 41 ...

Страница 62: ...Box series for the connection with external I O devices GV I O Box series provides a varied number of inputs and relay outputs It supports both DC and AC output voltages with optional support for Ethernet module and 4E additionally supporting POE connection ...

Страница 63: ...ble below GV Hot Swap NVR VMS System Models Default Optional Installation 1 Gb Network Card 20 Gb Network Card 2 port 10 Gb 2U 8 bay 2 5 Gb x1 1 Gb x 1 2 cards N A 2U 12 bay 2 5 Gb x1 1 Gb x 1 2 cards N A 4U 20 bay 2 5 Gb x1 1 Gb x 1 2 cards 1 card when purchased with RAID card GV Hot Swap Recording Server System Models Default Optional Installation 1 Gb Network Card 20 Gb Network Card 2 port 10 G...

Страница 64: ...y connected to the modules Access LED Glow green on both power supply modules when the modules are functioning Alarm LED Glow red or no light indicating the module is not functioning properly or out of order The alarm LED will be accompanied by the alarm sound LED Indicators Description Ready LED Glow red on both power supply modules when the power input is properly connected to the modules Access...

Страница 65: ...roperly installed but the audio alarm continues to ring the modules may be damaged and you may need to contact your distributor for a replacement To stop the ringing alarm sound press the alarm button To remove the module from the system push the release latch and pull out the entire module with the handle at the same time 4U Models Release Latch Handle Alarm Button Figure 3 46 2U Models Alarm But...

Страница 66: ...56 3 14 System Restoration You can restore the operating system and system software back up files using Windows Tool Refer to the instructions here ...

Страница 67: ...em V6 GeoVision will periodically update the GV System Software Multicam Surveillance System If you like to update your GV Hot Swap Surveillance System V6 contact your dealer for more information or check software update news at our website http www geovision com tw ...

Страница 68: ...etermine the cause A portable 2 5 HDD connected to the front panel cannot be detected When the portable 2 5 HDD connected to a GV Hot Swap Surveillance System V6 cannot be detected try this step Use a dual head USB cable and insert both heads to the USB ports on the GV Hot Swap Surveillance System V6 front panel as illustrated below 4U 20 Bay Models Figure 4 1 ...

Страница 69: ...ip is powered on 3 If the problem persists consult your dealer GV Hot Swap Surveillance System V6 stops responding crashed or frozen If your GV Hot Swap Surveillance System V6 is not responding to your clicking typing or mouse movements try these steps to get your GV Hot Swap Surveillance System V6 back on track Please note that you will lose any unsaved changes in all open applications 1 Restart ...

Страница 70: ... files or invalid files or directories try these steps 1 Use the HD Tune utility to scan the hard disk for errors Follow these steps A Download and install HD Tune from http www hdtune com B Click the Error Scan tab and click Start to scan Any found defects will be shown as red blocks Figure 4 4 C If your hard disk drive is damaged replace a new one ...

Страница 71: ...lect Disk Management when the Computer Management window appears B Right click the desired hard disk and select Properties from the file menu to display the Properties window Figure 4 5 C Click the Tools tab in the upper portion of the window D Under Error checking click the Check Now button Figure 4 6 E Select Automatically fix file system errors and Scan for and attempt recovery of bad sectors F...

Страница 72: ...V Hot Swap Surveillance System V6 is designed and optimized for Windows 7 platform It may be vulnerable to newly created worms and exploits that attack any of the underlying operating system s previously undocumented flaws If your GV Hot Swap Surveillance System V6 suffers virus attack try rebuilding the operating system and the software Refer to 3 13 System Restoration How can I find more help 1 ...

Страница 73: ...to a single hard disk is listed as below Frame Rate Limit in a Single Hard Disk Video resolution H 264 H 265 Frame Rate fps Bitrate Mbit s Frame Rate fps Bitrate Mbit s 1 3 MP 660 5 05 N A N A 2 MP 660 7 01 N A N A 3 MP 440 10 48 660 5 35 4 MP 330 11 65 550 7 74 5 MP 220 16 48 660 6 73 8 MP 550 14 13 N A N A 12 MP 330 14 47 N A N A Note 1 The data for GV VMSH NVRH V6 was determined using the bit r...

Страница 74: ...the maximum number of recording channel that you can assign to a single RAID 5 group is suggested as below Video Resolution Frame Rate fps Max Channel 1 3 MP 30 50 6 16 Mbps 2 MP 30 32 12 59 Mbps 3 MP 20 40 9 83 Mbps 4 MP 15 36 10 4 Mbps 5 MP 10 46 8 5 Mbps 8 MP 30 50 16 9 Mbps 12 MP 15 50 17 Mbps ...

Страница 75: ...tailed information on the supported IP devices refer to Supported IP Camera List on GeoVision s Website http www geovision com tw GeoVision ACTi Arecont Vision AXIS Bosch Canon CNB D Link Etrovision Hikvision HUNT IQinVision JVC LG MOBOTIX Panasonic Pelco Samsung Sanyo SONY UDP Verint VIVOTEK ...

Страница 76: ... multiple networks you need to install multiple network cards Each network card is assigned a different IP address and subnet mask 2 Organize IP channels and clients into groups and then assign each group to different network cards using the IP addresses you have set up For GV NVRH V6 the recommended network allocation is illustrated as below The first network card can receive up to 32 IP channels...

Страница 77: ...ot Swap Recording Server System the recommended network allocation is illustrated as below The first network card can receive up to 256 IP channels in 2 3 4 M resolution The second and third network cards can each transmit up to 300 channels to remote clients GV Recording Server 3 Network Cards assigned on different networks Network 1 256 CH Default 192 168 0 200 IP Video Devices Clients Network 2...

Страница 78: ...roduct try the following 1 Review troubleshooting sections in the documentation for software and peripheral devices 2 Try rebuilding the operating system and GV System Refer to 3 13 System Restoration 3 Consult your dealer They are your best sources for current information and support Or you can call or email GeoVision offshore offices for assistance When you call or e mail please inform us the fo...

Страница 79: ... original packing material or in equivalent packaging 3 The product shall be returned to GeoVision Taiwan at your expense for shipping and insurance costs BEFORE YOU DELIVER YOUR GV HOT SWAP SURVEILLANCE SYSTEM V6 FOR WARRANTY SERVICE IT IS YOUR RESPONSIBILITY TO BACK UP YOUR DATA YOU WILL BE RESPONSIBLE FOR REINSTALLING ALL DATA SETTINGS AND PASSWORDS DATA RECOVERY IS NOT INCLUDED IN THE WARRANTY...

Отзывы: