Target Mini Fixed Rugged Dome
7
7.3 Installation
The Target Mini Fixed Rugged Dome can be installed on the wall or ceiling.
You must use the supplied waterproof rubber set to waterproof the cable.
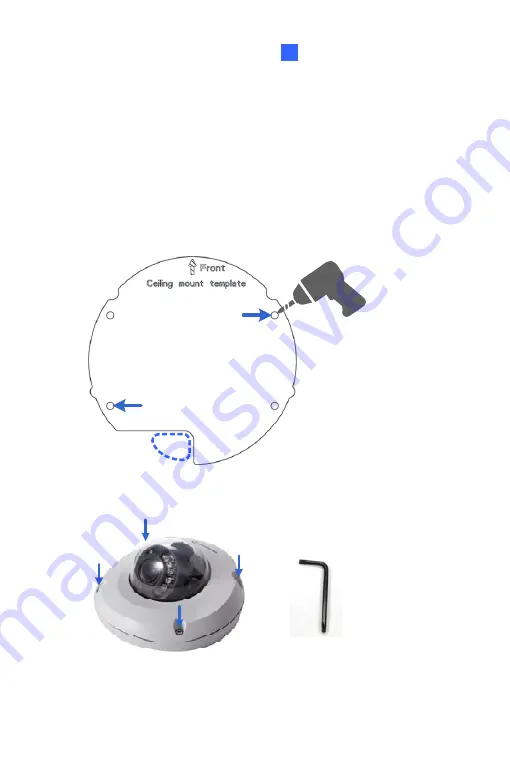
1.
Paste the installation sticker where you want to install, and drill two
holes that are at a diagonal. To run the cables inside the wall or ceiling,
drill a larger opening as shown below.
2.
Insert the supplied screw anchors into the two drilled holes.
3.
Open the camera’s housing cover using the supplied torx wrench.
55
Содержание GV-UNP2500
Страница 92: ...15 Attach the silica gel bag to the place indicated below and secure the housing cover using the torx wrench 60...
Страница 152: ...GV NVR Software DVD Warranty Card Note Power adapter can be purchased upon request 120...
Страница 168: ...Pan Adjustment Tilt Adjustment Rotational Adjustment 136...
Страница 179: ...Vandal Proof IP Dome Part II 15 15 2 Overview 1 2 3 4 5 6 8 7 9 10 12 11 13 14 147...
Страница 189: ...Vandal Proof IP Dome Part II 15 Pan Adjustment Tilt Adjustment Rotational Adjustment 157...
Страница 195: ...Vandal Proof IP Dome Part III 16 16 2 Overview 1 2 4 5 3 163...
Страница 207: ...Target Vandal Proof IP Dome 17 17 2 Overview 1 2 3 4 5 6 13 12 10 7 8 9 14 11 175...
Страница 225: ...Fixed IP Dome 18 Pan Adjustment Tilt Adjustment Rotational Adjustment 193...
Страница 230: ...15 Place the housing cover on the camera body with the GeoVision logo pointing toward the front of the camera 198...
Страница 243: ...Cube Camera 20 7 Adjust the angles of the camera based on live view and fasten the indicated screw 211...
Страница 253: ...PT Camera 22 22 2 Overview 1 2 3 4 5 6 7 8 9 10 11 12 221...
Страница 262: ...M3 Screw x 2 M2 Screw GV IPCAM Software DVD GV NVR Software DVD Warranty Card 230...
Страница 263: ...Pinhole Camera 23 23 2 Overview Camera Lens 1 2 3 4 Main Body 6 7 8 9 4 5 231...
Страница 279: ...Accessing the Camera 24 6 Unplug the Ethernet cable 247...
Страница 284: ...25 The Web Interface 1 2 3 4 5 6 7 8 9 10 11 12 13 252...


