background image

 English  


-40- 

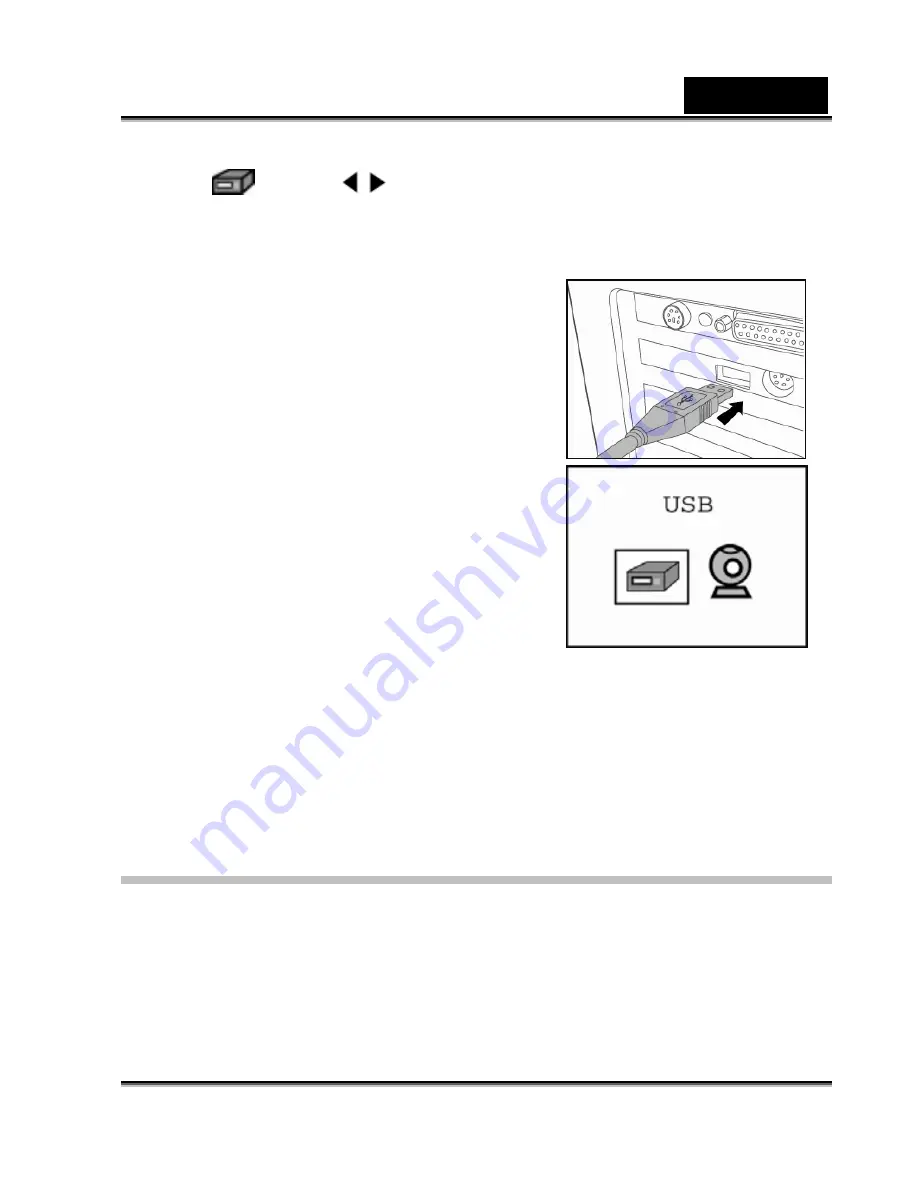
3. Select 

 with the 

/

  button and press the 

SET 

button. 

4. From the Windows desktop, double click on “My Computer”. 

5. Look for a new “removable disk” icon. 

This “removable disk” is actually the 

memory (or memory card) in your camera. 

Typically, the camera will be assigned drive 

letter “e” or higher. 

6.  Double click on the removable disk and 

locate the DCIM folder. 

7.  Double click on the DCIM folder to open it 

to find more folders. 

„

  Your recorded images and video clips 

will be inside these folders. 

„

  Copy & Paste or Drag-N-Drop image 

and video files to a folder on your 

computer. 


Mac users: 

Double-click the "untitled" disk drive icon on our desktop. iPhoto may 

automatically launch. The volume label may vary depending upon whether you 

use internal camera memory, or a memory card. 


Step 3: Downloading Images/Video clips 

When the camera is turned on and connected to your computer, it is considered 
as a disk drive, just like a floppy disk or CD. You can download (transfer) 
images/video clips by copying them from the “removable disk” (“untitled” disk on a 
Macintosh) to your computer hard drive or to another kind of disk. 


Содержание P513

Страница 1: ...armful interference to radio communications However there is no guarantee that interference will not occur in a particular installation If this equipment does cause harmful interference to radio or television reception which can be determined by turning the equipment off and on the user is encouraged to try to correct the interference by one or more of the following measures Reorient or relocate t...

Страница 2: ...uch as batteries memory cards cables pouches and language support Occasionally a retailer will specify a unique product color appearance and internal memory capacity Contact your dealer for precise product definition and included accessories 3 The illustrations in this manual are for the purpose of explanation and may differ from the actual design of your camera 4 The manufacturer assumes no liabi...

Страница 3: ... on inclined or unstable surfaces This might cause the camera to fall or tilt over causing injury Keep the batteries out of the reach of children Swallowing batteries might cause poisoning If the battery is accidentally swallowed immediately consult a physician Do not use the camera while you are walking driving or riding a motorcycle This might cause you to fall over or result in a traffic accide...

Страница 4: ... blankets This might cause heat to build up and deform the case resulting in fire Use the camera in a well ventilated place Do not leave the camera in places where the temperature may rise significantly such as inside a car This might adversely affect the case or the parts inside resulting in fire Before you move the camera disconnect cords and cables Failure to do this might damage cords and cabl...

Страница 5: ... one complete cycle before use The battery may feel warm after long period of continuous use of the camera or the flash This is normal and not a malfunction The camera may feel warm after long period of continuous use This is normal and not a malfunction If the battery is not to be used for a long period of time remove it from the camera to prevent leakage or corrosion If the batteries are not to ...

Страница 6: ... Resolution and Quality CAPTURE MODE 22 27 Normal Mode Macro Mode Digital Zoom Flash Shooting Mode VIDEO MODE 27 28 Recording video clips PLAYBACK MODE 28 32 Playing Back Still Images Playing Back Video Clips Slideshow Display Protecting Images Thumbnail Display Rotating the Image DELETING IMAGES 32 33 Deleting single image deleting all images MENU OPTIONS 33 38 Capture Menu Video Menu Playback Me...

Страница 7: ... PC Camera Driver Step 2 Connecting the digital still camera to your computer Step 3 Running your application software i e Windows NetMeeting EDITING SOFTWARE INSTALLATION 43 45 Installing Photo Explorer Installing Photo Express CAMERA SPECIFICATIONS 46 47 CAMERA TROUBLESHOOTING 47 51 ...

Страница 8: ...External memory supports SD memory card up to 1 GB capacity Digital zoom 4X digital zoom permits zoom photography Flexible flash settings Change the flash setting according to your lighting environment and photography mode setting Focus mode Images can be captured with the distance to the subject set by normal and macro Shooting mode Capture different still images including single self timer conti...

Страница 9: ...Carefully unpack your camera and ensure that you have the following items Digital camera Software CD ROM USB cable Camera strap Quick guide Camera pouch 2 x AAA alkaline batteries NOTE Accessories and components vary by retailer ...

Страница 10: ...s 3 Lens Designed to collect and focus rays of light to form a sharp image on the sensor 4 Self timer LED Blinks during Self timer mode until image is captured 5 Flash Provides flash illumination 6 POWER Power button Turns the camera power on and off 7 Shutter button Captures an image or records a video clip when the button is pressed ...

Страница 11: ...u to capture images of subjects at a distance of 1 5m to infinity Allows you to capture close ups of subjects up to the distances from 0 4 0 6m 2 Status LED Displays the camera current state 3 Arrow button up Playback button Scrolls upward Enters or exits playback mode 4 Arrow button right MODE button Scrolls right Sets the camera mode ...

Страница 12: ...d off 7 Arrow button left Zoom button Scrolls left Zooms in out the image 8 LCD monitor Provides menu information to operate the camera and previews the image before capturing it and review it afterwards 9 USB connector Connects a USB cable to the camera Name Description 10 Battery cover Allows loading the batteries 11 Memory card cover Accesses to the memory card 12 Tripod socket Allows tripod mo...

Страница 13: ... in progress Camera is powered on Green On Charging process is completed Status Off Flash is off Beep Beep Description The camera is powered on Camera operation Self timer mode for the first 7 seconds 1 sound After an image video clip is captured Cannot operate or undefined button function 2 sounds Low battery power 4 sounds Self timer mode for the last 3 seconds No sound Beeper is set to off ...

Страница 14: ... Daylight Cloudy Tungsten Fluorescent 5 Size VGA 1 3MP 3MP 4MP 5MP 6 Quality Normal Fine Super fine 7 Possible number of shots at the current size and quality settings 8 Digital zoom indicator 9 Flash mode Flash off Auto flash Flash off 10 Remaining battery status Full battery power Medium battery power No battery power Blinking 11 Storage media No icon Internal memory SD memory card ...

Страница 15: ...ble recording time 5 Size 6 Focus mode at preview mode only Playback mode Still image playback 1 Capture mode 2 Protect icon 3 File number total files Playback mode Video playback 1 Total recorded time 2 Video mode 3 Protect icon 4 File number total files 5 Video playback stop indicator ...

Страница 16: ...D card cover in the direction of the OPEN arrow 3 Insert the batteries according to the correct polarity marks or 4 Close the battery SD card cover firmly NOTE Avoid using batteries in extremely cold environments as low temperatures can shorten the battery life and reduce camera performance This low temperature will also influence alkaline battery performance therefore Ni MH rechargeable battery i...

Страница 17: ...ry card printed arrow should face towards the rear side of the camera If the card cannot be inserted check the orientation 4 Close the battery SD card cover NOTE Be sure to format the memory card with this camera before its initial usage Refer to section in this manual titled Formatting Media for further details To remove a memory card Make sure the camera is turned off Open the battery memory car...

Страница 18: ...he POWER button to turn the power off NOTE The power is turned off automatically when the camera has not been operated for a fixed period of time To resume the operation condition turn the power on again Refer to section in this manual titled Power Off in the Setup Menu for further details Choosing the Language Specify in which language menus and messages are to be displayed on the LCD monitor 1 T...

Страница 19: ...button To cancel formatting select and press the SET button 4 To exit from the menu press the MENU button NOTE To format the internal memory do not insert an SD memory card into the camera Otherwise you will format the SD memory card Formatting the SD memory card also erases the protected images All data other than images are also erased Before formatting the card make sure that all the images are...

Страница 20: ...her resolution and higher quality images offer the best photographic results but produce large files sizes Therefore few images will take up a lot of memory space High resolution and quality settings are recommended for printed output and situations requiring the finest detail Lower resolution quality images take up less memory space and may be quite suitable for sharing images via e mail in a rep...

Страница 21: ...r fine 18 35 71 144 291 584 1169 Normal 33 62 126 256 514 1031 2066 Fine 26 49 100 202 406 814 1631 2304x1728 4MP Super fine 20 38 79 160 321 644 1291 Normal 39 74 152 307 617 1238 2479 Fine 31 58 118 240 482 967 1936 2048x1536 3MP Super fine 24 46 95 192 385 773 1549 Normal 52 98 200 404 812 1629 3262 Fine 45 84 172 349 701 1407 2817 1280x960 1 3MP Super fine 35 66 135 274 551 1105 2213 Normal 11...

Страница 22: ...rate of video recording would be different depending on the SD memory card access speed If using a low access speed SD memory card it influences the frame rate and recording time CAPTURE MODE Normal Mode Your camera is equipped with a 1 5 TFT LCD monitor to help you compose images playback recorded images movie clips or adjust menu settings Before you start capturing images be sure that the lens c...

Страница 23: ...or darkens in strong or bright light This is not a malfunction Macro Mode For close up of small subjects like flowers or insects shoot using the Macro mode You can use this feature for close ups of subjects up to the distances from 0 4 0 6m 1 Set the focus switch to 2 Slide the lens cover to open 3 Press the POWER button 4 Toggle the MODE button to and press the SET button 5 Compose the image and ...

Страница 24: ...m in the image without deterioration 1 Toggle the MODE button to and press the SET button 2 Compose your picture while viewing the LCD monitor 3 Toggle the button to magnify up to 4x 4 Press the shutter button to capture a zoomed image NOTE The digital zoom function is not automatically cancelled after the image is captured The digital zoom is only activated in single and self timer shooting modes...

Страница 25: ...utton 2 Toggle the button until the desired flash mode appears 3 Compose the image and press the shutter button The available flash settings in normal mode Flash mode Description Flash off The flash will not fire Select this mode when taking images in a place where flash photography is prohibited or when the distance to the subject is beyond the effective range of the flash Auto flash The flash fi...

Страница 26: ... to improve your images NOTE Flash off is the default setting The flash mode is automatically set to off for close up photography If you will not be using the flash turn it off Turning the flash OFF will result in faster camera startup and faster operation because the capacitor will not be charged needlessly Turning the flash OFF when not needed will also improve battery life Shooting Mode This se...

Страница 27: ...ime Self timer The image is captured about 10 seconds after the shutter button is pressed The self timer LED blinks slowly for 7 seconds and then blinks rapidly for the last 3 seconds This allows you to get into the scene when taking group images Cont 1 3MP Permits continuous photography of 3 images max with the image size of 1 3MP Cont VGA Permits continuous photography of 3 images max with the i...

Страница 28: ...rage size and the subject of the image to be recorded 5 Pressing the shutter button again stops recording NOTE Flash cannot be used PLAYBACK MODE Playing Back Still Images You can play back still images on the LCD monitor 1 Slide the lens cover to open 2 Press the POWER button 3 Press the button The last image appears on the screen 4 Select the desired image with the buttons To view the previous i...

Страница 29: ...mages stored in memory icon will appear on the LCD monitor Playing Back Video Clips You can play back video clips on the LCD monitor 1 Press the button The last image appears on the screen 2 Select the desired video clip with the buttons To view the previous video clip press button To view the next video clip press button 3 Press the SET button Playback begins The elapsed time is displayed on the ...

Страница 30: ...ge please refer to the QuickTime on line help for more information Slide Show Display The slideshow function enables you to playback your images back automatically in order one image at a time 1 Press the button 2 Press the MENU button 3 Select Slide Show with the buttons and press the SET button The slideshow starts All still images in the folder are automatically played back 4 To stop the slides...

Страница 31: ...is applied to the image and the camera returns to the playback mode The protect icon is displayed with protected images Thumbnail Display This function allows you to view as many as 6 thumbnail images on the LCD monitor simultaneously so you may search for a particular image 1 Press the button 2 Press the MENU button 3 Select Thumbnail with the buttons and press the SET button 4 Press the buttons ...

Страница 32: ...ith the buttons and press the SET button The image is in a 90 degree rotated and displayed counterclockwise 4 Repeating the steps 2 3 will return the image to the normal display DELETING IMAGES Deleting single images Deleting all images 1 Press the button 2 Press the MENU button 3 Select the Delete or Delete All with the buttons and press the SET button Delete Deletes the selected last image video...

Страница 33: ...en no images are stored in the memory card or internal memory NOTE To delete images or videos stored in internal memory do not insert a memory card into the camera Otherwise you will delete the images or video clips stored on the memory card MENU OPTIONS Capture Menu This menu is for the basic settings to be used when capturing still images 1 Toggle the MODE button to and press the SET button 2 Pr...

Страница 34: ...lity compression rate at which the image is captured Normal Fine Super fine Size This sets the size of the image that will be captured VGA 1 3MP 3MP 4MP 5MP WB White Balance This sets the white balance capturing under a variety of lighting conditions and permits images to be captured that approach the conditions that are seen by the human eye A Auto Daylight Cloudy Tungsten Fluorescent ...

Страница 35: ...he SET button to select the desired setting 4 To exit from the menu press the MENU button Size This sets the size of the video clip that will be recorded VGA QVGA Playback Menu In the mode set which settings are to be used for playback 1 Press the button 2 Press the MENU button 3 Select the desired option item with the buttons 4 Press the SET button to enter its submenu or execute its function 5 S...

Страница 36: ...for further details Protect Refer to the section in the Protecting Images for further details Thumbnail Refer to section in this manual titled Thumbnail Display for further details Rotation Refer to the section in the Rotating Images for further details Setup Menu Set your camera s operating environment 1 Toggle the MODE button to and press the SET button 2 Select the desired option item with the ...

Страница 37: ...n your local area s voltage This function is only effective if you set the White Balance to Fluorescent setting 50Hz 60Hz Power Off If no operation is performed for a specific period of time the power to the camera is automatically turned off This feature is useful to reduce battery wear 1 Min 3 Min Off Beeper This sets whether or not to mute the camera sound each time you press the camera button ...

Страница 38: ...eps Step 1 Installing the USB driver Windows 98 and Mac OS 9 0 users only Step 2 Connecting the camera to your computer Step 3 Downloading image and video files System Requirements Windows Pentium 200 MHz or higher Windows 98 98SE Me 2000 XP 64MB RAM 128MB hard disk space CD ROM drive Available USB port System Requirements Macintosh PowerPC G3 G4 OS 9 0 or later 64MB RAM 128MB hard disk space CD R...

Страница 39: ...er the USB driver has been installed restart your computer Macintosh OS 9 0 computers For Mac OS 9 0 or higher the computer will automatically recognize the camera and load its own USB drivers NOTE The USB driver that bundled inside the CD ROM is designed in a form 2 in 1 USB PC camera driver a On Windows 98 the Windows OS will install both USB PC camera drivers b On Windows 2000 ME XP it will onl...

Страница 40: ... video clips will be inside these folders Copy Paste or Drag N Drop image and video files to a folder on your computer Mac users Double click the untitled disk drive icon on our desktop iPhoto may automatically launch The volume label may vary depending upon whether you use internal camera memory or a memory card Step 3 Downloading Images Video clips When the camera is turned on and connected to y...

Страница 41: ... disk to the desired destination NOTE Memory card users may prefer to use a memory card reader highly recommended Video playback application is not included with the package Make sure that video playback application has been installed in your computer USING THE CAMERA AS A PC CAMERA Your digital still camera can act as a PC camera which allows you to videoconference with business associates or hav...

Страница 42: ... function is not supported for Mac platforms 1 Insert the CD ROM that came with the camera into your CD ROM drive The welcome screen appears 2 Click USB PC CAM DRIVER Follow the on screen instructions to complete the installation 3 After the driver installation is completed restart your computer NOTE The USB driver that bundled inside the CD ROM is designed in a form 2 in 1 USB PC camera driver a ...

Страница 43: ...e Start Video button to view live video 3 Click the Place Call button 4 Type the e mail address or the network address of the computer that you are calling 5 Click Call The person that you are calling must also have Windows NetMeeting running and be willing accept your call to start the videoconference NOTE For more information about the operation of videoconference application software refer to i...

Страница 44: ... about the operation of Photo Explorer application software refer to its respective help documentation For Windows 2000 XP users please make sure to install and use the Photo Explorer in Administrator mode Photo Explorer is not supported on the Mac iPhoto or iPhoto2is recommended Installing Photo Express Ulead Photo Express is complete photo project software for digital images The step by step wor...

Страница 45: ...ive 2 When the welcome screen appears click Install Ulead Photo Express Follow the on screen instructions to complete the installation NOTE For more information on how to use Photo Express to edit and retouch your recorded images please refer to its online help For Windows 2000 XP users make sure to install and use the Photo Express while logged in as a user with an Administrator account Photo Exp...

Страница 46: ...36 pixels 1280 x 960 pixels 640 x 480 pixels Video clip VGA pixels QVGA pixels LCD 1 5 color TFT LCD 228 x 220 pixels Memory type 16MB internal memory 16MB available for image storage Support SD memory card up to 1GB capacity Files formats JPEG AVI MPEG 1 for video clip Lens Focal length f 8 5mm F number 2 8 Focus range Normal 1 5m infinity Macro 0 4m 0 6m Video frame rate VGA 10fps QVGA 15fps Dig...

Страница 47: ...otice TROUBLESHOOTING Refer to the symptoms and measures listed below before sending the camera for repairs If the problem persists contact your local reseller or service center Power Supply Symptom Cause Measure The batteries are not loaded Load the batteries correctly The power does not come on The batteries are exhausted Replace with a new set of batteries The power cuts out during use The came...

Страница 48: ...mera feels warm Long period of continuous use of the camera or the flash Shooting Symptom Cause Measure The batteries are running low Replace with a new set of batteries The power is not on Turn the power on The camera is not in shooting mode Toggle the MODE button to shooting mode Even if I press the shutter button the camera does not shoot The internal memory or memory card does not have any fre...

Страница 49: ...o power off function is activated Turn the power on again The memory card is write protected Remove the write protection The power is not on Turn the power on Images do not appear on the LCD monitor The lens cover is not open Open the lens cover The flash does not fire The flash cannot recharge The flash is set to off Switch to another mode other than one of those The image is too dark The image w...

Страница 50: ...tted by this device Insert a memory card that was formatted and stored on by this device The file is protected Cancel protection Files cannot be deleted You played back a memory card that was not formatted by this device Loaded a card that was formatted and stored on by this device The memory card is write protected Remove the write protection Cannot format a memory card End of memory card life Lo...

Страница 51: ...r use the AC power adapter About connecting to your computer software Symptom Cause Measure The free space on the hard disk in your computer may be insufficient Check whether the hard disk has a space for running Windows and if the drive for loading image files has a capacity at least that of the memory card inserted in the camera Cannot download images The USB driver is not installed for Windows ...

Отзывы: