background image

English  


-48 

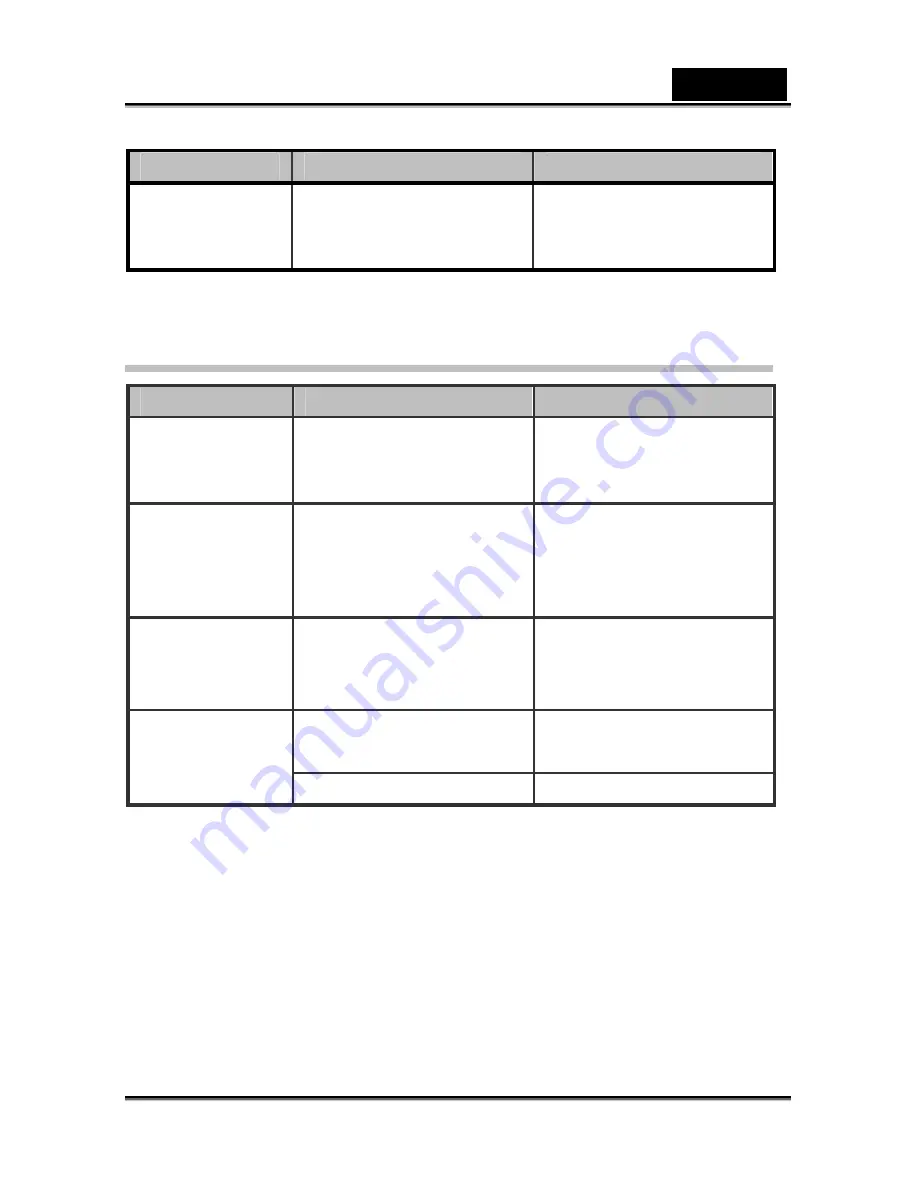
Symptom  


Cause  


Measure  


The image is too 
dark.  

The image was captured in 
a dark place while set to no 
flash.   

Set the flash to something 
other than flash off mode.   


Playback 


Symptom  


Cause  


Measure  


Cannot playback.   

It is not set to playback 
mode.   

Press the 

Mode selector


button for two seconds to 

access playback mode.


The contents of 
memory card 
cannot be 
replayed.  

You played back a memory 
card that was not formatted 
by this device.   

Insert a memory card that 
was formatted and stored 
on by this device. 

Files cannot be 
deleted.   

You played back a memory 
card that was not formatted 
by this device.   

Loaded a card that was 
formatted and stored on by 
this device.     

The memory card is 
write-protected.   

Remove the 
write-protection.   

Cannot format a 
memory card.   

End of memory card life.     

Load a new memory card. 


Содержание G-Shot D1211

Страница 1: ...and found to comply with the limits for Class B digital devices pursuant to Part 15 of the FCC rules These limits are designed to provide reasonable protection against harmful interference in a resid...

Страница 2: ...uit their market requirements customer demographics and geographical preferences Products very often vary between retailers especially with accessories such as batteries memory cards cables pouches an...

Страница 3: ...over causing injury Keep the batteries out of the reach of children Swallowing batteries might cause poisoning If the battery is accidentally swallowed immediately consult a physician Do not use the c...

Страница 4: ...n Battery Usage When you use the battery carefully read and strictly observe the Safety Instructions and the notes described below Use only the specified battery Avoid using the battery in extremely c...

Страница 5: ...n If the batteries are not to be used for a long period of time store it after no battery power left If the battery is stored for a long time in a fully charged state its performance may be impaired R...

Страница 6: ...ecting to a TV ___________________________________________ 17 USING THE CAMERA___________________________________________ 18 Using the Shutter button _______________________________________ 18 Back Vi...

Страница 7: ...____ 35 Icon display ______________________________________________________ 35 Playback menu ______________________________________________ 36 Delete one_______________________________________________...

Страница 8: ...00 ME 98SE operating system Intel Pentium 500 MHz CPU or higher At least 256 MB of RAM or higher Standard USB 1 1 port or higher 4 X CD ROM drive or higher At least 200MB of available disk space Note...

Страница 9: ...em is missing or appears damaged contact your dealer immediately Digital camera CD ROM containing the driver Camera pouch Wrist strap USB AV out cable Batteries User manual Digital Camera CD ROM conta...

Страница 10: ...English 10 About the camera Front view 1 Shutter button 6 Microphone 2 Sliding power ON OFF cover 7 Tripod socket 3 Self timer lamp 8 Memory card slot 4 Flash 9 Battery cover 5 Lens...

Страница 11: ...indicator 7 Set function button 2 Status indicator 8 Browse button 3 LCD display 9 Mode selector button 4 Up shift selector button 10 Macro catch 5 Down shift selector button 11 USB port cover 6 Wris...

Страница 12: ...the charge of the batteries Replace the batteries if their charge is insufficient so as to ensure that the camera functions normally When using your digital camera if the battery charge is weaker tha...

Страница 13: ...is what the memory card slot looks like Insert the memory card into the slot in the way shown 2 Removing the memory card Gently press on the memory card The memory card will automatically eject Pull...

Страница 14: ...ture to format it before using Turning on for the first time Slide the power cover sideways as shown in the picture to switch the camera on Slide the power cover sideways as shown to switch the camera...

Страница 15: ...s will be illustrated in the chapters that follow Setting the date and time 1 Please switch on the camera as shown in Turning on for the first time 2 Press and hold on to the Mode selector button for...

Страница 16: ...t Language option Press the Set Function button to confirm 4 Select the required language using the Up Down selection buttons 5 Press the Set Function button to save the new settings Press Mode select...

Страница 17: ...he video 3 Press the Shutter button to begin recording 4 Press the shutter button again to stop recording The video will be automatically saved with a unique filename Connecting to a PC Read this sect...

Страница 18: ...ing the Shutter button All of the buttons are found on the top or back of the camera Back View Up shift button Down shift button Set function button Browse button Mode selector button Front view Shutt...

Страница 19: ...ing the settings Set Function button accesses the Menu settings in Video mode Browse button Browse button activates and exits from Playback mode in Photo and Video modes Browse button allows picture s...

Страница 20: ...system Icons are also displayed on the LCD display that shows the current configuration Changing the LCD display You may decide not to display icons on the LCD screen by following the instructions be...

Страница 21: ...Photo mode Please see the table below for the functions of the icons Icon Description 1 Photo mode 2 Memory card status Please read Inserting the memory card for details on inserting and removing the...

Страница 22: ...pture images of subjects very close to the lens In Macro mode you can focus on subjects as close as 17 cm When the Macro mode is not in use the minimum focal distance is 19 cm Use Macro mode for subje...

Страница 23: ...ons in Video mode Use the following diagram to familiarize yourself with the Video mode icons and symbols Please see the table below for the functions of the icons Icon Description 1 Video mode 2 Reco...

Страница 24: ...ck mode The most recent picture or video clip will be displayed on the LCD display 2 Navigate using the Up shift selector Down shift selector buttons to select images and video clips stored in the mem...

Страница 25: ...between each picture 1 Switch on the camera and ensure that it is in the Playback mode The most recent picture or video clip will be displayed on the LCD display 2 Press Set Function button to access...

Страница 26: ...e used Video camera mode After the camera is set as a video camera using Windows XP it can be used to take photographs or complement other software for example it can be used for video conferencing be...

Страница 27: ...the Up Down Arrow button to go through the game selection and the OK Function button to enter the game of your choice The icons and names of the games are as follows Boxboy Tetris Memory GoBang The d...

Страница 28: ...eously removing 3 rows increases your score by 9 The blocks will fall faster when your score reaches the mark of 50 150 500 and 1500 points Press Shutter to exit the game and return to the game menu M...

Страница 29: ...you will see WIN displayed on the screen conversely if your opponent manages to form a straight line with five continuous pieces you will lose the game and the word FAIL will be shown in the screen W...

Страница 30: ...ector button 3 Use the Down shift selector button to navigate until the Resolution option is highlighted 4 Use the Up shift selector button to confirm select one of the four image resolutions 1280 x 9...

Страница 31: ...1269 2584 4881 Fine 74 156 293 625 1238 2519 4769 1280X960 1 3MP Normal 189 396 777 1615 3183 6487 11481 The above data shows the standard testing results The actual capacity varies according to the...

Страница 32: ...lector button to select 5 ON OFF 6 Press the Mode selector button to confirm and exit the menu EV Use the exposure compensation EV setting to change the exposure for your pictures Usually this value w...

Страница 33: ...ate display 1 Turn the camera on and ensure that it is in Photo mode 2 Press the Mode selector button 3 Use the Down shift selector button to navigate until the Time display option is highlighted 4 Us...

Страница 34: ...ensure that it is in Video mode 2 Press the Mode selector button 3 Use the Down shift selector button to navigate until the Video quality option is highlighted 4 Use the Up shift selector button to s...

Страница 35: ...t the menu EV Use the exposure compensation EV setting to change the exposure for your videos Usually this value would be set to zero but you might want to increase the exposure to brighten a scene wi...

Страница 36: ...ion button to proceed with deleting A confirmation in the form of a dialogue will be displayed To delete press OK else press Cancel Note Once deleted files cannot be recovered so make sure that you ha...

Страница 37: ...ne the number of prints press Browse button to swap photos press Set Function button to confirm and save the DPOF configuration or press Mode selector button to exit menu DPS Direct Print Use USB AV c...

Страница 38: ...lector button to copy the files 3 Press Set Function button to access the menu press the Up Down shift selector button to confirm or cancel 4 Press Set Function button to confirm or cancel 5 Press Mod...

Страница 39: ...xit Note if a memory card is present in the camera formatting will be carried out on the memory card and not the internal flash memory Auto power off This function is seldom used unless in power savin...

Страница 40: ...ss the Up Down shift selector button to select NTSC or PAL 4 Press Set Function button to confirm 5 Press Mode selector button to exit Frequency The setting of frequency will prevent the occurrence of...

Страница 41: ...o reset factory default settings 1 Turn the camera on and ensure that it is in Setup mode 2 Use the Up shift selector button to select option and use the Down shift selector button to select the facto...

Страница 42: ...nstalled and the camera is connected the camera memory and any installed mini SD card will appear as Mass Storage in Windows Explorer Files can be dragged and dropped in the same way as on an ordinary...

Страница 43: ...nstallation is completed Installing the driver 1 Insert the supplied CD ROM in the CD ROM drive 2 If the CD ROM doesn t automatically boot use Windows Explorer to execute the InstallMgr exe file in th...

Страница 44: ...ructions 4 After application is started you can find more information on Presto Video Works 6 in the help files Presto Mr Photo 3 Presto Mr Photo 3 is advanced application software for photo editing I...

Страница 45: ...rpolation Movie clips AVI Motion JPEG suitable sound formats Movie 320 x 240 30fps max 640 x 480 23 fps max PC camera 320 x 240 15fps max 640 x 480 14fps max Zoom 4x digital zoom TFT screen 2 4 inch H...

Страница 46: ...the batteries correctly The power does not come on The batteries are exhausted Replace with a new set of batteries The camera was left unattended and unused so the auto powers off cuts it off Turn th...

Страница 47: ...s recharging Wait until the status LED is off The memory card is unrecognized by the camera Format the memory card in this camera before its first use or when it was used other than this camera The au...

Страница 48: ...access playback mode The contents of memory card cannot be replayed You played back a memory card that was not formatted by this device Insert a memory card that was formatted and stored on by this de...

Страница 49: ...th a new set of batteries About connecting to your computer software Symptom Cause Measure The free space on the hard disk in your computer may be insufficient Check whether the hard disk has a space...

Отзывы: