background image

 English  


-19- 


3. 

For Protect all, press up or down button of Select button to select [OK] and 
press OK button to protect all file, select [Cancel] and press OK button to 
unprotect all file.


Camera Mode


Rotate mode dial to switch to 


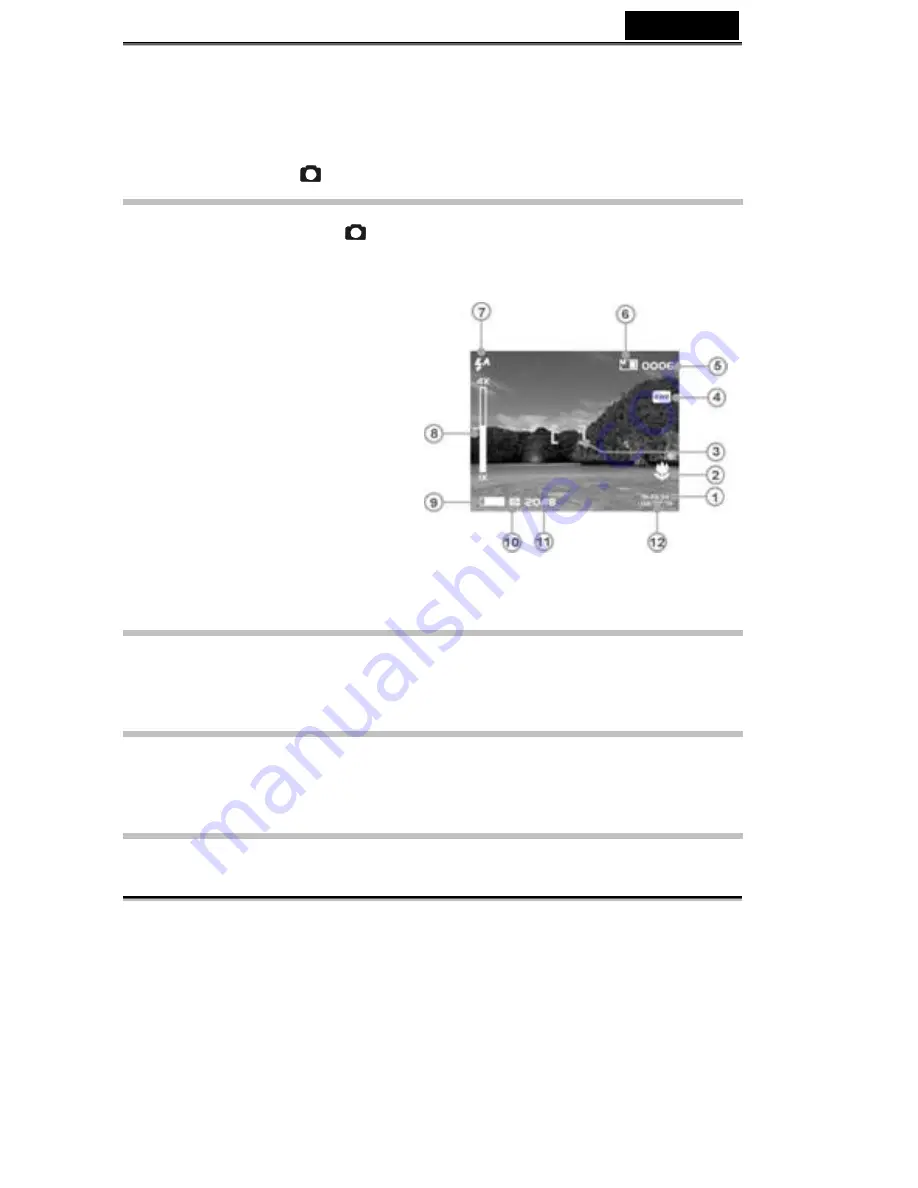
Status identifier


1. Time 
2. Macro 
3. AE-Lock 


4. White 

Balance 

5. Photo 

Counter 

6. Memory 

Status 

7. Flash 
8. Zoom 

Lever 

9. Battery 
10. Quality 
11. Size 
12. Date 


AE Lock:


When pressing the Shutter button half way, the image appears between the 
brackets [    ] indicates the stop auto exposure.


Camera menu: 

Before taking photos, you can configurate your camera options, press the menu 
button to enter the camera menu. 

Select image size: 

1.  Press up or down button of Select button to select [Size] and press OK button. 

Содержание DV600

Страница 1: ...a Menu Flash function Ev value adjust Taking a photo with self timer Special effects Shooting photos To take close up pictures To take portrait and distant pictures Playback photos Trim function Photo...

Страница 2: ...w Digital Video Camera and install all the software included in the software CD ROM You ll find clear instructions on how to take pictures record videos and voices play MP3 songs and use your Digital...

Страница 3: ...Camera at any important occasion such as a wedding ceremony or an overseas trip do test the Digital Video Camera beforehand to ensure that it functions well Any additional loss caused by the malfunct...

Страница 4: ...full of smoke oil fumes or steam 5 Locations subject to strong magnetic fields 6 Raining or snowing environment Do not open the battery cover when the power is on If water has entered the Digital Vid...

Страница 5: ...D ROM Driver Application Software Pouch Wrist Strap Lens Cover Strap Earphone USB Cable TV OUT Cable Audio Cable 4x AAA Alkaline Batteries User s Manual Quick Guide NOTE Accessory and components may v...

Страница 6: ...attaching the following cables Audio Output Video Output USB These ports will enable you to attach the appropriate cables from the Digital Video Camera to your computer TV VCR or earphone 4 USB Port U...

Страница 7: ...en And when the Digital Video Camera is busy the LED will turn to red 4 Menu button Press the MENU button in all modes the operation menus of each mode will display on the LCD monitor 5 Select button...

Страница 8: ...In Video mode and Camera mode press this button to clear the icon on LCD panel or enter help screen Normal Full screen Help Screen In other modes press this button to enter help screen Normal Help Sc...

Страница 9: ...memory card follow the direction shown in the compartment to insert the card push the memory card all the way into the memory compartment When pushing the card again it will pop up NOTE When a memory...

Страница 10: ...ver the time that you set Funtion Tree Video Mode 1 Display Normal Full screen Help screen 2 Recording Videos Start Pause Stop 3 Digital Zoom 1 0x 4 0x 4 EV adjust 2 0EV 2 0EV 5 Macro Normal Macro 6 S...

Страница 11: ...cent Cloud Size 2976 x 2232 2048 x 1536 1600 x 1200 640 x 480 Quality Fine Normal Basic Date stamp Date Time Date Off 11 Camera Playback Single Photo Index Camera Playback Menu Delete Delete one Delet...

Страница 12: ...MP3 Total Voice Total Free Space 6 Default Ok Cancel 7 TV NTSC PAL 8 Frequency 60Hz 50Hz 9 Auto Power Off 3 min 5 min Voice Mode 1 Recording Voices 2 Voice Playback Play Pause Stop Random Repeat one R...

Страница 13: ...r Delay 3 White Balance 4 Video Counter 5 Memory Status 6 Time remain to record 7 Zoom Lever 8 Battery 9 Quality 10 Size Recording Video This digital video camera can record video in MPEG4 format In v...

Страница 14: ...ect button to select the means that you want to record and press OK button White balance options Auto Sunny Tungsten Fluorescent Cloudy Select video quality 1 Press up or down button of Select button...

Страница 15: ...ton to stop recording Recording video with self timer 1 Press left button of Multi func button to enter self timer setup interface 2 On self timer setup interface press up or down button of Sselect bu...

Страница 16: ...ideo mode press Playback button to enter video playback mode 1 Press up or down button of Select button to select the video that you want to playback and press OK button to start playing 2 Press OK bu...

Страница 17: ...ess OK button 2 Press up or down button of Select button to select delete one and press OK button to enter delete one video 3 Press up or down button of Select button to select the file that you want...

Страница 18: ...ton of Select button to select the file that you want to protect If the current file is not protected press OK utton to protect current file and the icon will appear press OK button again to unprotect...

Страница 19: ...3 AE Lock 4 White Balance 5 Photo Counter 6 Memory Status 7 Flash 8 Zoom Lever 9 Battery 10 Quality 11 Size 12 Date AE Lock When pressing the Shutter button half way the image appears between the brac...

Страница 20: ...ect image quality 1 Press up or down button of Select button to select Quality and press OK button 2 Press up or down button of Sselect button to select the quality that you want to record and press O...

Страница 21: ...tton of Select button to select the wait time of self timer and press OK button 3 Press Shutter button to count down after count down to zero the digital video camera will take a picture When counting...

Страница 22: ...o mode The Macro indicator on the LCD display will appear allowing you to take pictures at a closer range between 17 22cm Step 2 To take pictures follow the steps in the Shooting Photos section To tak...

Страница 23: ...unction menu press up or down button of Select button to select the image size that you want then press OK button and current photo is trimmed as a new photo The images size selected must be smaller t...

Страница 24: ...of Select button to select delete all and press OK button to enter Delete all interface 3 In Delete all file interface press up or down button of Select button to select ok and press OK button to dele...

Страница 25: ...r printing orders for compatible printers that read DPOF Digital Print Order Format files Set one 1 Press up or down button of select button to select DPOF and press ok button 2 Press up or down butto...

Страница 26: ...s that support PictBridge Press up or down button of Select button to select Print and press OK button then you will be informed to connect your digital video camera to a printer with USB cable When c...

Страница 27: ...to set paper type that you want to print date stamp Press left or right button of Multi func button to select print date or not Print Press OK button to start printing Print all 1 In Print menu press...

Страница 28: ...English 28 MP3 Player Status identifier...

Страница 29: ...down button of Select button to select MP3 file that you want to play then press OK button to be ready to play MP3 song selected At this time you will see the time length and the baud rate of current...

Страница 30: ...English 30 Volume Bass Treble adjust When playing MP3 songs press up or down button of Multi func button to adjust volume press OK button to switch among volume bass and treble...

Страница 31: ...orward press menu button to pause press again to continue playing When not playing you can also press left or right button of Multi func button to select previous song or next song Repeat one Repeat a...

Страница 32: ...lect button to select the file that you want to delete press OK button to delete file selected protected file can t be deleted Delete all 1 Press up or down button of Select button to select delete an...

Страница 33: ...gain to unprotect current file and the icon will disappear Protect all 1 Press up or down button of Select button to select Protect and press OK button 2 Press up or down button of Select button to se...

Страница 34: ...volume at any time Fast forward Fast reverse Next Previous When playing voice press once left or right button of Multi func button to select previous voice or next voice press and hold for fast rever...

Страница 35: ...elect button to select delete all and press OK button to enter Delete all file interface 3 In Delete all file interface press up or down button of Select button to select ok and press OK button to del...

Страница 36: ...up mode you can configure the basic settings for the Digital Video Camera 1 Date Time 2 Language 3 Format 4 Memory information 5 Default 6 Frequence 7 Auto power off time 8 Beep 9 TV signal method Opt...

Страница 37: ...English 37 Setting...

Страница 38: ...English 38 Help screen This digital video camera has a help screen for every mode Press Display button to enter help screen Help screen in camera mode Help screen in camera playback mode...

Страница 39: ...English 39 Help screen in video mode Help screen in video playback mode Help screen in MP3 mode Help screen in voice mode Help screen in voice playback mode Help screen in setup mode...

Страница 40: ...compartment Step 2 Connect the smaller end of the USB cable into the USB port of your Digital Video Camera NOTE Make sure to plug in the USB cable in the right direction gently to avoid possible damag...

Страница 41: ...iliary Audio Video input NOTE Channels may vary by manufacturers refer to your VCR s operating manual System Requirements At least refer to the minimum system requirements for the Digital Video Camera...

Страница 42: ...2 Select and click Device Manager Step3 Select GENERIC IDE DISK TYPE47 and click Properties the screen will appear as following Step4 Select DMA and click OK NOTE Before playing Video Clips AVI file m...

Страница 43: ...p exe file in the root directory 3 Please select the desired language of the setup program you want to install 4 Please click on the Driver Install and the following screen will appear 5 Select the de...

Страница 44: ...ouble click on the My Computer icon on the desktop Then double click the CD ROM drive icon and click the MP38 Setup exe file in the root directory 3 Please select the desired language of the setup pro...

Страница 45: ...the application setup screen press Next to continue 9 Press Yes to accept the conditions of Software License Agreement and continue the installation 10 Please follow the installation wizard to select...

Страница 46: ...folder name 12 After the installation is completed the following screen will appear Press Finish to complete the application installation 13 After the Multimedia Software is completed the following s...

Страница 47: ...English 47 14 Entering DirectX9 setup screen press Ok after the content is confirmed...

Страница 48: ...22cm Digital Zoom 4X Shutter Speed 1 4 1 2000 sec White Balance Auto Sunny Tungsten Fluorescent Cloudy EV Compensation 2 0EV 2 0EV LCD Display 1 5 color TFT 240x354 pixels PC Cam 640 x 480 10 fps 320...

Страница 49: ...g results The actual capacity varies according to the shooting conditions and settings Sound storage data capability Built in 16MB memory Approx 21 minutes Still storage data capability Built in 16MB...

Страница 50: ...mode you might see error prompt caused by printer malfunctions improper operating or power supplying problems In these cases please unplug the USB cable from your digital video camera After you make s...

Отзывы: