background image

S

S

t

t

e

e

p

p


2

2

.

.


C

C

o

o

n

n

n

n

e

e

c

c

t

t

i

i

n

n

g

g


t

t

h

h

e

e


G

G

e

e

n

n

i

i

u

u

s

s


S

S

c

c

a

a

n

n

n

n

e

e

r

r


t

t

o

o


Y

Y

o

o

u

u

r

r


C

C

o

o

m

m

p

p

u

u

t

t

e

e

r

r


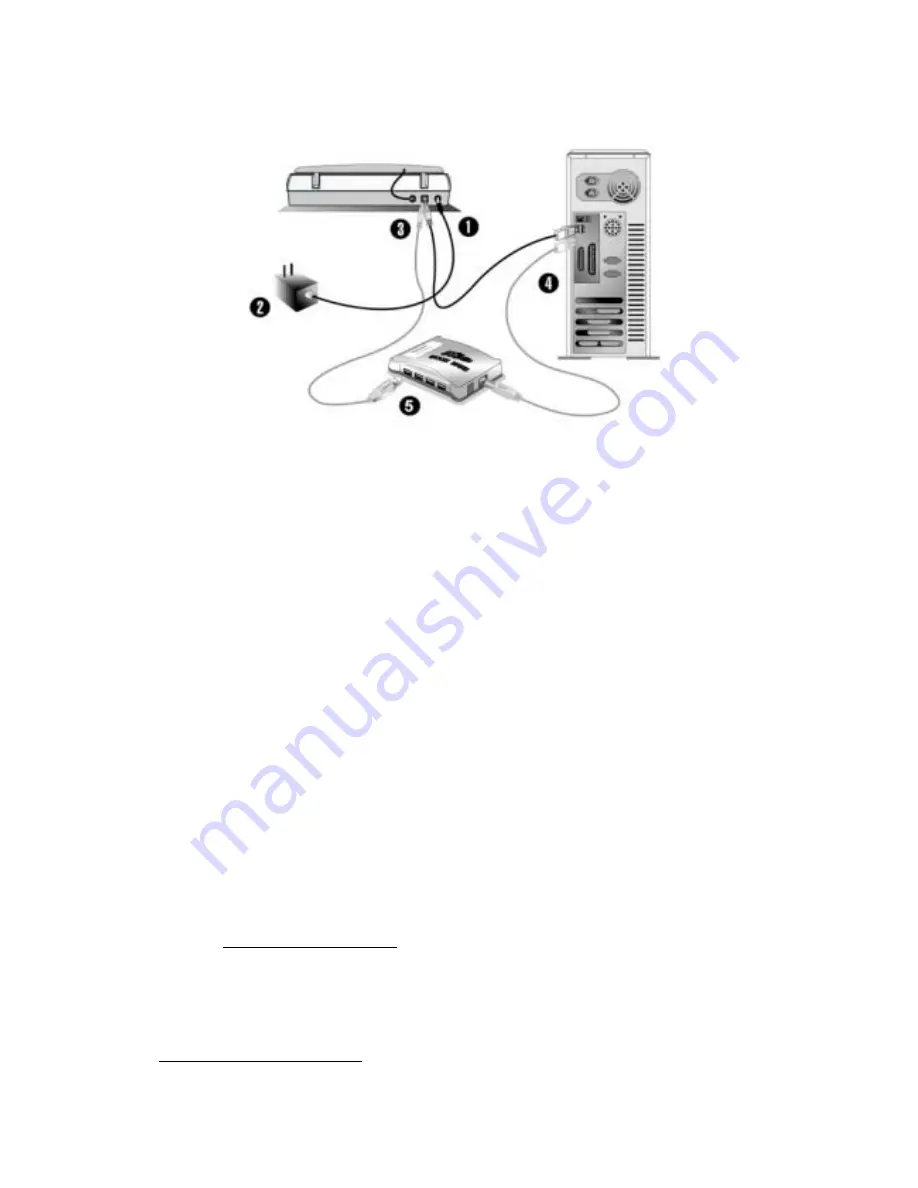
1.  Plug the power adapter into the scanner’s power receptor. 

2.  Plug the other end of the power adapter into a standard AC power outlet. 

3.  Plug the square end of the included USB cable to the USB port at the rear of 

the scanner. 

4.  Plug the rectangular end of the USB cable to the USB port on the back of 

your computer. 

Note

: If there is another USB device connected to the computer, connect the 

scanner to an available USB port. 

5.  If you plan to connect your scanner to a USB hub

5

, make sure that the hub is 

connected to the USB port in your computer.  Next, connect the scanner to 

the USB hub. 

Note: 

If you do not have a USB port available, you might need to buy a USB 

port.


S

S

t

t

e

e

p

p


3

3

.

.


I

I

n

n

s

s

t

t

a

a

l

l

l

l

i

i

n

n

g

g


t

t

h

h

e

e


S

S

o

o

f

f

t

t

w

w

a

a

r

r

e

e


1.  If the USB components on your computer are functioning correctly, they will 

automatically detect the scanner causing the “Add New Hardware Wizard” or 

“Found New Hardware Wizard” to be launched.  

2. 

For Windows 98 & 2000


a.  Click on the NEXT button when the “Add New Hardware Wizard” 

window is displayed. 

b.  Select “SEARCH FOR THE BEST DRIVER FOR YOUR DEVICE 

[RECOMMENDED]” and click on the NEXT button. 


5

 The USB hub is not included with the scanner. 

Genius Scanner 


6

Содержание ColorPage HR8

Страница 1: ...us Scanner All trademarks and brand names mentioned in this publication are property of their respective owners 2003 KYE Systems Corp All rights reserved No portion of this document may be reproduced without permission ...

Страница 2: ...8 Uninstalling the Scanner 8 Uninstall from the Start Menu Uninstall Wizard 8 Scanner Setup After Windows XP Upgrade 8 CHAPTER II USAGE AND MAINTENANCE 10 Operating the Scanner 10 Testing the Scanner 11 Scan and Image Editing 11 Scanning the Films 12 Installing the Transparency Adapter 13 Using the Negative and Positive Film Holders 13 Important Notes about Scanning Film 15 Sound Settings 15 Scann...

Страница 3: ...o Set Up Editor 24 To Use the TEXT OCT Button 25 PRINT COPY Button 25 To Set Up Printer 25 To use PRINT COPY Button 26 FILE FAX Button 27 To Set Up the Software for FILE FAX button 27 To use FILE FAX Button 28 APPENDIX A SPECIFICATIONS 30 APPENDIX B CUSTOMER SERVICE AND WARRANTY 31 Statement of Limited Warranty 31 FCC Radio Frequency Statement 32 CONTACTING GENIUS 34 ...

Страница 4: ... The Introduction section of this manual describes the box contents and minimum computer requirements to use this scanner Before you start installing your Genius scanner check the box contents to make sure all parts are included If any items are damaged or missing please contact the vendor where you purchased your scanner or Genius customer service directly at one of the locations listed at the ba...

Страница 5: ...f not followed may result in data loss or damage to the product Attention Pay Special Attention Instructions that are important to remember and may prevent mistakes System Requirements1 Windows Intel Compatible Personal Computer Pentium III or above CD ROM Drive Minimum 128 MB RAM 300 Free Hard Disk Space USB 2 0 Port Microsoft Windows XP Me 2000 98 NOTE Windows NT 4 0 does not support Universal S...

Страница 6: ... Bridgewell Page abc Web Editing Software ABBYY FineReader 5 0 Sprint Text Recognition Software Adobe Acrobat Reader PDF Product Manuals Reading Program Cardiris 2 51LE Trial Version This User s Guide Electronic Version 6 Reflective Document Mat 7 Negative and Positive Film Holder 8 Base Stand 2 Save the box and packing materials in case you need to transport this scanner in the future 3 The scann...

Страница 7: ...nstallation as well as for scanning and saving images a minimum of 250 megabytes of hard disk space is recommended Hardware Requirements This scanner connects to your computer through the Universal Serial Bus USB which supports hot Plug and Play To determine whether your computer is USB capable you must check the rear of your PC to locate a USB jack that looks the same as the one pictured below No...

Страница 8: ...ic locking mechanism to hold the scanning head in place during transportation When the locking switch located on the scanner s underside is pressed it automatically unlocks the scanning head when not pressed it automatically locks up the scanning head again Always place your scanner on a flat and smooth surface before proceeding the scanner setup or any scanning task Note When you need to move the...

Страница 9: ...If you plan to connect your scanner to a USB hub5 make sure that the hub is connected to the USB port in your computer Next connect the scanner to the USB hub Note If you do not have a USB port available you might need to buy a USB port S St te ep p 3 3 I In ns st ta al ll li in ng g t th he e S So of ft tw wa ar re e 1 If the USB components on your computer are functioning correctly they will aut...

Страница 10: ...t and click on CONTINUE ANYWAY to continue the installation without any misgiving at your scanner functioning 5 When the system completes the installation click on the FINISH button 6 Follow the on screen instructions to install all software that your new USB scanner requires 7 After the software is installed close all open applications and click on the FINISH button to restart your computer Atten...

Страница 11: ...th your scanner please make sure that it conforms to the TWAIN standard Uninstalling the Scanner Windows XP Me 2000 98 provides an Uninstall Wizard for uninstalling your scanner software driver and application programs U Un ni in ns st ta al ll l f fr ro om m t th he e S St ta ar rt t M Me en nu u U Un ni in ns st ta al ll l W Wi iz za ar rd d 1 From the Windows Start menu select Programs and then...

Страница 12: ...o remove all the scanner software 4 After uninstallation completes close all open applications and click the Finish button to restart your computer 5 Start installing your Windows XP upgrade software by following Microsoft s related procedures 6 When the Windows XP upgrade is done re install the scanner s hardware and software Refer to the scanner setup quick guide for details Genius Scanner 9 ...

Страница 13: ...our scanner on the included Setup Application CD ROM It will allow you to alter and correct any scanned images by using a variety of filters tools and effects What about scanning text documents and editing them in a word processor This is the role of Optical Character Recognition OCR software OCR software converts the image files that are created from scanning text documents into text files that c...

Страница 14: ...olio to gain access to the scanner 5 Within Presto ImageFolio click on FILE ACQUIRE and then choose ACQUIRE 6 The Genius TWAIN window will open 7 If an image appears on your screen your scanner is working properly If the image doesn t appear to your liking you might need to adjust some settings in the Genius TWAIN window To learn how to adjust scanner settings please refer to the Genius Help by cl...

Страница 15: ... to open the Genius TWAIN window 3 Select the appropriate scan mode and resolution if desired To proceed scanning task click the SCAN button from Genius TWAIN window 4 When you complete the scanning task click the CLOSE button to close the Genius TWAIN window and you may review the scanned image in Presto ImageFolio software Scanning the Films Your scanner provides an easier and quicker way to sca...

Страница 16: ...si in ng g t th he e N Ne eg ga at ti iv ve e a an nd d P Po os si it ti iv ve e F Fi il lm m H Ho ol ld de er rs s 1 Remove the reflective document mat Hold the top of the mat and gently pull it upward until it is separated from the document cover 2 Insert a filmstrip or a 120 220 film into the proper compartment on the film holder Adjust the position of the inserted film so that the desired imag...

Страница 17: ... compartment must be in alignment with the inverse arrow sign carved on the scanner housing a b c d Attention Note If you are scanning 35mm slides place the film holder on the scanner first and then place the slides in the holder 4 Select POSITIVE FILM or NEGATIVE FILM as the scan source by clicking the SCAN SOURCE button on the Genius TWAIN window 5 Select 35mm 120 220 6x6 cm film or 120 220 6x9 ...

Страница 18: ...cted before proceeding the scanning task It is recommended to use a higher resolution such as 600dpi for 35mm films or 300dpi for 120 220 films when you proceed the film scanning task to prevent the scan images from losing the quality while you enlarge the size of the images Sound Settings You may choose to play a sound file when executing any scanning task to add fun and pleasure To personalize y...

Страница 19: ...sion Scanner Utility Program The Scanner Utility Program can help you get your new scanner up and running In addition it contains a number of other features to help you tailor and control the scanner Most significantly the Scanner Utility Program checks to make sure that the scanner software is properly installed and the scanner and computer are communicating with each other Two other features of ...

Страница 20: ...r scanner is to check all physical connections Make sure your scanner is plugged in and the USB cable is fit snugly into the rear of your scanner and computer Secondly determine the status of your USB hardware and software configuration To do this please run the Scanner Utility program as described below 1 Click on the START button and then choose PROGRAMS Genius Scanner the model name of your sca...

Страница 21: ...ick on the ALIGN POSITION buttons until the top left corner of the scanned photograph aligns with the top left corner of the preview window 4 Click on the check mark button when the alignment has been completed L La am mp p C Co on nt tr ro ol l The scanner s lamp may be turned ON and OFF manually in the Scanner Utility program While there you can also set a timer to turn the lamp off after the sc...

Страница 22: ...gile and could break Clean the scanner glass by lightly spraying a non abrasive glass cleaner onto a soft lint free cloth Then wipe the glass thoroughly with the cloth DO NOT SPRAY CLEANER DIRECTLY ONTO THE SCANNER GLASS Excess liquid residue may fog or damage the scanner Your scanner operates best in temperatures between 10 C to 40 C 50 F to 104 F Removing the Document Cover The document cover ha...

Страница 23: ...rwise the automatic scan and file saving function will not work properly T To o S Se et t u up p t th he e D De ef fa au ul lt t A Ap pp pl li ic ca at ti io on n P Pr ro og gr ra am m 1 Open the Scan Manager Setting window by clicking on the Windows START button and choose PROGRAM Genius Scanner the model name of your scanner KYESCAN 2 Click the icon on the bottom right corner of the screen to op...

Страница 24: ...en 4 Press Scan button on the Genius TWAIN window to start scanning 5 The scanned file will be saved automatically under the folder of INBOX in PageManager software 6 To scan another image press the Scan button on the Genius TWAIN window again Repeat the above steps until all the scanning tasks are completed E MAIL WEB Button Ensure that you have already installed the E mail program supporting MAP...

Страница 25: ... the Scan Manager Setting window 4 Choose E mail as the in the drop down Application menu 5 Check Enable and Confirm under Preview if you require the system to automatically generate a preview image before proceeding scan 6 Adjust or select proper scanning attributes if necessary 7 Click on Close to complete setting S Sc ca an n t to o W We eb b F Fu un nc ct ti io on n 1 Open the Scan Manager Set...

Страница 26: ...e Mail button in the PRESCAN window to start scanning 5 Click on Yes button to continue scanning the next page 6 Click on No button when you finish scanning At the meanwhile your mail system will be opened and the scanned images will be transferred as attachments of a new mail A As s S Sc ca an n t to o W We eb b F Fu un nc ct ti io on n 1 Place a document or picture face down on the scanning glas...

Страница 27: ...can Manager Setting window by clicking on the Windows START button and choose PROGRAM Genius Scanner the model name of your scanner KYESCAN 2 Click the icon on the bottom right corner of the screen to open the Scan Manager Setting window 3 Click on the TEXT OCR tab in the Scan Manager Setting window 4 Choose a proper word processor in the drop down Editor menu 5 Check Enable and Confirm under Prev...

Страница 28: ...CAN window to start scanning 5 Click on Yes button to continue scanning the next page 6 Click on No button when you finish scanning 7 Word processing software will be launched and the recognized text will be transferred to the default word processing software PRINT COPY Button Ensure to install and set up a printer driver before using this function T To o S Se et t U Up p P Pr ri in nt te er r 1 O...

Страница 29: ...eflection Object 7 Click Close to complete setting T To o u us se e P PR RI IN NT T C CO OP PY Y B Bu ut tt to on n 1 Place a document or picture face down on the scanning glass 2 Press the PRINT COPY Button on the scanner Note Skip to step 5 if you did not have Enable and Confirm checked under Preview in Scan Manager 3 The scanner will start prescanning automatically 4 Click on the Print button i...

Страница 30: ... Application menu 5 Check Enable and Confirm under Preview if you require the system to automatically generate a preview image before proceeding scan 6 Adjust or select proper scanning attributes if necessary 7 Click Close to complete setting F FA AX X F Fu un nc ct ti io on n 1 Open the Scan Manager Setting window by clicking on the Windows START button and choose PROGRAM Genius Scanner the model...

Страница 31: ...lick on the Scan to Album button in the PRESCAN window to start scanning 5 Click on Yes button to continue scanning the next page 6 Click on No button when you finish scanning 7 The Scanned Images will be filed into the default folder of PageManager A As s S Sc ca an n t to o F Fa ax x f fu un nc ct ti io on n 1 Place a document or picture face down on the scanning glass 2 Press the FILE FAX Butto...

Страница 32: ...ndow to start scanning 5 Click on Yes button to continue scanning the next page 6 Click on No button when you finish scanning 7 Fax Application Window will be opened Following the screen instructions to proceed fax transmission Genius Scanner 29 ...

Страница 33: ...ilm max 6 x 9 cm Scan Method Single Pass Scan Modes 48 bit Color 8 bit Grayscale 1 bit Line Art Black White Resolution Optical 2400 dpi 24000 dpi software interpolated Scaning Materials Reflective color or black and white originals 35 mm slides 35mm filmstrip 120 220 film max 6 x 9 cm Protocols TWAIN Compliant Connection USB 2 0 High Speed Lamp type Cold Cathode Lamp Power adapter Power Output DC ...

Страница 34: ... performance of our product drivers To check for the updated device driver you may visit our Web Site Please refer to the section of Contacting Genius on the last page of this manual Statement of Limited Warranty This Statement of Limited Warranty applies only to the options you originally purchase for your use and not for resale from an authorized reseller If you transfer this product to another ...

Страница 35: ...2 Loss of or damage to your records or data or 3 Economic consequential damages including lost profits or savings or incidental damages even if we are informed of their possibility Some jurisdictions do not allow the exclusion or limitations of incidental or consequential damages so the above limitation or exclusion may not apply to you This Limited Warranty gives you specific legal rights and you...

Страница 36: ...ipment must be employed with this equipment to ensure compliance with the pertinent RF emission limits governing this device Consult the dealer or an experienced radio TV technician for help if the conditions persist Changes or modifications not expressly approved by the manufacturer or authorized service center could void the users authority to operate this equipment Genius Scanner 33 ...

Страница 37: ... Fax 44 208 664 2721 sales 44 208 664 2740 Tech Support Web Site http www kye co uk KYE Systems H K Corp Ltd Unit 01 17th Floor Aitken Vanson Centre No 61 Hoi Yuen Road Kwun Tong Kowloon Hong Kong Tel 852 2342 3813 Fax 852 2341 9517 Web Site http www geniusnet com hk Asia Pacific Asia Pacific KYE Systems Corp No 492 Sec 5 Chung Hsin Rd San Chung Taipei Hsien 241 Taiwan R O C Tel 886 2 2995 6645 Fa...

Отзывы: