background image

10

6.1 Ananlogue Camera Connection

First connect the camera to the DVR. 
Then go to Start → Settings → Camera→ Manage Camera → Camera Signal to checkmark the 
video mode. Theactual signals input shall correspond to the video mode. Please refer to 
the User Manual for details.

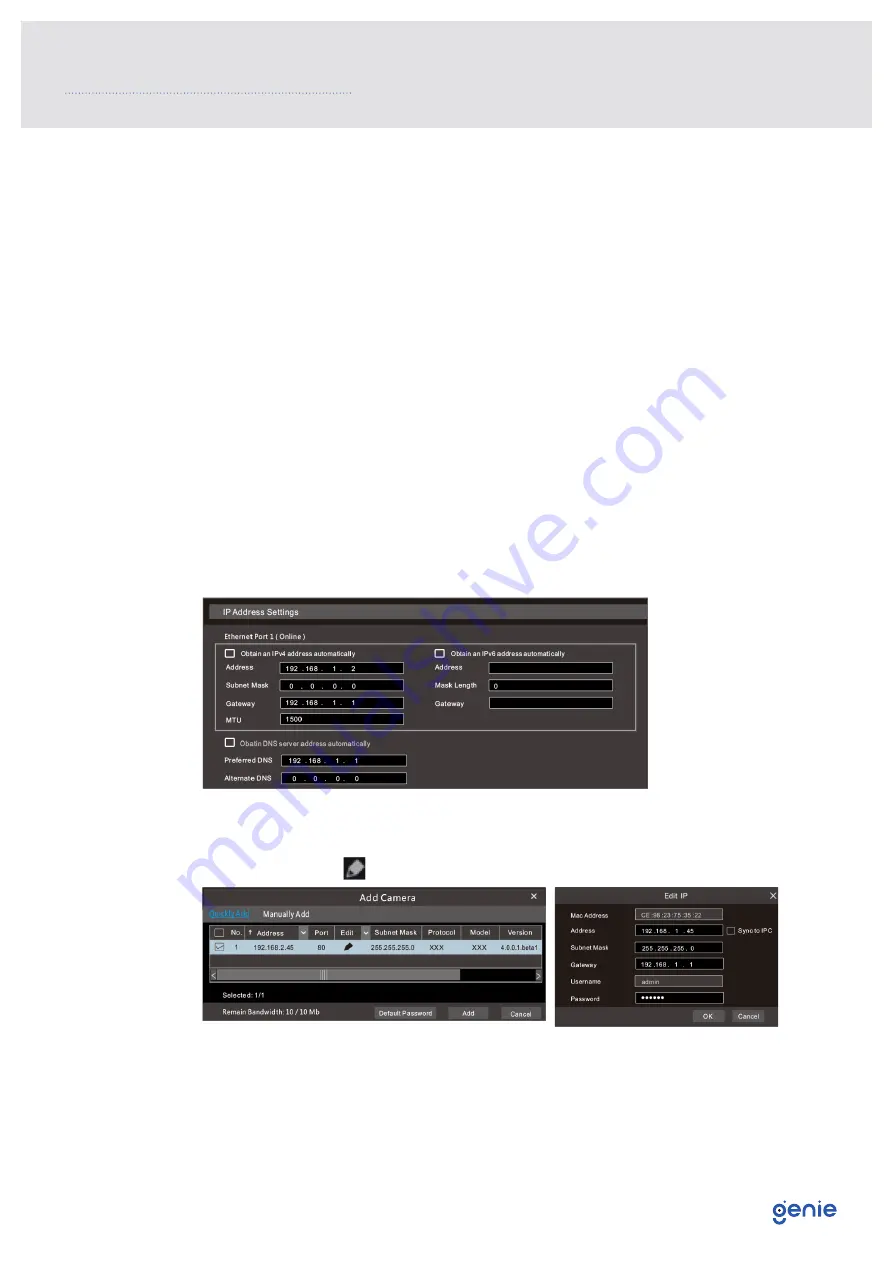
6.2 Network Configuration & Adding IP Camera

After you finish adding IP cameras, you can see the live images through the monitor of the 
DVR. The following will mainly introduce how to add the IP cameras via LAN/WAN.

LAN

1.  Set the network of the DVR. Go to Start → Settings → Network → TCP/IP. Enter IP 

address, subnet mask, gateway, etc. If using DHCP, please enable DHCP in both the 
DVR and the router.

2.  Go to Start → Settings → Network → Port. Enter HTTP port (the default value is 80), 

server port (the default port is 6036). 

3.  Click “Apply” to save the settings.

4.  Go to Start → Settings → Camera → Add Camera. The DVR will automatically refresh the 

cameras searched. The IPC which supports the Onvif protocol may be added manually. 
If the IPC searched is not in the same local network as the DVR, you should select the 
device and click       to modify the IP address.

6.0 Configurations and Connections

Содержание WAHD8162

Страница 1: ...Quick Start Guide Please read these instructions carefully before operating the unit and keep for further reference 16 Channel 5 in 1 High Definition 8MP Hybrid DVR with 2 HDD Bays WAHD8162...

Страница 2: ...urther reference All examples and pictures used here are for reference only The contents of this manual are subject to change without notice CAUTION Please check the device and the accessories after g...

Страница 3: ...D Installation 6 3 0 Rear Panel Instruction 7 4 0 Start Up and Shut Down 8 5 0 Login 9 6 0 Configurations and Connections 10 6 1 Ananlogue Camera Connection 10 6 2 Network Configuration Adding IP Came...

Страница 4: ...d Playback Backup and Remote access HDMI 4K output true high resolution display Multi mode recording Manual Timer Motion Smart Event Playback 16 channel simultaneous playback Search Time Slice Time Ev...

Страница 5: ...PAL 30fps NTSC IP Channel 25fps PAL 30fps NTSC Bit Rate 32Kbps 5Mbps Mode Manual Timer Motion Smart Event Mobile Device OS iOS Android Storage HDD SATA x2 Up to 8TB per HDD Playback Playback 16CH Sear...

Страница 6: ...s into the holes of the HDD but don t tighten them 3 Put the HDD s onto the bottom of the machine 4 Turn over the machine and secure the HDD s with the screws 5 Connect the power and data cables 6 Ins...

Страница 7: ...VIDEO IN Video input CVBS CVBS output AUDIO OUT Audio output AUDIO IN Audio input HDMI Connect to high definition display device VGA Connect to monitor LAN Network port USB Connect to USB storage dev...

Страница 8: ...oot and the power indicator will display blue 3 A wizard window will pop up Shutdown Click Start and then select Shutdown icon This will bring up a shutdown window The device will shut down by clickin...

Страница 9: ...the DVR for the first time and you may change the password when you configure the wizard for the first time You can skip the settings wizard next time Click Start and select Login This will take you...

Страница 10: ...s via LAN WAN LAN 1 Set the network of the DVR Go to Start Settings Network TCP IP Enter IP address subnet mask gateway etc If using DHCP please enable DHCP in both the DVR and the router 2 Go to Star...

Страница 11: ...ed device and click button to modify channel IP address etc WAN 1 Set the network of the DVR Go to Start Settings Network PPPoE Enter static IP address or enable PPPoE and then enter the user name and...

Страница 12: ...UPnP and then click Apply button to save 2 Enable the UPnP function in the router 3 Click Refresh button to refresh the UPnP status If the UPnP status were still Invalid UPnP after refreshing it for...

Страница 13: ...m Click Apply to save the parameters NAT Access After finishing the NAT settings you can enter www autonat com in the address bar of your browser and then press enter to go to the following interface...

Страница 14: ...to select or drag the playback progress bar to change the playback time to play back the record General Playback Click on the tool bar at the bottom of the live preview interface or click Start Playba...

Страница 15: ...Sales 44 0 1707 330541 Enquiries sales genieproducts co uk Website www genieproducts co uk...

Отзывы: