background image

PLACEMENT WITHIN THE SHOP

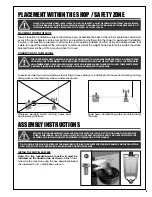
The unit should be installed as close to the dust source(s) as possible. The base of the unit is mounted on casters and 
as such the dust collector can be moved from one location to another within the shop if a permanent installation 
location is not practical or desired. In all cases the unit should be installed on a flat, sturdy and stable surface that 
is able to support the weight of the unit and its contents, as well as the weight of the operator. The casters should be 
blocked to prevent the unit from moving when it is in use.

PLACEMENT WITHIN THE SHOP / SAFETY ZONE

9

THIS DUST COLLECTOR MODEL 10-950 IS HEAVY. DO NOT OVER-EXERT. A HOIST OR FORKLIFT WITH STRAPS SHOULD BE USED 

TO LIFT THIS MACHINE. TO LIMIT THE RISK OF SERIOUS INJURY OR DAMAGE TO THE MACHINE, ANY EQUIPMENT USED TO LIFT 

THIS MACHINE SHOULD HAVE A RATED CAPACITY IN EXCESS OF 183 LBS (83 KG).

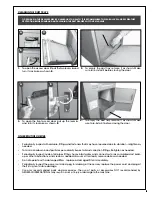
Wherever possible avoid running hoses and 
ducting along the floor.

Keep hoses and ducting safely mounted along 
the walls.

CONNECTION OF THE MACHINE

To avoid accidents as well as damage to ducting or hoses, plan your installation with hoses and ducting running 
along walls or mounted from above wherever possible. 

THE 10-950 METAL DUST COLLECTOR CANNOT BE CONNECTED TO A MACHINE EQUIPPED WITH A COOLANT RESER-
VOIR. ALSO, THE 10-950 MODEL IS NOT DESIGNED TO REMOVE WOOD DUST OR WET DUST. DUE TO THE POTENTIALLY 
HIGH TEMPERATURE CHIPS, PLEASE USE ONLY HOSE AN ALUMINUM HOSE. FAILURE TO FOLLOW THESE SAFETY RULES 
CAN RESULT IN SERIOUS INJURY TO THE USER AS WELL AS DAMAGE TO THE MACHINE. 

ASSEMBLY INSTRUCTIONS

TIP: TO INSTALL THE SWIVEL CASTERS, LAY THE MACHINE ON ITS SIDE. TO PREVENT SCRATCHES OR DAMAGE ON THE COLLECTOR, 
FIRST PLACE A PIECE OF CARDBOARD ON THE GROUND UNDER THE MACHINE.

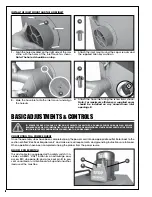
INSTALL THE SWIVEL CASTERS

BEFORE STARTING THE ASSEMBLY, MAKE SURE THAT THE SWITCH IS IN THE “OFF” POSITION AND THAT THE POWER 
CORD IS UNPLUGGED. DO NOT PLUG IN OR TURN ON THE DUST COLLECTOR UNTIL YOU HAVE COMPLETED THE 
ASSEMBLY AND INSTALLATION STEPS DESCRIBED IN THIS SECTION OF THE MANUAL.

A

B

Note: The two lockable swivel casters B must be 
installed on the handle side as shown. 

Attach the 4 

wheels to the machine using the hex. head bolts 

A

 and 

the supplied 12 mm combination wrench. 

Содержание 10-950

Страница 1: ...th handle and four swivel casters 2 locking on the base for complete mobility and stability Large paddle style stop switch with safety lock out pin to prevent unauthorized use Superior 3 stage 5 1 micron filtration system includes pleated carbon and stainless steel filters Tool free filter changes SPECIFICATIONS Inlet diameter 1 6 152 mm or 2 4 102 mm Airflow capacity 755 cfm Blower wheel diameter 12 ...

Страница 2: ...n confirm from knowledgeable and qualified sources that it is safe to do so Once you ve read through these instructions keep this manual handy for future reference DISCLAIMER The information and specifications in this manual pertain to the unit as it was supplied from the factory at the time of printing Because we are committed to making constant improvements General International reserves the rig...

Страница 3: ...ard 2 year Limited Warranty or under our Limited Lifetime Warranty all defective parts components or machinery must be returned freight or postage prepaid to General International or to a nearby distributor repair center or other location designated by General International For further details call our service department at 1 888 949 1161 or your local distributor for assistance when filing your c...

Страница 4: ... 9 10 Installing swivel casters 9 Installing the inlet mount hose inlet 10 Basic adjustments and controls 10 11 Connecting to a power source 10 ON OFF power switch 10 Using the power switch 11 Overload protection Circuit breaker 11 Checklist before and after starting 12 Maintenance 12 Cleaning Replacing filters 12 Cleaning the dust drawers 13 Other routine checks 13 Recommended optionnal accessorie...

Страница 5: ...or combustible liquids gases gasoline or other fuels lighter fluid cleaners oil or solvent based paints natural gas hydrogen or explosive dusts like coal dust magnesium dust grain dust or gun powder 16 Do not operate the unit until a dust hose is installed onto the hose inlet and make sure all the joints and connectors are properly installed 17 Never leave the machine unattended while it is run nin...

Страница 6: ... connected to the ground ing prong on the plug The outlet must be properly in stalled and grounded and all electrical connections must be made in accordance with all local codes and regulation CIRCUIT CAPACITY Make sure that the wires in your circuit are capable of handling the amperage draw from your machine as well as any other machines that could be operating on the same circuit If you are unsu...

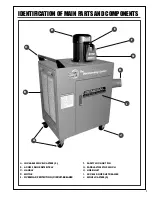
Страница 7: ...ONENTS A LOCKABLE SWIVEL CASTERS 2 B ACCESS DOOR FILTER TRAY C HANDLE D MOTOR E OVERLOAD PROTECTION CIRCUIT BREAKER F SAFETY LOCK OUT PIN G PADDLE STYLE STOP SWICH H HOSE INLET I ACCESS DOOR DUST DRAWER J SWIVEL CASTERS 2 B D E F I C G H A J ...

Страница 8: ...T CONTINUE TO USE PERSONAL BREATHING PROTECTION DEVICES WHENEVER RECOMMENDED FOR THE OPERATION OR WORK BEING PER FORMED To ensure efficiency and maximize service life make sure to check and clean the filters regularly and replace them as needed To avoid potentially costly down time consider keeping a spare set of replacement filters on hand and nearby for use when needed Order spare replacement filter...

Страница 9: ...E MACHINE To avoid accidents as well as damage to ducting or hoses plan your installation with hoses and ducting running along walls or mounted from above wherever possible THE 10 950 METAL DUST COLLECTOR CANNOT BE CONNECTED TO A MACHINE EQUIPPED WITH A COOLANT RESER VOIR ALSO THE 10 950 MODEL IS NOT DESIGNED TO REMOVE WOOD DUST OR WET DUST DUE TO THE POTENTIALLY HIGH TEMPERATURE CHIPS PLEASE USE ...

Страница 10: ...pleted plug the power cord into an appropriate outlet Refer back to the section entitled Electrical Requirements and make sure all requirements and grounding instructions are followed When operations have been completed unplug the planer from the power source ON OFF POWER SWITCH This dust collector is equipped with a safety switch It in cludes a GREEN START button A an extra large easy access RED ...

Страница 11: ... switch box and push on the green button A B C TO PREVENT ANY USE OF THE MACHINE BY AN UNAUTHORIZED PERSON IT IS RECOMMENDED TO REPLACE THE LOCK PIN AND UNPLUG THE COLLECTOR FROM THE POWER SOURCE WHEN THE MACHINE IS NOT USED CHECKLIST BEFORE AND AFTER STARTING Make sure you and any assistants are wearing safe and appropriate workshop attire To reduce the risk of damage to the machine as well as a ...

Страница 12: ...is is a sign that the filter is permanently clogged 1 micron filter C Use low pressure air blower or vacu um or a soft bristle brush to gently clean the filter every 35 40 hours of operation or any time you notice a drop in the overall airflow of the unit Replace the filter after 300 hours of operation or when cleaning the filter no longer improves overall airflow as this is a sign that the filter is perm...

Страница 13: ...iodically inspect all hardware fittings and fasteners that may have loosened due to vibration retighten as needed To minimize airborne dust particles periodically inspect all dust collection fittings Retighten as needed Periodically inspect inside of all pipes fittings hoses blast gates and connectors for accumulated dust build up or other obstructions and clean as needed Vacuum or manually remove de...

Страница 14: ...ernational deal er For more information about our products please visit our website at www general ca Item 10 953 1 MICRON PLEATED OUTER MICRO FILTER Easy to install and cleans with diffused air or soft bristle brush Di mensions 19 3 8 x 15 3 8 x 7 8 492 x 391 x 22 mm Item 10 951 STAINLESS FILTER Designed to filter larger debris and metal dust 30 microns Cleans with water or compressed air Dimensio...

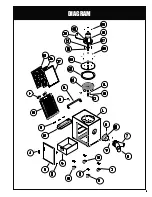
Страница 15: ...15 DIAGRAM ...

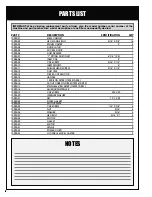
Страница 16: ...5 16 X 1 2 8 10950 10 INLET MOUNT 6 1 10950 11 PHILLIPS HEAD SCREW 3 16 X 1 4 1 10950 12 DUST TRAY 1 10950 13 FILTER ACCESS DOOR 1 10950 14 HANDLE 1 10950 15 1 MICRON FILTER ITEM 10 953 1 10950 16 ACTIVE CARBON FILTER ITEM 10 952 1 10950 17 STAINLESS STEEL FILTER ITEM 10 951 1 10950 18 ALUMINUM IMPELLER 1 10950 19 CAP SCREW M6 X 30 1 10950 20 IMPELLER WASHER 1 10950 21 KEY 7 X 7 X 25 1 10950 22 FO...

Страница 17: ...17 NOTES ...
Страница 18: ...Follow us 8360 Champ d Eau Montreal Quebec Canada H1P 1Y3 Tel 514 326 1161 Fax 514 326 5565 Parts Service 514 326 5555 Order Desk orderdesk general ca www general ca 18 ...

Отзывы: