


ASSEMBLY INSTRUCTIONS
• SERIOUS PERSONAL INJURY COULD OCCUR IF YOU CONNECT THE MACHINE TO THE POWER SOURCE BEFORE YOU
HAVE COMPLETED THE SETUP PROCESS. DO NOT HOOK-UP THE MACHINE TO A POWER SOURCE UNTIL INSTRUCTED
TO DO SO.
• BE SURE TO READ AND UNDERSTAND THIS ENTIRE MANUAL.
• USE CAUTION AND WEAR GLOVES WHEN HANDLING METAL PARTS SUCH AS THE BELT CLAMPS, WHICH CAN CUT IF
HANDLED CARELESSLY.
• THE SOUND LEVEL OF THIS MACHINE IS RATED AT APPROXIMATELY 80 DB DURING OPERATION. MAKE SURE THAT ADE-
QUATE HEARING PROTECTION IS USED AND THAT THE OVERALL SOUND LEVEL WITHIN THE WORKING ENVIRONMENT
IS TAKEN INTO CONSIDERATION.
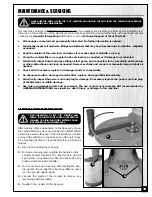
Hardware/Tools Needed for the following steps*:
•
10 mm Hex Head Bolts
•
10 mm Flat Washers
•
10 mm Hex Nuts
•
10 mm open end or socket wrench
Tighten all bolts securely with a 10 mm open end or
socket wrench.
* Except where specified otherwise.
or
1.
Carefully turn the fan/motor assembly upside
down.
2.
Attach the air flow pipe to the fan housing using
4 bolts and 4 flat washers.
3.
Remove the first inch (approx.) of backing strip
A
from the start of the foam gasket
B
.
4.
Gradually remove the rest of the backing as you
stick the foam gasket around the opening of the
cyclone separator
A
, as shown in
B
. Trim off excess
tape wih a knife or scissors,
C
.
A
B
A
B
C
11
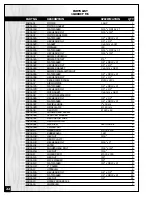
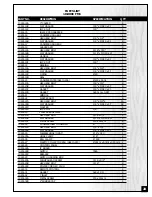
Содержание 10-800CF M1
Страница 24: ...WIRING DIAGRAM 24...
Страница 25: ...25 Notes...


