Generac Power Systems PowerManager PM-GC Скачать руководство пользователя страница 8

6

Generac

®

Power Systems, Inc.

Section 3 — Operation

PM-GC

3.2

THE OPTIONAL DISPLAY

The optional, programmable, remote display can be
mounted up to 1000 meters away from the generator.
Only one display per generator is allowed. The dis-
play has an IP65 front panel with an IP20 rating for
the rest of the housing. This means that the rear of
the panel must be protected if it is to be used outside.
Normally, it would be mounted to the face of a sealed
enclosure with the supplied screw type clamps. The
panel thickness should be <=6mm and the mount-
ing torque should be <=0.5Nm. The angle of inclina-
tion must be less than 35 degrees from vertical.

Connections to the unit can be made via a single
screened multicore cable and one 9 way D type male
connector, or, via separate signal and power connec-
tors(supplied). The second option is recommended
for distances of >75m.

The display is independently programmable and
could be customized to display different data from
the same product without altering the PM-GC soft-
ware. Currently, there are three versions of display
software, one for MPS (SC and IC), one for engine
controllers (PM-PC and PM-GC) then finally one ver-
sion for bifuelled engines.

3.2.1 CONNECTION DETAILS

The power supply should be in the range 18-30VDC
at 0.4A. This is normally supplied from the con-
troller. J1 pin 11 is Ground and pin 12 is +24VDC.
The case earth screw should be connected to an earth
point in the enclosure via a 2.5mm diameter wire.

The multicore cable should have 24AWG cores for
distances up to 75 meters. Above this, 18AWG
should be used.

3.2.2 CONTRAST ADJUSTMENT

Contrast may need to be adjusted depending on the
incident lighting conditions.

EITHER

1. Switch on the power to the unit.
2. During the initialization phase, a menu will

appear briefly. Press the CONFIG button.

3. Now use the CO and - keys to adjust

contrast.

OR

1. During normal operation, select the MAINTE-

NANCE screen and then use the co and -
buttons to adjust the contrast.

3.2.3 CALIBRATION

As the unit can be mounted at different angles, there
may be calibration required to compensate for paral-
lax errors.

EITHER

1. Switch on the power to the unit.
2. During the initialization phase, a menu will

appear briefly. Press the CONFIG button.

3. Now use the CALIBRATE button to calibrate the

screen

4. Five calibration crosses appear in succession on

the screen, touch them as they appear.

5. Once this is done, touch the screen within 30 sec-

onds at any position to "accept" the calibration. If
not completed within 30 seconds, calibration will
revert to original.

OR

1. During normal operation, select the MAINTE-

NANCE screen and then the "Calibrate
Touchscreen" button.

2. Follow steps 4 and 5 above.

3.2.4 CLEANING

As a result of normal operation the screen will
become dirty and should be cleaned with a soft cloth.
In order to prevent operating the touchscreen during
this time, select the MAINTENANCE page and choose
the "Clean Screen" option.

3.2.5 TOUCHSCREEN OPERATION

Operate the touch screen with a finger only, do not
use pens or other pointed objects.

3.2.6 FUNCTIONALITY

The display screen has been devised as a way to
examine data within the PM-GC. Changes to settings
cannot be made from this screen, this can only be
done via Genlink. Data has been divided into groups
and each group is shown as a button on the menu
screen. Touching the button will access the main
screen for the group. Some groups, such as diagnos-
tics, may also have sub screens associated with them.
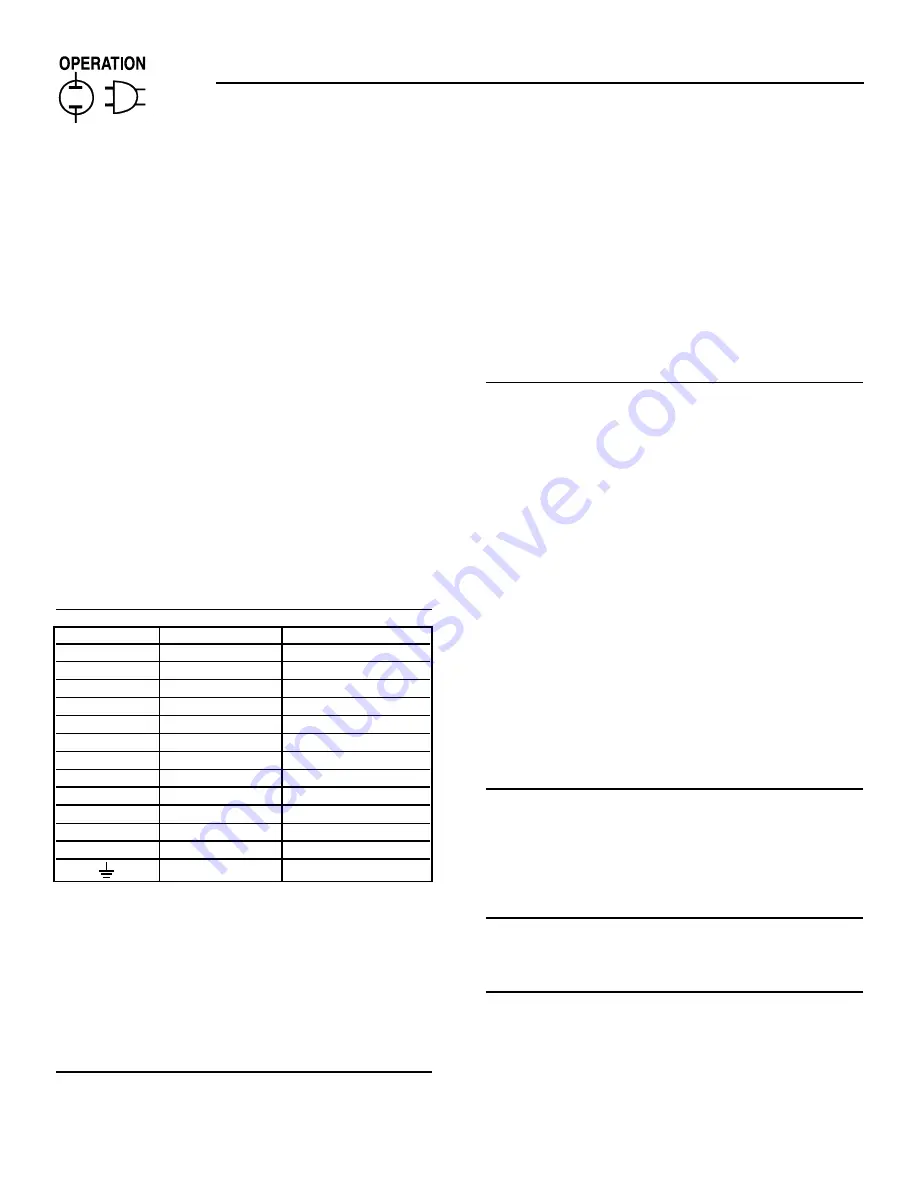
‹

‹

‹

‹

‹

‹

DISPLAY PIN

CONNECTION

CONTROLLER PIN

1

-

-

2

-

-

3

RS485-

J1 - 21

4

-

-

5

-

-

6

-

-

7

-

-

8

RS485+

J1 - 20

9

-

-

TERMINAL

CONNECTION

WIRE

+24VDC

24VDC

220C

OV

OVDC

0

GROUND

0

Содержание PowerManager PM-GC

Страница 1: ...POWER SYSTEMS INC ONLY QUALIFIED ELECTRICIANS OR CONTRACTORS SHOULD ATTEMPT INSTALLATION DANGER PowerManager Generator Controller PM GC This manual should remain with the unit...

Страница 2: ...nts out potential explosion hazard This symbol points out potential fire hazard This symbol points out potential electrical shock hazard The operator is responsible for proper and safe use of the equi...

Страница 3: ...Contrast Adjustment 6 3 2 3 Calibration 6 3 2 4 Cleaning 6 3 2 5 Touchscreen Operation 6 3 2 6 Functionality 6 3 2 7 Software Version Display 7 3 3 On Screen Diagnostics 8 3 3 1 Main Diagnostics Menu...

Страница 4: ...unsafe or in noncompliance with such codes and standards Keep hands feet clothing etc away from drive belts fans and other moving or hot parts Never operate the unit with any drive belt or fan guard r...

Страница 5: ...the victim from the live conductor AVOID DIRECT CONTACT WITH THE VICTIM Use a nonconducting imple ment such as a rope or board to free the victim from the live conductor If the victim is uncon scious...

Страница 6: ...ol system monitors engine oil pressure dur ing operation If oil pressure drops below a safe level the system automatically shuts down the engine 1 2 4 OVERSPEED SHUTDOWN The control system monitors en...

Страница 7: ...ger fuses 3 1 CONTROL CONSOLE COMPONENTS The PM GC control module performs all of the gen erator control functions within the system It controls engine starting and stopping engine speed output voltag...

Страница 8: ...the unit 2 During the initialization phase a menu will appear briefly Press the CONFIG button 3 Now use the CONTRAST and keys to adjust contrast OR 1 During normal operation select the MAINTE NANCE s...

Страница 9: ...rs Figure 4 System Status Screen Figure 5 Typical Menu Screen Figure 6 Typical Parameter Screen Engine Prameters ENGINE PARAMETERS Temperatures pressures rpm etc GENERATOR PARAMETERS Voltages frequenc...

Страница 10: ...ond with the cir cuit diagram Refer to this diagram to see that the cor rect input has operated Outputs from the controller are generally open col lector meaning that they sink current through a load...

Страница 11: ...urrent sense C 7 Utility voltage sense A 8 Utility voltage sense B 9 Utility voltage sense C 10 Generator voltage sense A 11 Generator voltage sense B 12 Generator voltage sense C 13 4 20ma User confi...

Страница 12: ...sition the audi ble alarm can be silenced though When a warning occurs the display will automatical ly switch to the current alarm page where it will be displayed in the list of current alarms The aud...

Страница 13: ...the generator continues to run after a stop command is sent in AUTO mode in order to cool down the engine with no load NOTE If the key switch is turned to the OFF position when the generator is runni...

Страница 14: ...ilure Y Y Delay 0 0 seconds Active Hold off Hold off Hysteresis 2 2 Deg F Low Coolant Temperature Deg F Setpoint Shutdown N Dialout N Common alarm Y Alarm log N Sensor failure detection Y Shutdown on...

Страница 15: ...seconds Active Hold off Hysteresis 200 1 100ths volt High Gen Voltage A B C Volts RMS Setpoint Shutdown N Dialout N Common alarm Y Alarm log Y Sensor failure detection N Shutdown on sensor failure N...

Страница 16: ...ths Hz Under Frequency 1 10ths Hz Setpoint 1 10ths Hz Shutdown N Dialout N Common alarm Y Alarm log N Sensor failure detection N Shutdown on sensor failure N Delay 0 5 seconds seconds Active Hold off...

Страница 17: ...port communications are done via Modbus RTU protocol 3 11 1 GENLINK The control panel can communicate with GenLink which is a PC based program allowing both the inter rogation of the generator and re...

Страница 18: ...16 Generac Power Systems Inc Section 4 Notes PM GC...

Страница 19: ...Generac Power Systems Inc 17 Section 4 Notes PM GC...

Страница 20: ...on the first year of the warranty provision 2 Use of Non Generac replacement part s will void the warranty in its entirety 3 Failures due but not limited to normal wear and tear accident misuse abuse...

Отзывы: