background image


10 

4.2. Installation Procedure  


Please follow the following steps one by one in order to install successfully. 

The PRISM WLAN Configuration Utility is installed simultaneously with the driver by executing the 
PRISM for  Windows.exe file. Installation procedures differ depending on whether this is an initial 
installation or an upgrade. The following sections discuss these scenarios. 
Note also that some versions of Microsoft Windows operating systems require administrator privileges 
to install software. If this is the case for your operating system, be sure that you have such privileges 
before executing the PRISM for Windows.exe file. 
 

To upgrade an existing driver, it is not necessary to remove your PRISM card from your computer. 
Simply run the PRISM for Windows.exe file to replace the existing driver with the latest version. After 
the new driver is installed, you must restart the operating system (if the system was not restarted 
during the installation procedure). 
 

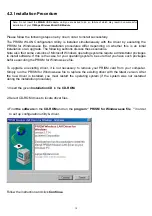
1. Insert the given 

Installation CD 

in the 

CD-ROM.


2. Select CD-ROM drives to locate driver files.  


3. Find 

the software 

in the 

CD-ROM 

and run the

 program “ PRISM for Windows.exe file  ” 

in order 

to set up configuration utility & driver.


Follow the instruction and click 

Continue

.  


Note: Do not insert the 

WLAN

 USB adapter until you are asked to do so, failure of which may result in unsuccessful 

installation of your

 11Mbps Wireless Mini-USB Module 


Содержание WL-383F

Страница 1: ...WL 383F 11Mbps Wireless Mini USB Module User s Manual 2002 03 27 Gemtek Technology Co Ltd...

Страница 2: ...ublication may be reproduced stored in a retrieval system or transmitted in any form or by any means whether electronic mechanical photocopying recording or otherwise without the prior writing of the...

Страница 3: ...is connected Consult the dealer or an experienced radio TV technician for help FCC Caution To assure continued compliance example use only shielded interface cables when connecting to computer or per...

Страница 4: ...ID can not be used on the final product In these circumstances the OEM integrator will be responsible for re evaluating the end product including the transmitter and Obtaining a separate FCC authoriza...

Страница 5: ...st be paid to the dangers of electric shock and static electricity when working with electrical equipment All guidelines of this manual and of the computer manufacturer must therefore be allowed at al...

Страница 6: ...ntents 5 2 Introduction 6 3 Wireless LAN Basics 7 4 Installation forWindows 8 4 1 Installation Overview 9 4 2 Installation Procedure 10 4 3 Uninstallation Procedure 17 5 Configuration Utility 18 6 Tro...

Страница 7: ...e following items 11Mbps Wireless Mini USB Module User manual Diskette containing Wireless LAN Management utility and drivers Note if anything is missing please contact your vendor The diskette contai...

Страница 8: ...time information anywhere in their organization This mobility supports productivity and service opportunities not possible with wired networks Installation Speed and Simplicity Installing a wireless...

Страница 9: ...e driver and then insert the 11Mbps Wireless Mini USB Module and finally set the network properties to accommodate resource sharing and select the type of wireless network that you wish to install The...

Страница 10: ...Install the Access Point AP at first AP is needed in case of Infrastructure network mode l Install the software using the Installation Diskette or CD l Install the 11Mbps Wireless Mini USB Module l I...

Страница 11: ...ing the PRISM for Windows exe file To upgrade an existing driver it is not necessary to remove your PRISM card from your computer Simply run the PRISM for Windows exe file to replace the existing driv...

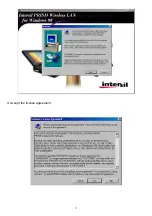
Страница 12: ...11 4 Accept the license agreement...

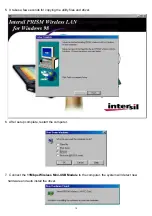
Страница 13: ...seconds for copying the utility files and driver 6 After setup complete restart the computer 7 Connect the 11Mbps Wireless Mini USB Module to the computer the system will detect new hardware and auto...

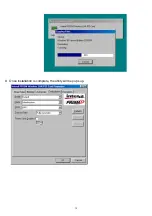
Страница 14: ...13 8 Once installation is complete the utility will be pops up...

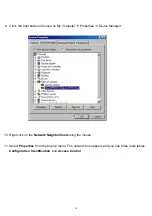
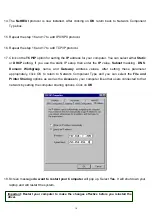
Страница 15: ...My Computer Properties Device Manager 10 Right click on the Network Neighborhood using the mouse 11 Select Properties from the pop up menu The network box appears and you see three main tables Configu...

Страница 16: ...Add button Select Network Component Type box appears Click on the Protocol the click the Add button 13 Select Network Protocols box appears From the list of manufactures click on Microsoft From the l...

Страница 17: ...value Subnet masking DNS Domain Workgroup name and Gateway Address values After setting these parameter appropriately click OK to return to Network Component Type and you can select the File and Prin...

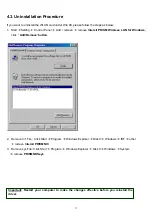
Страница 18: ...e Intersil PRISM Wireless LAN for Windows click Add Remove button 2 Remove Inf File Click Start Program Windows Explorer Disk C Windows INF other remove Intersil PRISM NIC 3 Romove sys File Click Star...

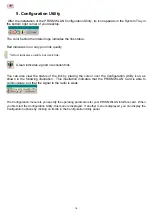
Страница 19: ...You can also view the status of the link by placing the cursor over the Configuration Utility icon as shown in the following illustration This illustration indicates that the PRISM WLAN Card is able t...

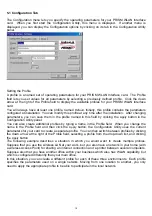
Страница 20: ...ion Utility panel You can also create additional profiles by typing a name in the Profile field When you change the name in the Profile field and then click the Apply button the Configuration Utility...

Страница 21: ...network is directed to an Access Point which then routes the data to the appropriate wireless station The Access Point may also be configured to allow data to be bridged from the wireless network to...

Страница 22: ...general fixed rates are used only in test environments Enabling Power Save Mode The IEEE 802 11 standard provides a Power Save Mode In this mode your PRISM card listens for a beacon a periodic frame...

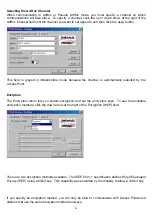
Страница 23: ...automatically selected by the Access Point Encrption The Encryption menu lets you enable encryption and set the encryption keys To see the available encryption methods click the down arrow at the righ...

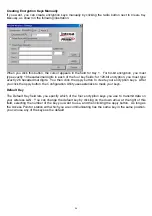
Страница 24: ...ollowing sections Creating Encryption Keys Using a Passphrase To create encryption keys using a passphrase click the radio button next to Create Key with Passphrase and type a character string in the...

Страница 25: ...its You then click the Apply button to create your encryption keys After you click the Apply button the Configuration Utility uses asterisks to mask your keys Default Key The Default Key field lets yo...

Страница 26: ...ction is made In Infrastructure mode this number changes as the radio scans the available channels Current Tx Rate shows the highest transmit rate of the current association Throughput shows the short...

Страница 27: ...About menu provides information on the version of the Network Driver the Configuration Utility and the firmware in the PRISM WLAN Interface card In addition this menu also provides the MAC address of...

Страница 28: ...the followings if you encounter some problem while installing the Mini PCI card or your Mini PCI card is non functional 1 Click on the Control Panel and then on PC Card Check whether it has PC card in...

Страница 29: ...er devices you must change that value I O address needs 40h byte length 2 Click on the Control panel Double click on the Mini PCI Card you will see Wireless LAN Mini PCI 11Mbps Card Double clicking on...

Отзывы: