Gefen GTB-HDFST-848 Скачать руководство пользователя страница 26

22

Routing Sources using the IR Remote Control

Buttons

1 - 8

 on the IR remote control correspond to each HDMI input (Input 1 - 8) on

the Matrix. Buttons

A - H

 correspond to each HDMI output (Output A - H). To route a

source to a display, press the desired output fi rst, then press the input.

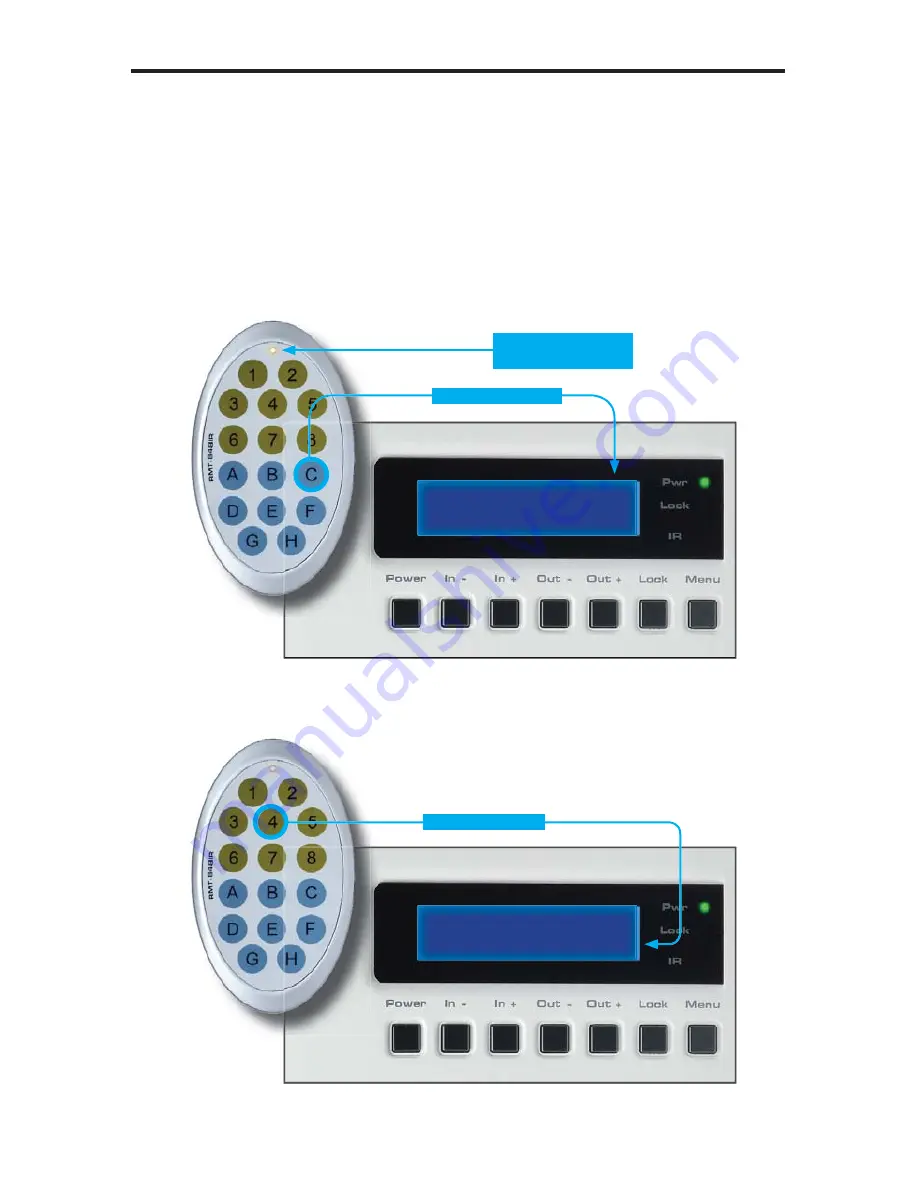
Routing Example: Route Input 4 to Output C

1.  Select Output C by pressing button

C

 on the IR Remote Control.  The 

number 3 will appear in the upper right-hand corner of the LCD display:

2.  Select Input 4 by pressing button

4

 on the IR Remote Control.  The number 

4 will appear in the lower right-hand corner of the LCD display:




p

Input 4 selected




p

Output C selected

LED indicates a

p

button was pressed

IR REMOTE CONTROL

Содержание GTB-HDFST-848

Страница 1: ...8x8 Matrix for HDMI GTB HDFST 848 GTB HDFST 848 BLK User Manual gefentoolbox com...

Страница 2: ......

Страница 3: ...x com support gefentoolbox com Notice Gefen LLC reserves the right to make changes in the hardware packaging and any accompanying documentation without prior written notice 8x8 Matrix for HDMI is a tr...

Страница 4: ...Switching Technology 15 Determining the current Switching Mode 18 Setting the IR channel on the 8x8 Matrix for HDMI 20 IR Remote Control 20 Layout and Descriptions 21 Installing the IR Remote Control...

Страница 5: ...eliminates the need to disconnect and reconnect Hi Def sources It works with any HDMI source that needs to be connected to an HDTV display Each source is accessible at all times from any display usin...

Страница 6: ...ces and display devices See pages 25 for more details The GefenToolBox 8x8 Matrix for HDMI can detect the presence of Deep Color 12 bit signal automatically and will disable Deep Color EDID features a...

Страница 7: ...e HDCP authentication process Fast and Slow FST Modes Front Panel Push Button Switching Supports the use of DVI sources and displays with HDMI to DVI cables or adapters IP Control via Web Graphical Us...

Страница 8: ...PANEL LAYOUT 4 Top Front 6 5 2 4 3 1 7 10 12 11 9 8...

Страница 9: ...PANEL LAYOUT 5 14 13 Left Side Right Side...

Страница 10: ...ion Buttons These buttons are used to navigate between the inputs and outputs of the Gefen 8x8 Matrix for HDMI For details on how these controls are used see page 10 7 Power Turn the power on or off b...

Страница 11: ...Matrix 4 Connect the AC power cord to the power supply and connect the power cord to an available electrical outlet Wiring Diagram for the 8x8 Matrix for HDMI GTB HDFST 848 HD Display HD Display HD Di...

Страница 12: ...e matrix and is also used to display additional system information When the unit is powered on the following screen is displayed After a few moments the status screen is displayed The status screen is...

Страница 13: ...as been routed to Outputs A B C and D Continuing on Input 4 is routed to Output E Input 6 is routed to Output F Input 8 is routed to Output G and finally Input 1 is routed to Output H Note that each o...

Страница 14: ...once The routing state for Output A will be displayed 2 Press the Out or Out button again to cycle through the routing state for each output Consecutively pressing the Out button will cycle through ea...

Страница 15: ...has been selected press the In or In button Consecutively pressing the In button will increment the input source value by a factor of 1 within a range of 1 8 For example if Input 4 was originally rout...

Страница 16: ...status of another output press the Out or Out buttons to navigate to the desired output Use the In or In buttons to change the source 6 Press the Menu button to return to the Routing Screen OPERATING...

Страница 17: ...ee page 26 1 Press the Lock button on the front panel The Lock LED will glow bright orange to indicate that the front panel buttons on the 8x8 Matrix for HDMI have been locked I If any buttons other t...

Страница 18: ...sconnecting or turning ON OFF of HDTV displays without having these activities affect other Hi Def sources routed to any other HDTV display in the same system Fast Mode Setting the 8x8 Matrix for HDMI...

Страница 19: ...rst row IN represents each HDMI input on the matrix The bottom row MODE represents the current switching mode of each HDMI input Selecting the Input 2 To change the switching mode on an HDMI input pre...

Страница 20: ...pressing the Out button will cycle through each input from left to right starting with Input 1 4 Consecutively pressing the Out button will cycle through each output from right to left NOTE In Routin...

Страница 21: ...of another input press the Out or Out button to navigate to the desired input Press the In or In button to toggle the switching mode between Fast F or Slow S 6 Press the Menu button to return to the...

Страница 22: ...e Control must be set to the same IR channel Follow the procedure outlined below to set the IR channel on the 8x8 Matrix for HDMI 1 From the Routing screen simultaneously press the In In and the Out b...

Страница 23: ...n the LCD display In this case the 8x8 Matrix for HDMI is set to IR channel 1 Therefore the I DIP switch 1 on the IR Remote Control must be set to the ON position and DIP switch 2 must be set to the O...

Страница 24: ...tons are used to select which source is routed to a display The Source and Display buttons are mapped as follows IR REMOTE CONTROL RMT 848IR Layout and Description 1 2 20 NOTE An Activity Indicator th...

Страница 25: ...e IR channel on the IR Remote Control must match the IR channel used by the 8x8 Matrix for HDMI For example if both DIP switches on the IR Remote Con trol unit are set to IR channel 0 both DIP switche...

Страница 26: ...put first then press the input Routing Example Route Input 4 to Output C 1 Select Output C by pressing button C on the IR Remote Control The number 3 will appear in the upper right hand corner of the...

Страница 27: ...the input and output have been selected on the IR Remote Control the numbers on the far right hand of the LCD display will disappear and the new routing state will be displayed in the LCD display Inp...

Страница 28: ...tional IR Extender Gefen Part No EXT RMT EXTIR can be used to extend the IR capabilities of the GefenToolBox 8x8 Matrix for HDMI One such application allows the Matrix to be hidden within or behind a...

Страница 29: ...rce can send to each output device The following EDID features are copied from Output A Supported Resolutions 3D Support Audio Features Display Connections If a device is not connected to Output A the...

Страница 30: ...d on the RS 232 serial interface IMPORTANT When sending RS 232 commands a carriage return and a line feed character must be included at the end of each line Commands and parameters are not case sensit...

Страница 31: ...sk command see page 37 for details 5 Set the gateway router IP address using the sgateway command see page 33 for details 6 Set the Telnet listening port using the set_telnet_port command see page 32...

Страница 32: ...e user name for the login procedure sgateway Sets the IP gateway address show_gateway Displays the gateway address show_http_port Displays the HTTP listening port show_ip Displays the IP address of th...

Страница 33: ...Meaning 0 Do not display welcome message 1 Display welcome message ipconfig Command The ipconfig command displays all TCP IP settings on the matrix Syntax y ipconfig Parameters None Example p ipconfig...

Страница 34: ...The matrix must be rebooted after executing this command set_http_port Command The set_http_port command sets the Web server listening port Syntax y set_http_port param1 Parameters param1 Port 0 6553...

Страница 35: ...net_pass command sets the Telnet password The maximum length of the password is 20 characters The password is case sensitive Syntax y set_telnet_pass param1 Parameters param1 Password Default Admin No...

Страница 36: ...Port 0 65535 Notes The matrix must be rebooted after executing this command set_telnet_username Command The set_telnet_username command sets the Telnet user name The maximum length of the user name is...

Страница 37: ...param1 Parameters param1 IP gateway Example p sgateway 192 168 1 1 Default 192 168 1 254 Notes The matrix must be rebooted after executing this command show_gateway Command The show_gateway command sh...

Страница 38: ...This command is will be implemented in a future release of the firmware show_ip Command The show_ip command shows the current IP address of the Matrix Syntax y show_ip Parameters None show_mac_addr C...

Страница 39: ..._telnet_port Command The show_telnet_port command shows the current Telnet listening port Syntax y show_telnet_port Parameters None show_telnet_username Command The show_telnet_username command return...

Страница 40: ...data Parameters None sipadd Command The sipadd command sets the IP address of the matrix Dot decimal notation must be used when specifying the IP address Syntax y sipadd param1 Parameters param1 IP ad...

Страница 41: ...param1 Parameters param1 Network mask Default 255 255 255 0 Notes The matrix must be rebooted after executing this command use_telnet_pass Command The use_telnet_pass command requires or disables Tel...

Страница 42: ...put show_input_name Displays the specified input name show_output_name Displays the specified output name show_r Displays the current routing state of the specified output r Command The r command rout...

Страница 43: ...the front panel RS 232 and Telnet Syntax y lock_matrix param1 Parameters param1 Value 0 1 Value Meaning 0 Unlock Matrix 1 Lock Matrix recall_preset Command The recall_preset command recalls a routing...

Страница 44: ...The set_input_name command provides a name to the selected input For example Input 1 could be renamed as Computer 1 The maximum string length for param2 is 15 characters Special characters and spaces...

Страница 45: ...score character _ to separate characters Syntax y set_output_name param1 param2 Parameters param1 Output A H param2 Name Example p set_output_name 3 Sony_XBR7 Sony_XBR7 is assigned to output 3 show_in...

Страница 46: ...arameters param1 Output A H Example p show_output_name C The name for output C is Sony_XBR7 show_input_name Command The show_input_name command shows the name provided to the specified input using the...

Страница 47: ...ommand The show_r command shows the current routing status of the specified output Syntax y show_r param1 Parameters param1 Output A H Example p show_r c Output C is routed to Input 2 RS 232 TELNET CO...

Страница 48: ...Displays the RSENSE status of the specified output m Displays the current matrix routing status in table format help Command The help command displays help on the specified command If param1 is not sp...

Страница 49: ...f the Matrix Syntax y show_fw Parameters None Example p show_fw Firmware version GTB HDFST 848 v2 0E show_hdp Command The show_hpd command displays the HPD Hot Plug Detect status of the specified outp...

Страница 50: ...w Command The fst_slow command sets the FST Fast Switching Technology to slow normal mode for the specified inputs If param1 is set to 0 then all inputs are set to slow FST mode Syntax y fst_slow para...

Страница 51: ..._fast param1 param9 Parameters param1 Input 1 8 Examples p fst_fast 2 3 4 Inputs 2 3 4 are set to FST fast mode fst_fast 0 All inputs are set to FST fast mode show_fst Command The show_fst command sho...

Страница 52: ...ask status for the specified output unmask Unmasks the specified outputs mask Command The mask command masks the specified outputs If param1 is set to 0 then all outputs are masked Syntax y mask param...

Страница 53: ...param1 Parameters param1 Output A H Example p show_mask d Outputs D is masked unmask Command The unmask command unmasks the specified outputs If param1 is set to 0 then all outputs are unmasked Syntax...

Страница 54: ...splays the IR channel of the matrix activeisp Command The activeisp command activates ISP mode This command is used when programming the matrix Syntax y activeisp param1 Parameters param1 State 0 1 Va...

Страница 55: ...atrix Syntax y power param1 Parameters param1 State 0 1 Value Meaning 0 Power matrix OFF 1 Power matrix ON reboot Command The reboot command reboots the matrix Syntax y reboot Parameters None Example...

Страница 56: ...unit are returned See page 21 for details on setting the IR channel for the IR remote control Syntax y set_ir param1 Parameters param1 Channel 0 3 Example p set_ir 2 IR channel is set to channel 2 sho...

Страница 57: ...nect the Ethernet cable between the matrix and the computer containing the firmware file 3 Configure the matrix for IP control See page 27 for more information 4 In a Web browser type in the IP addres...

Страница 58: ...ance between the edges of the unit and any walls or vertical surfaces to allow for enough clearance for insertion and retraction of cables at the HDMI connectors For installation on a drywall surface...

Страница 59: ...pin female IP Connector 1 RJ 45 sheilded USB Port 1 Mini B female RS 232 Port DB 9 serial female IR Extender Port 3 5 mm mini stereo jack Power Supply 24V DC Power Consumption 100W max Operating Tempe...

Страница 60: ...oof of sale may be required in order to claim warranty 2 Customers outside the US are responsible for shipping charges to and from Gefen 3 Copper cables are limited to a 30 day warranty and cables mus...

Страница 61: ......

Страница 62: ......

Страница 63: ......

Страница 64: ...Rev A4 2 0N Pb 20600 Nordhoff St Chatsworth CA 91311 1 800 545 6900 818 772 9100 fax 818 772 9120 www gefentoolbox com support gefentoolbox com This product uses UL or CE listed power supplies...

Отзывы: