background image

page | 23

B

asic Oper

ation

B

asic Oper

ation

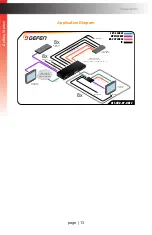
IP Control


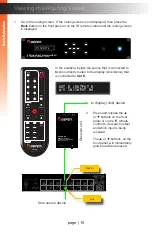
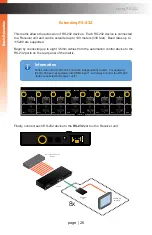
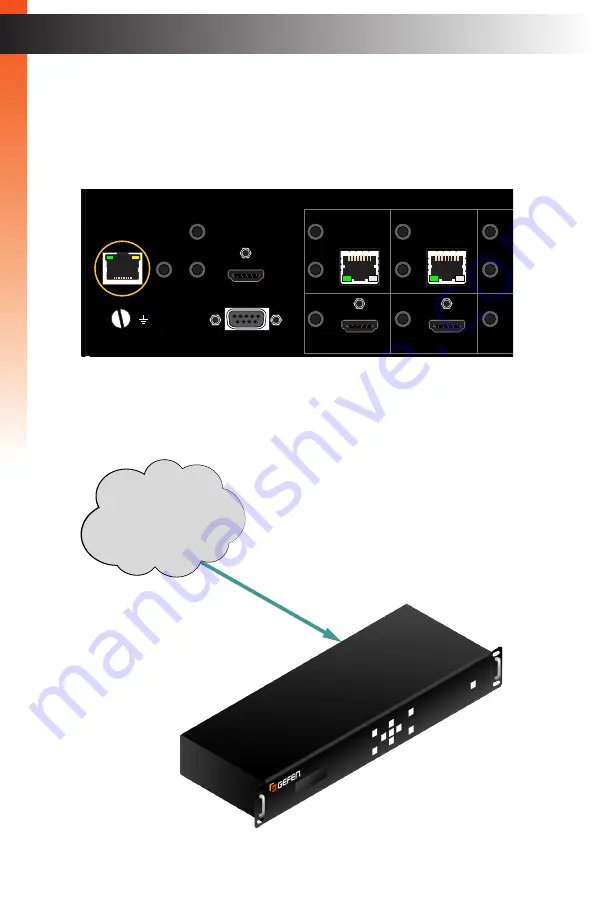
In order to control matrix operation, provide access to the built-in web interface, and 

allow the extension of network devices, connect a shielded CAT-5 (or better) cable to the 

Ethernet / IP Control

 port from the rear panel of the matrix to the Local Area Network. 


Once the shielded CAT-5 (or better) cable is connected to the 

Ethernet / IP Control

 port, 

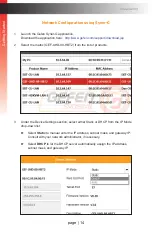
the matrix can be configured to work on a network.  See 

Network Configuration using 

Syner-G (page 14)

 for more information. 

*Preferred

4K Ultra HD

HDBaseT

w/ HDCP 2.2, POH, Ethernet,
RS-232 & 2-way IR

Receiver

RS-232

Ethernet

HDMI

Out

IR

In/Ext

IR

Out

Pwr

HDBaseT™

POH Input

®

4K Ultra HD 8x9 Matrix for HDMI

w/ HDCP 2.2, HDBaseT™ & POH

Back

Enter

IR

Power

Menu

Preset

Lock

*Preferred

®

Ethernet

IP Control

IR In/Ext

IR All

Out

RS-232

IR Out

IR In

RS-232

IR Out

IR In

RS-232

IR Out

IR In

RS-232

IR Out

IR In

RS-232

IR Out

IR In

RS-232

IR Out

IR In

RS-232

IR Out

IR In

RS-232

IR Out

IR In

RS-232

In

Local Out

HDMI

1

2

3

4

5

6

7

8

A

B

C

D

E

F

G

H

GEF-UHD-89-HBT2

HDMI Inputs

HDBaseT™ POH Outputs

Using Ethernet

Matrix

Ether

net

LAN / Network

Содержание GEF-UHD-89-HBT2

Страница 1: ...8x9 Matrix for HDMI w HDCP 2 2 HDBaseT POH Release A1 Preferred GEF UHD 89 HBT2 User Manual ...

Страница 2: ...rd from being walked on or pinched particularly at plugs convenience receptacles and the point where they exit from the apparatus 11 Only use attachments accessories specified by the manufacturer 12 To reduce the risk of electric shock and or damage to this product never handle or touch this unit or power cord if your hands are wet or damp Do not expose this product to rain or moisture 13 Unplug t...

Страница 3: ...icular purpose all of which are expressly disclaimed 1 Proof of sale may be required in order to claim warranty 2 Customers outside the US are responsible for shipping charges to and from Gefen 3 Copper cables are limited to a 30 day warranty and cables must be in their original condition The information in this manual has been carefully checked and is believed to be accurate However Gefen assumes...

Страница 4: ... Time Fax 818 772 9120 Email support gefen com Web http www gefen com Mailing Address Gefen LLC c o Customer Service 20600 Nordhoff St Chatsworth CA 91311 Product Registration Register your product here http www gefen com kvm Registry Registration jsp iv Contacting Gefen Technical Support ...

Страница 5: ...adable application from Gefen that provides effortless network configuration for this product Download the application here http www gefen com synerg 4K Ultra HD 8x9 Matrix for HDMI w HDCP 2 2 HDBaseT POH is a trademark of Gefen LLC 2015 Gefen LLC All Rights Reserved All trademarks are the property of their respective owners Gefen LLC reserves the right to make changes in the hardware packaging an...

Страница 6: ... with or without modification are permitted provided that the following conditions are met 1 Redistributions of source code must retain the above copyright notice this list of conditions and the following disclaimer 2 Redistributions in binary form must reproduce the above copyright notice this list of conditions and the following disclaimer in the documentation and or other materials provided wit...

Страница 7: ...vanced EDID Management for rapid integration of sources and displays Pass through of LPCM 7 1 and HBR High Bit Rate audio formats such as Dolby Atmos Dolby TrueHD DTS X and DTS HD Master Audio Supports the use of DVI sources and DVI displays with HDMI to DVI adapters not included RS 232 Serial interface for use with an automation control system IP control via Telnet UDP and the built in web server...

Страница 8: ...resent in the box when you first open it immediately contact your dealer or Gefen 1 x 4K Ultra HD 8x9 Matrix for HDMI with detachable rack ears 8 x 4K Ultra HD HDBaseT Receiver units 1 x IR remote control unit 8 x DB 9 female to 3 5mm mini stereo cables 16 x L shape brackets 40 x Bracket screws 8 x Brackets for locking HDMI 8 x DB 9 male to 3 5mm mini stereo cables 1 x IEC type AC power cord 1 x Q...

Страница 9: ...g Inputs to Outputs 20 Using the Front Panel 20 Using the IR Remote Control 22 Using Ethernet 23 IP Control 23 Ethernet Extension 24 Using RS 232 25 Controlling the Matrix 25 Extending RS 232 26 IR Control 27 IR In Ext Port 27 IR All Out Port 28 IR All In Port 29 IR In Ports 30 IR Out Ports 31 Changing the IR Routing State 33 Masking Outputs 36 Blocking Inputs 37 Locking the Matrix 38 Using the Fr...

Страница 10: ...ing Editing Routing Presets 91 Independent IR Routing 94 IR Routing Presets 97 Input and Output Status 100 Changing Input and Output Names 101 HPD Control 102 HDCP 103 Setting the EDID Mode 105 Copying EDID Data 107 Getting EDID Information 109 Uploading and Downloading EDID Data 110 Configuring Network Settings 113 System Settings 119 3 Advanced Operation Using Telnet UDP and RS 232 130 Telnet Co...

Страница 11: ...This page left intentionally blank ...

Страница 12: ...This page left intentionally blank ...

Страница 13: ...8x9 Matrix for HDMI w HDCP 2 2 HDBaseT POH 1 Getting Started ...

Страница 14: ...ix See Locking the Matrix page 38 for more information 7 IR Receives signals from the included IR remote control unit 8 Power Press this button to power ON or Power OFF the matrix Preferred 4K Ultra HD HDBaseT w HDCP 2 2 POH Ethernet RS 232 2 way IR Receiver RS 232 Ethernet HDMI Out IR In Ext IR Out Pwr HDBaseT POH Input 4K Ultra HD 8x9 Matrix for HDMI w HDCP 2 2 HDBaseT POH Back Enter IR Power Me...

Страница 15: ...al IR cable from the IR output port on the automation control device to the IR All In port 6 HDMI Local Out Connect a local 4K Ultra HD display to this HDMI port This port can be used to monitor any source device that is connected to the matrix Preferred 4K Ultra HD HDBaseT w HDCP 2 2 POH Ethernet RS 232 2 way IR Receiver RS 232 Ethernet HDMI Out IR In Ext IR Out Pwr HDBaseT POH Input 4K Ultra HD ...

Страница 16: ... 10 IR Out 1 8 Connect an IR emitter from each IR Out port to each source device 11 POH Connectors A H Connect a CAT 5 or better cable from each of these ports to a Receiver unit 12 HDMI Inputs 1 8 Connect up to eight 4K Ultra HD source devices to the matrix using these HDMI ports 13 Cooling fan assembly Provides active cooling for the matrix by expelling warm air from the enclosure To prevent ove...

Страница 17: ...R Out IR In RS 232 IR Out IR In RS 232 IR Out IR In RS 232 IR Out IR In RS 232 IR Out IR In RS 232 IR Out IR In RS 232 IR Out IR In RS 232 cal Out HDMI 1 2 3 4 5 6 7 8 A B C D E F G H HDMI Inputs HDBaseT POH Outputs Introduction Getting Started 1 6 7 2 3 4 5 Preferred 4K Ultra HD HDBaseT w HDCP 2 2 POH Ethernet RS 232 2 way IR Receiver RS 232 Ethernet HDMI Out IR In Ext IR Out Pwr HDBaseT POH Inpu...

Страница 18: ...indicator will glow solid blue when the Receiver unit is powered Power is supplied by the Sender unit over the CAT 5 or better cable 5 HDBaseT POH Input Connect a CAT 5 or better cable up to 330 feet 100 meters from the Sender unit to this port This transmits audio video IR RS 232 power Ethernet and other control signals between the Sender and Receiver unit 6 Ethernet Connect a shielded CAT 5 or b...

Страница 19: ... any source device connected to the matrix 2 Menu Press this button to display the On Screen Menu 3 Press these buttons to move around within the OSD 4 Back Press this button to return to a previous menu item OK Preferred Output RMT 89L Menu Back OFF 1 3 5 6 7 Input 8 4 2 Preset Mask Local Lock A B Power C D E F G H R03 1 5V R03 1 5V ON 1 2 OK Preferred Output RMT 89L Menu Back OFF 1 3 5 6 7 Input...

Страница 20: ...tton to select the desired preset See Routing Presets page 40 for more information 9 Mask Press this button to mask the desired output See Masking Outputs page 36 for more information 10 Power Press this button to toggle between power on and standby See Powering the Matrix page 18 for more information 11 DIP switches Sets the IR channel of the IR remote control In order for the IR remote control t...

Страница 21: ...e battery compartment 3 Replace the back cover Getting Started Introduction Warning Risk of explosion if battery is replaced by an incorrect type Dispose of used batteries according to the instructions OK Preferred Output RMT 89L Menu Back OFF 1 3 5 6 7 Input 8 4 2 Preset Mask Local Lock A B Power C D E F G H R03 1 5V R03 1 5V ON 1 2 _ _ ...

Страница 22: ... matrix the IR remote control must be set to the same channel as the matrix Use the front panel to set the IR channel of the matrix See Setting the Matrix IR Channel page 73 for more information Channel 3 Channel 4 Channel 1 default DIP1 OFF DIP2 OFF DIP1 OFF DIP2 ON DIP1 ON DIP2 ON DIP1 ON DIP2 OFF Channel 2 R03 1 5V R03 1 5V ON 1 2 _ _ ON 1 2 R03 1 5V R03 1 5 ON 1 2 ON 1 2 R03 1 5V R03 1 5 ON 1 ...

Страница 23: ...Network See Network Configuration using Syner G page 14 for more information on configuration 6 Connect a shielded CAT 5 or better cable from the Ethernet port on each Receiver unit to a Smart TV or other network device This connection provides extension of network devices using the Receiver unit RS 232 Control Optional For more information on RS 232 see RS 232 Configuration page 131 7 Connect a D...

Страница 24: ...l IR cable from the automation control system to the IR All In port on the rear panel of the matrix 13 Connect an IR emitter Gefen part no EXT 2IREMIT to each of the IR Out ports on the rear panel of the matrix 14 Connect an IR emitter Gefen part no EXT 2IREMIT to the IR All Out port on the rear panel of the matrix 15 Connect an IR extender Gefen part no EXT RMT EXTIRN to the IR In Ext port on eac...

Страница 25: ... Matrix for HDMI w HDCP 2 2 HDBaseT POH Automation Control Device 8x 8x OR IR Emitter IR Blaster IR Emitters IR Extender IR Extender RS 232 3 5mm DB 9 H D M I O u t E t h e r n e t E t h e r n e t R S 2 3 2 D B 9 8 x R S 2 3 2 3 5 m m D B 9 8 x e l e c t r i c a l I R c a b l e s E l e c t r i c a l I R c a b l e E l e c t r i c a l I R c a b l e IR Out All IR Out HDMI Out H D M I I n IR In Ext IR...

Страница 26: ... 2 Select the matrix GEF UHD 89 HBT2 from the list of products 3 Under the Device Settings section select either Static or DHCP from the IP Mode drop down list Select Static to manual enter the IP address subnet mask and gateway IP Consult with your network administrator if necessary Select DHCP to let the DHCP server automatically assign the IP address subnet mask and gateway IP ...

Страница 27: ...he screen 5 The matrix will automatically reboot and use the new network settings 6 Use the IP address of the matrix to access the built in web interface or start a Telnet session See the following for more information The Web Interface page 79 Using Telnet UDP and RS 232 page 130 ...

Страница 28: ...This page left intentionally blank ...

Страница 29: ...8x9 Matrix for HDMI w HDCP 2 2 HDBaseT POH 2 Basic Operation ...

Страница 30: ...DCP 2 2 POH Ethernet RS 232 2 way IR Receiver RS 232 Ethernet HDMI Out IR In Ext IR Out Pwr HDBaseT POH Input 4K Ultra HD 8x9 Matrix for HDMI w HDCP 2 2 HDBaseT POH Back Enter IR Power Menu Preset Lock Preferred HDMI Inputs HDBaseT POH Outputs Ethernet IP Control IR In Ext IR All Out RS 232 IR Out IR In RS 232 IR Out IR In RS 232 IR Out IR In RS 232 IR Out IR In RS 232 IR Out IR In RS 232 IR Out I...

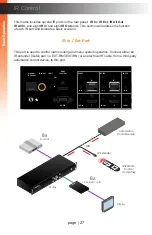
Страница 31: ... HD 8x9 Matrix for HDMI w HDCP 2 2 HDBaseT POH Back Enter IR Power Menu Preset Lock Preferred HDMI Inputs HDBaseT POH Outputs Out D In 4 from source device to display sink device Receiver unit Ethernet IP Control IR In Ext IR All Out RS 232 IR Out IR In RS 232 IR Out IR In RS 232 IR Out IR In RS 232 IR Out IR In RS 232 IR Out IR In RS 232 IR Out IR In RS 232 IR Out IR In RS 232 IR Out IR In RS 232...

Страница 32: ...e the or buttons until Output G is displayed Currently Input 7 is routed to Output G We need to change it to Input 4 3 Press the Enter button 4 An arrow cursor will be displayed next to the input This indicates that input can now be changed Basic Operation Basic Operation out G output G A V In input 07 out B output B A V In input 02 out G output G A V In input 07 Ethernet IP Control IR In Ext IR A...

Страница 33: ...e Enter button The arrow cursor next to the input will disappear indicating that the input can not be changed 7 The selected input is now routed to the selected output 8 Repeat steps 2 6 to change the routing state for additional outputs Basic Operation Basic Operation Routing Inputs to Outputs out G output G A V In input 04 out G output G A V In input 04 ...

Страница 34: ...ts to Outputs 3 The selected output will be displayed in the front panel display In this example we have pressed button D Output D 4 Select the desired input by pressing one of the Input buttons 1 8 on the lower portion of the IR remote control In this example we will press button 5 5 The selected input and output will be displayed in the front panel display 6 The routing process is complete out D...

Страница 35: ...s connected to the Ethernet IP Control port the matrix can be configured to work on a network See Network Configuration using Syner G page 14 for more information Preferred 4K Ultra HD HDBaseT w HDCP 2 2 POH Ethernet RS 232 2 way IR Receiver RS 232 Ethernet HDMI Out IR In Ext IR Out Pwr HDBaseT POH Input w HDCP 2 2 HDBaseT POH Ethernet IP Control IR In Ext IR All Out RS 232 IR Out IR In RS 232 IR ...

Страница 36: ...eT w HDCP 2 2 POH Ethernet RS 232 2 way IR Receiver RS 232 Ethernet HDMI Out IR In Ext IR Out Pwr HDBaseT POH Input 4K Ultra HD 8x9 Matrix for HDMI w HDCP 2 2 HDBaseT POH Back Enter IR Power Menu Preset Lock Preferred Ethernet IP Control IR In Ext IR All Out RS 232 IR Out IR In RS 232 IR Out IR In RS 232 IR Out IR In RS 232 IR Out IR In RS 232 IR Out IR In RS 232 IR Out IR In RS 232 IR Out IR In R...

Страница 37: ... on RS 232 settings Basic Operation Basic Operation Using RS 232 Preferred 4K Ultra HD HDBaseT w HDCP 2 2 POH Ethernet RS 232 2 way IR Receiver RS 232 Ethernet HDMI Out IR In Ext IR Out Pwr HDBaseT POH Input Ethernet IP Control IR In Ext IR All Out RS 232 IR Out IR In RS 232 IR Out IR In RS 232 IR Out IR In RS 232 IR Out IR In RS 232 In Local Out HDMI 1 2 3 A B C GEF UHD 89 HBT2 Matrix Automation ...

Страница 38: ...xt IR All Out RS 232 IR Out IR In RS 232 IR Out IR In RS 232 IR Out IR In RS 232 IR Out IR In RS 232 IR Out IR In RS 232 IR Out IR In RS 232 IR Out IR In RS 232 IR Out IR In RS 232 In Local Out HDMI 1 2 3 4 5 6 7 8 A B C D E F G H HDMI Inputs HDBaseT POH Outputs for HDMI OH Back Enter IR Power Menu Preset Lock IR Out IR In S 232 IR Out IR In RS 232 IR Out IR In RS 232 IR Out IR In RS 232 IR Out IR...

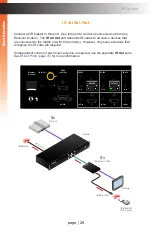
Страница 39: ...ontrol device to this port Preferred 4K Ultra HD HDBaseT w HDCP 2 2 POH Ethernet RS 232 2 way IR Receiver RS 232 Ethernet HDMI Out IR In Ext IR Out Pwr HDBaseT POH Input 4K Ultra HD 8x9 Matrix for HDMI w HDCP 2 2 HDBaseT POH Back Enter Ethernet IP Control IR In Ext IR All Out RS 232 IR Out IR In RS 232 IR Out IR In RS 232 IR Out IR In RS 232 IR Out IR In RS 232 In Local Out HDMI 1 2 3 A B C GEF UH...

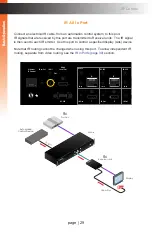
Страница 40: ...is required use the separate IR Out ports See IR Out Ports page 31 for more information Preferred 4K Ultra HD HDBaseT w HDCP 2 2 POH Ethernet RS 232 2 way IR Receiver RS 232 Ethernet HDMI Out IR In Ext IR Out Pwr HDBaseT POH Input 4K Ultra HD 8x9 Matrix for HDMI w HDCP 2 2 HDBaseT POH Back Ethernet IP Control IR In Ext IR All Out RS 232 IR Out IR In RS 232 IR Out IR In RS 232 IR Out IR In RS 232 I...

Страница 41: ...his port To allow independent IR routing separate from video routing see the IR In Ports page 30 section Preferred 4K Ultra HD HDBaseT w HDCP 2 2 POH Ethernet RS 232 2 way IR Receiver RS 232 Ethernet HDMI Out IR In Ext IR Out Pwr HDBaseT POH Input 4K Ultra HD 8x9 Matrix for HDMI w HDCP 2 2 HDBaseT POH Back Ethernet IP Control IR In Ext IR All Out RS 232 IR Out IR In RS 232 IR Out IR In RS 232 IR O...

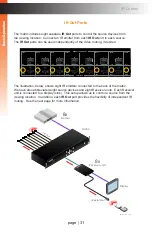
Страница 42: ... eight source devices and eight Receiver units Each Receiver unit is connected to a display sink Preferred D POH Ethernet way IR Receiver HDMI Out IR n Ext IR Out Pwr HDBaseT POH Input HD 8x9 Matrix for HDMI 2 HDBaseT POH Back Enter IR Pow Lock xt IR All Out RS 232 IR Out IR In RS 232 IR Out IR In RS 232 IR Out IR In RS 232 IR Out IR In RS 232 IR Out IR In RS 232 IR Out IR In RS 232 IR Out IR In R...

Страница 43: ...his setup allows us to control a source from the viewing location In addition each IR Out port provides the flexibility of independent IR routing See the next page for more information Preferred D POH Ethernet ay IR eceiver HDMI Out IR Ext IR Out Pwr HDBaseT POH Input HD 8x9 Matrix for HDMI 2 HDBaseT POH Back Enter IR Powe Lock IR All Out RS 232 IR Out IR In RS 232 IR Out IR In RS 232 IR Out IR In...

Страница 44: ... IR routing feature we can route the IR signals to a different IR Out port independent of the video routing In the illustration below we have changed the IR routing in order to control the source that is connected to HDMI In 1 See Independent IR Routing page 94 for information on how to change the IR routing state Matrix IR extender IR extender Sources Receiver unit Receiver unit Display Display 1...

Страница 45: ...nged independently of the A V routing As an example we have three blu ray players Each blu ray player is controlled from different viewing locations using IR an extender that is connected to each Receiver unit Normally a display is connected to each Receiver unit but for clarity we have removed them from the diagram Now let s say we want to control blu ray player 2 from any of the outputs A C 2 3 ...

Страница 46: ... want to be able to control blu ray player 2 from any of the outputs A C we need to change the IR IN setting to Input 02 Basic Operation Basic Operation IR Control out A output A IR In input 01 out A output A IR In input 01 out A output A A V In input 01 OK Preferred Output RMT 89L Menu Back OFF 1 3 5 6 7 Input 8 4 2 Preset Mask Local Lock A B Power C D E F G H R03 1 5V R03 1 5V ON 1 2 Ethernet IP...

Страница 47: ...e the IR routing for each output We can verify our IR routing state by pressing the or buttons to scroll through the output list For our example we now have the following Now the blu ray player which is connected to Input 2 can now be controlled from Output A Output B or Output C 9 Press and release the Back button to return to the routing screen Basic Operation Basic Operation IR Control out A ou...

Страница 48: ... we are starting at the routing screen Basic Operation Basic Operation 2 Press the Mask button on the IR remote control 3 Select the desired output by pressing one of the Output buttons Local A H on the top portion of the IR remote control 4 The selected output will be masked immediately 5 To unmask an output repeat steps 2 and 3 OK Preferred Output RMT 89L Menu Back OFF 1 3 5 6 7 Input 8 4 2 Pres...

Страница 49: ...ere the Input is routed For example if we want to block Input 3 and Input 3 is routed to Output H then we would press the H button 5 To unblock an input press the desired Output button A H then select an input from the Input buttons located at the bottom portion of the IR remote control 2 Press the Off button on the IR remote control 3 The selected input will be turned off immediately 4 The front ...

Страница 50: ... RS 232 IR Out IR In RS 232 IR Out IR In RS 232 IR Out IR In RS 232 IR Out IR In RS 232 IR Out IR In RS 232 IR Out IR In RS 232 In Local Out HDMI 1 2 3 4 5 6 7 8 A B C D E F G H GEF UHD 89 HBT2 Preferred 4K Ultra HD HDBaseT w HDCP 2 2 POH Ethernet RS 232 2 way IR Receiver RS 232 Ethernet HDMI Out IR In Ext IR Out Pwr HDBaseT POH Input 4K Ultra HD 8x9 Matrix for HDMI w HDCP 2 2 HDBaseT POH Back Ent...

Страница 51: ... In RS 232 IR Out IR In RS 232 IR Out IR In RS 232 In Local Out HDMI 1 2 3 4 5 6 7 8 A B C D E F G H GEF UHD 89 HBT2 Preferred 4K Ultra HD HDBaseT w HDCP 2 2 POH Ethernet RS 232 2 way IR Receiver RS 232 Ethernet HDMI Out IR In Ext IR Out Pwr HDBaseT POH Input 4K Ultra HD 8x9 Matrix for HDMI w HDCP 2 2 HDBaseT POH Back Enter IR Power Menu Preset Lock Preferred HDMI Inputs HDBaseT POH Outputs Ethern...

Страница 52: ...n the preset will be applied to the matrix 7 After a few moments the routing screen will be displayed Basic Operation Basic Operation Ethernet IP Control IR In Ext IR All Out RS 232 IR Out IR In RS 232 IR Out IR In RS 232 IR Out IR In RS 232 IR Out IR In RS 232 IR Out IR In RS 232 IR Out IR In RS 232 IR Out IR In RS 232 IR Out IR In RS 232 In Local Out HDMI 1 2 3 4 5 6 7 8 A B C D E F G H GEF UHD ...

Страница 53: ...cted when using the IR remote control 4 The preset is now loaded and the routing state stored in the preset will be applied to the matrix Basic Operation Basic Operation Routing Presets OK Preferred Output RMT 89L Menu Back OFF 1 3 5 6 7 Input 8 4 2 Preset Mask Local Lock A B Power C D E F G H R03 1 5V R03 1 5V ON 1 2 Preset button Input buttons Information When using the IR remote control no conf...

Страница 54: ...Local Lock A B Power C D E F G H R03 1 5V R03 1 5V ON 1 2 Ethernet IP Control IR In Ext IR All Out RS 232 IR Out IR In RS 232 IR Out IR In RS 232 IR Out IR In RS 232 IR Out IR In RS 232 IR Out IR In RS 232 IR Out IR In RS 232 IR Out IR In RS 232 IR Out IR In RS 232 In Local Out HDMI 1 2 3 4 5 6 7 8 A B C D E F G H GEF UHD 89 HBT2 Preferred 4K Ultra HD HDBaseT w HDCP 2 2 POH Ethernet RS 232 2 way I...

Страница 55: ...IR Out IR In RS 232 IR Out IR In RS 232 IR Out IR In RS 232 IR Out IR In RS 232 IR Out IR In RS 232 IR Out IR In RS 232 In Local Out HDMI 1 2 3 4 5 6 7 8 A B C D E F G H GEF UHD 89 HBT2 Preferred RS 232 IR In Ext IR Out Pwr HDBaseT POH Input 4K Ultra HD 8x9 Matrix for HDMI w HDCP 2 2 HDBaseT POH Back Enter IR Power Menu Preset Lock Preferred HDMI Inputs HDBaseT POH Outputs out a output a A V In in...

Страница 56: ...R remote control 5 The HPD Control option will be displayed 6 Press the Enter button on the front panel If using the included IR remote control press the OK button setup setup HDP control OK Preferred Output RMT 89L Menu Back OFF 1 3 5 6 7 Input 8 4 2 Preset Mask Local Lock A B Power C D E F G H R03 1 5V R03 1 5V ON 1 2 Ethernet IP Control IR In Ext IR All Out RS 232 IR Out IR In RS 232 IR Out IR ...

Страница 57: ...ss the Enter button on the front panel If using the included IR remote control press the OK button 10 The HPD pulse will be sent to the selected input If a display is connected to the output to which the input is routed then the display will flash as the HPD pulse is received 11 After a few moments the input selection screen will be displayed again 12 To send an HPD pulse to another input repeat s...

Страница 58: ...ton on the IR remote control 4 The HPD Control option will be displayed 5 Press and release the or buttons on the front panel or on the IR remote control to select the HDCP Control option setup setup HDP control setup hdcp control OK Preferred Output RMT 89L Menu Back OFF 1 3 5 6 7 Input 8 4 2 Preset Mask Local Lock A B Power C D E F G H R03 1 5V R03 1 5V ON 1 2 Ethernet IP Control IR In Ext IR Al...

Страница 59: ... source device 1 4 and below Only HDCP version 1 4 and below is allowed to be sent from the source device Reject Blocks HDCP content from being sent from the source device If an output A H is selected then the following options will be available Follow Input HDCP pass through The content on the output of the matrix matches the content provided by the source device Always Encode Always applies HDCP...

Страница 60: ...save the setting 13 To set the HDCP control on a different input or output press the Back button on the front panel or on the IR remote control 14 To return to the HPD Control option press the Back button on the front panel or on the IR remote control 15 To return to the routing screen press the Back button two more times input 03 1 4 and below Basic Operation Basic Operation Menu System input 03 ...

Страница 61: ...t the EDID Management menu 4 Press the Enter button on the front panel If using the included IR remote control press the OK button 5 The EDID Mode menu will be displayed setup EDID management edid mode OK Preferred Output RMT 89L Menu Back OFF 1 3 5 6 7 Input 8 4 2 Preset Mask Local Lock A B Power C D E F G H R03 1 5V R03 1 5V ON 1 2 Ethernet IP Control IR In Ext IR All Out RS 232 IR Out IR In RS ...

Страница 62: ... EDID indicating that it can be changed 10 Press and release the or buttons on the front panel or on the IR remote control to select the desired EDID Refer to Internal EDID Profiles page 209 for details on internal EDID specifications The available EDID options for each input are EDID Description Internal 720p 2Ch 720p with 2 channel audio Internal 720p Multi 720p with multichannel audio Internal ...

Страница 63: ...l or the OK button on the IR remote control The input selection screen will be displayed 12 To set the EDID on another input repeat steps 7 11 13 Press the Back button on the front panel or on the IR remote control to return to the EDID Mode menu 14 To return to the routing screen press the Back button two more times edid mode input 05 ...

Страница 64: ... on the front panel or on the IR remote control to select the Network menu 4 Press the Enter button on the front panel If using the included IR remote control press the OK button 5 The IP Settings menu will be displayed setup network ip settings OK Preferred Output RMT 89L Menu Back OFF 1 3 5 6 7 Input 8 4 2 Preset Mask Local Lock A B Power C D E F G H R03 1 5V R03 1 5V ON 1 2 Ethernet IP Control ...

Страница 65: ...y address are automatically assigned by a DHCP server c Press the Enter button on the front panel or the OK button on the IR remote control to save the change d Reboot the matrix to affect changes Setting the IP Address a From the IP Mode screen press and release the or buttons on the front panel or on the IR remote control to select the IP Address option The current IP address will be displayed b...

Страница 66: ...ng the Subnet Mask a From the IP Mode screen press and release the or buttons on the front panel or on the IR remote control to select the Subnet Mask option The current subnet mask will be displayed b Press the Enter button on the front panel or the OK button on the IR remote control to edit the IP address c The cursor will appear under the first digit of the address d Press the or buttons on the...

Страница 67: ...tons on the front panel or on the IR remote control to select the Gateway option The current gateway address will be displayed b Press the Enter button on the front panel or the OK button on the IR remote control to edit the address c The cursor will appear under the first digit of the address d Press the or buttons on the front panel or on the IR remote control to change the numerical value of th...

Страница 68: ... Port option The current HTTP port will be displayed b Press the Enter button on the front panel or the OK button on the IR remote control to edit the port number The cursor will appear under the first digit of the port number c Press the or buttons on the front panel or on the IR remote control to change the numerical value of the digit 0 9 d Press the or buttons on the front panel or on the IR r...

Страница 69: ...r on the IR remote control to select the Network menu 4 Press the Enter button on the front panel If using the included IR remote control press the OK button 5 Press the or buttons on the front panel or on the IR remote control to select the TCP Telnet Settings menu setup network tcp telnet settings OK Preferred Output RMT 89L Menu Back OFF 1 3 5 6 7 Input 8 4 2 Preset Mask Local Lock A B Power C ...

Страница 70: ...n arrow cursor will be displayed next to the current setting indicating that it can be changed c Press and release the or buttons on the front panel or on the IR remote control to select the desired setting Enabled Allows Telnet sessions to the matrix Disabled Disables Telnet sessions to the matrix d Press the Enter button on the front panel or the OK button on the IR remote control to save the ch...

Страница 71: ...he port number The cursor will appear under the first digit of the port number c Press the or buttons on the front panel or on the IR remote control to move between each digit in the port number d Press the or buttons on the front panel or on the IR remote control to change the numerical value of the digit 0 9 e After the desired port number has been set press the Enter button on the front panel o...

Страница 72: ... remote control to change the current setting The cursor will appear next to the current setting c Press and release the or buttons on the front panel or on the IR remote control to select the desired setting Enabled Shows the welcome message at the beginning of each Telnet session Disabled Hides the welcome message for Telnet sessions d Press the Enter button on the front panel or the OK button o...

Страница 73: ...he current setting c Press and release the or buttons on the front panel or on the IR remote control to select the desired setting Enabled Requires login credentials at the beginning of each Telnet session Disabled Login credentials are not required for Telnet sessions See Configuring Network Settings page 113 for information on changing the current default password d Press the Enter button on the...

Страница 74: ...or on the IR remote control to select the Network menu 4 Press the Enter button on the front panel If using the included IR remote control press the OK button 5 Press the or buttons on the front panel or on the IR remote control to select the UDP Settings menu setup network udp settings OK Preferred Output RMT 89L Menu Back OFF 1 3 5 6 7 Input 8 4 2 Preset Mask Local Lock A B Power C D E F G H R03...

Страница 75: ...e IR remote control to change the current setting The cursor will appear next to the current setting c Press and release the or buttons on the front panel or on the IR remote control to select the desired setting Enabled Allows the UDP protocol to be used with the matrix Disabled Prevents the UDP protocol from being used with the matrix d Press the Enter button on the front panel or the OK button ...

Страница 76: ... port number The cursor will appear under the first digit of the port number c Press the or buttons on the front panel or on the IR remote control to move between each digit in the port number d Press the or buttons on the front panel or on the IR remote control to change the numerical value of the digit 0 9 e After the desired port number has been set press the Enter button on the front panel or ...

Страница 77: ... the current setting The cursor will appear next to the current setting c Press and release the or buttons on the front panel or on the IR remote control to select the desired setting Enabled Allows the Remote UDP protocol to be used with the matrix Disabled Prevents the Remote UDP protocol from being used with the matrix d Press the Enter button on the front panel or the OK button on the IR remot...

Страница 78: ...ear under the first digit of the UDP address d Press the or buttons on the front panel or on the IR remote control to change the numerical value of the digit 0 9 e Press the or buttons on the front panel or on the IR remote control to move between each digit in the IP address f After the desired UDP address has been set press the Enter button on the front panel or the OK button on the IR remote co...

Страница 79: ...ect the Network menu 4 Press the Enter button on the front panel If using the included IR remote control press the OK button 5 Press the or buttons on the front panel or on the IR remote control to select the Discovery Settings menu setup network discovery settings OK Preferred Output RMT 89L Menu Back OFF 1 3 5 6 7 Input 8 4 2 Preset Mask Local Lock A B Power C D E F G H R03 1 5V R03 1 5V ON 1 2 ...

Страница 80: ...n the front panel or on the IR remote control to select the desired setting Enabled Allows the matrix to be discovered when connected to a network by the Syner G Software Suite Disabled Prevents the matrix from being discovered by the Syner G Software Suite 9 Press the Enter button on the front panel or the OK button on the IR remote control to save the change 10 Reboot the matrix to affect change...

Страница 81: ...l If using the included IR remote control press the OK button 6 Press the or buttons on the front panel or on the IR remote control to select the RS 232 Feedback menu The current setting will be displayed setup System RS 232 feedback enabled OK Preferred Output RMT 89L Menu Back OFF 1 3 5 6 7 Input 8 4 2 Preset Mask Local Lock A B Power C D E F G H R03 1 5V R03 1 5V ON 1 2 Ethernet IP Control IR I...

Страница 82: ...ns on the front panel or on the IR remote control to select the desired setting Enabled RS 232 commands are executed and a response is sent back to the automation device Disabled RS 232 commands are executed but no response is provided 9 Press the Enter button on the front panel or the OK button on the IR remote control to save the change 10 Reboot the matrix to affect changes rs 232 feedback Enab...

Страница 83: ...uded IR remote control press the OK button 6 Press the or buttons on the front panel or on the IR remote control to select the LCD Brightness menu The current setting will be displayed setup System lcd brightness 60 OK Preferred Output RMT 89L Menu Back OFF 1 3 5 6 7 Input 8 4 2 Preset Mask Local Lock A B Power C D E F G H R03 1 5V R03 1 5V ON 1 2 Ethernet IP Control IR In Ext IR All Out RS 232 IR...

Страница 84: ...to the current setting 8 Press and release the or buttons on the front panel or on the IR remote control to select the desired setting The range is from 0 to 100 and can be adjusted by increments of 1 9 Press the Enter button on the front panel or the OK button on the IR remote control to save the change 10 Reboot the matrix to affect changes lcd brightness 60 lcd brightness 70 lcd brightness 70 ...

Страница 85: ... or on the IR remote control to select the System menu 5 Press the Enter button on the front panel If using the included IR remote control press the OK button 6 Press the or buttons on the front panel or on the IR remote control to select the IR Channel menu The current IR channel will be displayed setup System IR channel 1 OK Preferred Output RMT 89L Menu Back OFF 1 3 5 6 7 Input 8 4 2 Preset Mas...

Страница 86: ... cursor will appear next to the current IR channel 8 Press and release the or buttons on the front panel or on the IR remote control to select the desired IR channel The IR channel range is 1 4 9 Press the Enter button on the front panel or the OK button on the IR remote control to save the change 10 Reboot the matrix to affect changes IR CHANNEL 1 ir channel 2 ir channel 2 ...

Страница 87: ...nter button on the front panel If using the included IR remote control press the OK button 6 Press the or buttons on the front panel or on the IR remote control to select the Factory Reset menu setup System factory reset OK Preferred Output RMT 89L Menu Back OFF 1 3 5 6 7 Input 8 4 2 Preset Mask Local Lock A B Power C D E F G H R03 1 5V R03 1 5V ON 1 2 Ethernet IP Control IR In Ext IR All Out RS 2...

Страница 88: ...y reset operation 8 Press and release the or buttons on the front panel or on the IR remote control to select either Yes or No 9 Press the Enter button on the front panel or the OK button on the IR remote control to confirm the selection If Yes is selected then the matrix will be reset to factory default settings and will automatically be rebooted factory reset yes factory reset no ...

Страница 89: ... Enter button on the front panel If using the included IR remote control press the OK button 6 Press the or buttons on the front panel or on the IR remote control to select the Reboot Unit menu setup System reboot unit OK Preferred Output RMT 89L Menu Back OFF 1 3 5 6 7 Input 8 4 2 Preset Mask Local Lock A B Power C D E F G H R03 1 5V R03 1 5V ON 1 2 Ethernet IP Control IR In Ext IR All Out RS 232...

Страница 90: ...mpt to confirm the factory reset operation 8 Press and release the or buttons on the front panel or on the IR remote control to select either Yes or No 9 Press the Enter button on the front panel or the OK button on the IR remote control to confirm the selection If Yes is selected then the matrix will automatically be rebooted reboot unit yes reboot unit no ...

Страница 91: ...the address bar type the IP address of the matrix 3 The login page will be displayed 4 Select the user from the Username drop down list Operator The Operator username provides restricted access to the web interface This username allows access to both the Routing and Status tabs locking unlocking and powering on off the matrix The default password for the Operator user name is Operator All password...

Страница 92: ... see Configuring Network Settings page 113 5 Enter the password for the selected username 6 Click the Login button 7 Ater a few moments the Routing tab will be displayed Administrator vs Operator As mentioned earlier logging in as Operator provides restricted access to many of the available features within the web interface This is summarized in the table below Administrator Operator Access to all...

Страница 93: ...anage EDID tab have their own set of tabs which we will refer to as sub tabs as shown below Buttons Several screen contain buttons which allow the selection of a particular mode or setting Click the button for the desired setting Buttons that are red represent a setting that is turned on If the button is pale yellow then the feature is turned off Feature is turned on Feature is turned off Screen s...

Страница 94: ...emote UDP Access button and the UDP Port field are disabled in the illustration below In order to change either of these settings UDP Access must be enabled After clicking the Enable button next to UDP Access the button turns red and reads Enabled Since UDP Access is now enabled we can now enable or disable Remote UDP Access and or change the UDP Port number Legend The legend near the bottom right...

Страница 95: ...ing Inputs and Masking Outputs page 88 for more information Active An input or output name which is highlighted in green indicates that an active source or sink is connected to the representative input output of an active source or sink Inactive Indicates the absence of an source or sink device on that input or output Error Although a rare occurrence this indicates an error e g HDCP etc with the s...

Страница 96: ...r Off Power On button in the web interface If the matrix is powered on then the indicator will read Unit powered on as shown below The Power Off Power On button will be displayed as Power Off If the matrix is powered off then the indicator will be highlighted in red and will read In Standby mode as shown The Web Interface ...

Страница 97: ... message box will be displayed as the matrix powers down 4 After a few moments the web interface will reappear 5 Click the Power On button to turn on the matrix 6 The Please wait processing message box will be displayed and after a few moments the web interface will reappear The Web Interface ...

Страница 98: ...ab 2 Click the Lock button near the top of the screen 3 Once pressed the Lock button will read Unlock The Lock button on the front panel will also glow bright blue The matrix is now locked 4 Click the Unlock button to unlock the matrix 5 The Unlock button will now read Lock The Lock button on the front panel will also turn off The matrix is now unlocked The Web Interface Information Locking the Ma...

Страница 99: ...te the column where the dark blue square is located Each column identifies an input The output and inputs names can be changed if desired See Changing Input and Output Names page 101 for more information If the row or column is highlighted in green then this indicates an active output or input respectively For example in the illustration below Input 3 is routed to Output C Input 3 Output C The Web...

Страница 100: ...e current output row and input column will be highlighted in yellow 4 Click the desired input Use the column with the input names as a guide when selecting the input For this example we will select Input 05 5 The new routing state will be applied immediately 6 A routing indicator dark blue square will appear at the intersection of the row output and column input of the current routing state Refer ...

Страница 101: ...nput 05 is located in the same row as Output C Therefore we need to click the dark square next to Output C When an input is off the gray square will turn black as shown 8 To turn on the input click the desired input within the same row Once an input is selected the black box will disappear indicating that the input is active Basic Operation Basic Operation Routing indicator Input is Off The Web In...

Страница 102: ...input Turning off an input When an input is turned off the signal is blocked at the source This has the effect of masking all outputs to which each input is routed For example if Input 02 is routed to Output A Output B and Output C then turning off Input 02 will prevent the A V signal from being displayed on Output A Output B and Output C Masking output When an output is masked the signal is block...

Страница 103: ... Operation Creating Editing Routing Presets 1 Click the Routing tab 2 Under the Presets section click the Preset Edit button 3 The screen will change and the Preset Edit button will read Choose One The Web Interface ...

Страница 104: ...d 6 Select the desired routing state for each input output See Routing Inputs and Mask ing Outputs page 88 if necessary The preset selections for the selected preset will be indicated by a green square as shown below Note that an input can also be set to inactive off The dark blue squares indicate the current routing state The Web Interface ...

Страница 105: ...reset click the Clear All button To use the current routing state dark blue squares as the preset selection click the Select Current button To abort the editing of the preset click the Cancel button 8 Click the Save to Preset button to save the preset 9 Repeat steps 2 8 as desired for each preset 10 To load a preset click the desired preset button Basic Operation The Web Interface ...

Страница 106: ...yers By default the IR signal from each Receiver unit output is controlling its associated input source In other words the IR routing follows the input Output A Input 1 Output B Input 2 etc If we look at the web interface we can verify this IR routing state Basic Operation Basic Operation The Web Interface 2 3 1 B C A Matrix Receiver units w IR extenders Blu ray players ...

Страница 107: ... over each square within the table As the mouse moves the current output row and input column will be highlighted in yellow 3 Click the green square at the intersection of the desired input and output In this example since we want to control Input 2 from all the outputs Output A Output C we will click Input 2 for each output Basic Operation Basic Operation The Web Interface ...

Страница 108: ...applied immediately If we revisit our original illustration we can see that the blu ray player which is connected to Input 2 can now be controlled from any of the outputs Basic Operation Basic Operation The Web Interface 2 3 1 B C A Matrix Receiver units w IR extenders Blu ray players Selected Unselected ...

Страница 109: ...g state to any one of 16 presets After a preset has been saved it can be edited or recalled for later use within the web interface Note that the IR presets are linked to the main presets 1 Click the IR Routing tab 2 Click the drop down list to select the desired preset In this example we will save the IR routing state which we created in the previous section to Preset 1 3 Click the Preset Edit but...

Страница 110: ...e we could manually click on the desired squares However since we want to save the current routing state it is easier to click the Select Current button To deselect the current selection click the Clear All button When the Clear All button is clicked the orange squares are cleared Click the Cancel button to return to select a different preset 5 Click the Save To Preset button to save the IR preset...

Страница 111: ...t a preset from the drop down list If orange squares are present within the table then this preset has been defined To edit an existing IR routing preset select the desired preset from the drop down list and repeat steps 3 5 7 Click the Route IR button to execute the currently selected preset Basic Operation Basic Operation The Web Interface ...

Страница 112: ...section is outlined in blue 3 Information on each output is listed in the bottom portion of the screen This section is outlined in red The table below outlines the information that is available for each section Input Output Color depth Color space HDCP version 3D type Active Signal Vertical resolution Horizontal Resolution Progressive interlaced Refresh rate Video mode Audio format Rsense Mask HDP...

Страница 113: ...ed to the input or output This allows easy reference when performing routing operations 1 Click the Setup tab within the built in web interface 2 Click the Names sub tab 3 Click in the field of the desired output or input to be changed 4 Once all changes have been made click the Save button 5 The new input output name s will be displayed within the Routing tab Note that the new input output name s...

Страница 114: ... pulse can be sent to the selected input and reset the HDMI connection without disconnecting any cables The connected display will flash when an HPD signal is received 1 Click the Setup tab within the built in web interface 2 Click the HPD Control sub tab 3 Click the Pulse button for the desired input Click the Pulse All Inputs button to send an HPD signal to all inputs Basic Operation Basic Opera...

Страница 115: ... built in web interface 2 Click the HDCP sub tab 3 For inputs select the desired button next to the input Reject Does not allow HDCP content to be passed through Click the Reject All button to set all inputs to Reject 2 2 Click this button if the sink device supports HDCP 2 2 Click the All 2 2 button to set all inputs to 2 2 1 4 Click this button if the sink device only supports HDCP 1 4 Click the...

Страница 116: ...used on the input Click the Follow All button to set all outputs to Follow Input Always Encode Encodes the output signal with HDCP regardless of the input signal Use this feature for displays that require HDCP encoded content Click the All Encode button to set all outputs to Always Encode Basic Operation Basic Operation The Web Interface ...

Страница 117: ...h input 1 Click the Manage EDID tab within the built in web interface 2 Click the EDID Mode sub tab 3 Select the desired EDID mode for each input using the drop down list If the EDID Mode is set to External then the name of the downstream EDID device will appear under the EDID Name column as shown Basic Operation The Web Interface ...

Страница 118: ...EDID to the input that is using the Custom mode See one of the following sections for more information on copying or uploading EDID data Copying EDID Data page 107 Uploading and Downloading EDID Data page 110 3 Set the EDID Lock mode to either Locked or Unlocked Locked Prevents the EDID from being changed on the input Unlocked Allows the EDID to be changed 4 The name of the custom EDID will appear...

Страница 119: ... must be set to Custom User defined mode and then unlocked See Setting the EDID Mode page 105 for more information 1 Click the Manage EDID tab within the built in web interface 2 Click the EDID Copy sub tab 3 Click the button of the desired output or input from the Select EDID to Copy section Select only one input or output at a time Basic Operation The Web Interface ...

Страница 120: ...n for the corresponding input where the EDID will be copied One or more inputs can be selected at a time 5 Click the Copy button The Copy can only be pressed when both an output or input the source and an input destination are selected 6 The EDID copy process is complete Repeat steps 3 5 as desired ...

Страница 121: ...DID information from an input or sink device to be displayed 1 Click the Manage EDID tab within the built in web interface 2 Click the EDID Info sub tab 3 Select the desired input or output from the Choose EDID drop down list 4 The EDID information for the selected input or output will be displayed ...

Страница 122: ...ts to be downloaded and saved as a file on your computer An EDID file can also be uploaded to any unlocked input Downloading an EDID 1 Click the Manage EDID tab within the built in web interface 2 Click the Upload Download sub tab 3 Select the desired input output or internal EDID preset to be downloaded using the Select EDID File drop down list 4 Click the Download button ...

Страница 123: ...lick the Save File button to save the EDID file to your computer Mac OS X The file will automatically be saved under Macintosh HD Users username Downloads Windows OS The file will be saved under C Users username Downloads Basic Operation The Web Interface ...

Страница 124: ... section 5 The File Upload dialog will be displayed 6 Select the EDID file from your computer The EDID file must be in bin format After the file is selected the name of the file will appear next to the Browse button as shown below 7 Click the OK button on the dialog box 8 Select the input where the EDID will be uploaded using the Select Destination drop down list In order for an input to be select...

Страница 125: ...etwork setting click the Save button at the bottom of the page To revert network settings to factory default click the Set Network Defaults button IP Settings 1 Set the network mode by clicking the Static or DHCP button 2 If set to Static mode then enter the IP address subnet mask and gateway address in the IP Address Subnet and Gateway fields respectively If set to DHCP mode the DHCP server will ...

Страница 126: ...e matrix Otherwise click the Disable button TCP Port Enter the TCP listening port in this field Login Message on Connect Click the Show button to display the welcome message at the beginning of a Telnet session Otherwise click the Hide button Require Password on Connect Click the Enable button to require password credentials at the beginning of a Telnet session The Web Interface ...

Страница 127: ...sword Enter the old current password in this field The factory default password is Admin Passwords are case sensitive New Password Enter the new password in this field Passwords are case sensitive Confirm New Password Confirm the new password by entering the new password in this field Passwords are case sensitive The Web Interface ...

Страница 128: ...er the TCP listening port in this field Remote UDP Access Click the Enable button to set the remote UDP address and UDP listening port This feature only needs to be enabled if feedback to the matrix is required Otherwise this feature can be disabled Remote UDP IP Address Enter the remote UDP IP address in this field Remote UDP Port Enter the remote UDP listening port in this field Basic Operation ...

Страница 129: ...d username above in this field Passwords are case sensitive Old Password Enter the old current password in this field Passwords are case sensitive Confirm New Password To confirm the new password re enter the new password in this field Passwords are case sensitive The default password for the Administrator username is Admin The default password for the Operator username is Operator The Web Interfa...

Страница 130: ...e displayed by Syner G but they cannot be changed In order to display and change IP settings from within Gefen Syner G click the Read Write button Product Description GEF UHD 89 HBT2 is the default product description This name will be used to identify the matrix when using the Gefen Syner G software Ethernet IP Control IR In Ext IR All Out RS 232 IR Out IR In RS 232 IR Out IR In RS 232 IR Out IR ...

Страница 131: ...eedback 1 Click the Off button to disable RS 232 feedback 2 Click the On button to enable RS 232 feedback LCD Brightness Increases decreases the brightness of the front panel display 1 Move the slider to the right to increase the brightness 2 Move the slider to the left to decrease the brightness Basic Operation The Web Interface page 119 ...

Страница 132: ... Current Configuration to PC Saves the current matrix configuration to a file on your computer 1 Click the Download button 2 The following dialog box will be displayed Basic Operation The Web Interface page 120 ...

Страница 133: ... Windows OS The file will be saved under C Users username Downloads Restore Upload Configuration File Uploads the selected matrix configuration from a file on your computer to the matrix 1 Click the Browse button 2 Select the desired configuration file from your computer After the file has been selected the filename will appear next to the Browse button 3 Click the Restore button to upload the fil...

Страница 134: ...ve the following naming convention GEF UHD 89 HBT2 version PACK bin 4 Click the Update button 5 The following message box will be displayed WARNING Updating the firmware may overwrite some of your settings Consider saving the configuration before updating the firmware Are you sure you want to continue To save the configuration before continuing click the Cancel button on the message box Refer to t...

Страница 135: ...message box will be displayed within the web interface The Power button on the front of the matrix will flash red and blue and the update progress will be shown in the front panel display 7 After the update process completes the matrix will automatically reboot system updating 34 ...

Страница 136: ...x must be set to the same IR channel as the included IR remote control in order for the IR remote control to communicate with the matrix 1 Click the desired IR channel for the matrix by clicking one of the IR Channel buttons 1 4 The IR channel setting is automatically saved Rebooting the matrix is not required ...

Страница 137: ...button to continue with the reset procedure Click the Cancel button to abort the reset procedure and return to the web interface page 125 Basic Operation The Web Interface Important Performing this function will erase all current setting in your matrix IP settings will be retained To save the configuration before continuing refer to the section Download Current Configuration to PC ...

Страница 138: ...ix Clicking this button will reboot the matrix 1 Click the Reboot button 2 The following message box will be displayed Click the OK button to continue with the reboot procedure Click the Cancel button to abort the reboot procedure and return to the web interface ...

Страница 139: ...This page left intentionally blank ...

Страница 140: ...This page left intentionally blank ...

Страница 141: ...page 129 8x9 Matrix for HDMI w HDCP 2 2 HDBaseT POH 3 Advanced Operation ...

Страница 142: ...ystem for UDP 2 Click the Network tab within the web interface and do the following See UDP Settings page 62 for more information a Click the Enabled button next to UDP Access b Enter the UDP listening port in the UDP Port field The default UDP listening port is 50007 c Click the Enabled button next to Remote UDP Access This feature only needs to be enabled if feedback to the matrix is required Ot...

Страница 143: ...for the RS 232 device 1 Launch the desired terminal application 2 Selected the desired COM port 3 Configure the RS 232 port to the following settings Only TxD RxD and GND pins are used Description Setting Baud rate 19200 Data bits 8 Parity None Stop bits 1 Hardware flow control None 4 Connect to the RS 232 port 5 Type help for a list of commands or refer to the tables on the following pages Using ...

Страница 144: ...onfig Returns the matrix IP configuration get_mac_addr Returns the MAC address of the matrix get_netmask Returns the subnet mask of the matrix get_output_hdcp Returns the HDCP setting of the specified output get_power Returns the current power state of the matrix get_preset_name Returns the name of the specified preset get_remote_udp_access Returns the remote UDP access state of the matrix get_rem...

Страница 145: ...ightness Sets the brightness of the front panel display set_netmask Sets the subnet mask for the matrix set_output_hdcp Sets the HDCP setting on the specified output set_preset_name Sets the name of the specified preset set_remote_udp_access Enables or disables remote UDP access set_remote_udp_ip Sets the remote UDP IP address set_remote_udp_port Sets the remote UDP listening port on the matrix se...

Страница 146: ...t is performed through the built in web interface or Telnet then IP settings will be preserved To reset all including IP settings this command must be issued using RS 232 Syntax factory_reset Parameters None Example factory_reset RESET TO FACTORY DEFAULTS GTB UHD 89 HBT2 V0 2B OUT ABCDEFGH IN 12345678 Related Commands reboot ...

Страница 147: ...le Advanced Operation Commands get_device_desc Returns the description of the matrix Syntax get_device_desc Parameters None Example get_device_desc DEVICE DESCRIPTION IS GTB UHD 89 HBT2 Related Commands set_device_desc ...

Страница 148: ...eturns the discovery mode setting The value returned is one of the following Value Description 0 Discovery mode is disabled 1 Discovery mode is enabled Syntax get_discovery Parameters None Example get_discovery DISCOVERY 1 Related Commands set_discovery set_showme ...

Страница 149: ...urns the current discovery mode The value returned is one of the following Value Description 0 Read only 1 Read Write Syntax get_discovery_mode Parameters None Example get_discovery_mode get_discovery_mode 1 Related Commands get_discovery set_discovery set_discovery_mode ...

Страница 150: ...fied input The value returned is one of the following Value Description 0 EDID unlocked 1 EDID locked Syntax get_edid_lock input Parameters input Type INTEGER The number of the HDMI input 1 8 to query Example get_edid_lock 1 EDID_LOCK 1 0 Related Commands get_edid_mode set_edid_copy set_edid_lock set_edid_mode ...

Страница 151: ...ternal 720p 2Ch 1 Internal 720p Multi Ch 2 Internal 1080p 2Ch 3 Internal 1080p Multi Ch 4 Internal UHD 2Ch 5 Internal UHD Multi Ch 6 External Output A 7 Custom Syntax get_edid_mode input Parameters input Type INTEGER The number of the HDMI input 1 8 to query Example get_edid_mode 1 get_edid_mode 1 0 Related Commands get_edid_lock set_edid_copy set_edid_lock set_edid_mode ...

Страница 152: ... the gateway address of the matrix Syntax get_gateway Parameters None Example get_gateway GATEWAY 10 5 64 1 Related Commands get_http_port get_ip_address get_ip_mode get_ipconfig get_mac_addr get_netmask set_gateway set_http_port set_ip_address set_ip_mode set_netmask ...

Страница 153: ...ed output The value returned is one of the following Value Description 0 Normal mode 1 Long reach mode Syntax get_hdbt_distance output Parameters output Type CHARACTER The identifier of the HDMI output A H to query Example get_hdbt_distance a HDBT_DISTANCE A 1 Related Commands get_hdbt_ir set_hdbt_distance set_hdbt_ir ...

Страница 154: ...rier signal has been inserted Syntax get_hdbt_ir output tofrom Parameters output Type CHARACTER The identifier of the HDMI output A H to query tofrom Type INTEGER Accepts a number from the table below specifying the desired request tofrom Description 0 Returns the IR state from the Receiver 1 Returns the IR state to the Receiver Example get_hdbt_ir a 0 HDBT_IR A 0 Related Commands get_hdbt_distanc...

Страница 155: ...s the HTTP listening port of the matrix Syntax get_http_port Parameters None Example get_http_port HTTP_PORT 80 Related Commands get_gateway get_ip_address get_ip_mode get_ipconfig get_mac_addr get_netmask set_gateway set_http_port set_ip_address set_ip_mode set_netmask ...

Страница 156: ... value returned is one of the following Value Description 0 Reject 1 HDCP 2 2 and below 2 HDCP 1 4 and below Syntax get_input_hdcp input Parameters input Type INTEGER The number of the HDMI input 1 8 to query Example get_input_hdcp 1 INPUT_HDCP 1 0 Related Commands get_output_hdcp set_input_hdcp set_output_hdcp ...

Страница 157: ...s get_io_name Returns the name given to the specified input or output Syntax get_io_name inout Parameters input Type INTEGER or CHARACTER The number of the HDMI input 1 8 to query Example get_io_name 1 IO_NAME 1 Bluray Related Commands set_io_name ...

Страница 158: ...e current IP address of the matrix Syntax get_ip_address Parameters None Example get_ip_address IP_ADDRESS 10 5 64 81 Related Commands get_gateway get_http_port get_ip_mode get_ipconfig get_mac_addr get_netmask set_gateway set_http_port set_ip_address set_ip_mode set_netmask ...

Страница 159: ...value returned is one of the following Value Description 0 Static mode 1 DHCP mode Syntax get_ip_mode Parameters None Example get_ip_mode IP_MODE 0 Related Commands get_gateway get_http_port get_ip_address get_ipconfig get_mac_addr get_netmask set_gateway set_http_port set_ip_address set_ip_mode set_netmask ...

Страница 160: ...me information as executing the get_ip_address get_netmask get_gateway and get_mac_addr ommands Syntax get_ipconfig Parameters None Example get_ipconfig IP CONFIGURATION IS IP 10 5 64 81 NETMASK 255 255 255 0 GATEWAY 10 5 64 1 MAC ADDRESS 00 1C 91 04 90 03 Related Commands get_gateway get_http_port get_ip_mode get_ip_address get_mac_addr get_netmask set_gateway set_http_port set_ip_address set_ip_...

Страница 161: ...ge 149 Page Title Advanced Operation Commands get_ir_channel Returns the IR channel of the matrix Syntax get_ir_channel Parameters None Example get_ir_channel IR_CHANNEL 1 Related Commands set_ir_channel ...

Страница 162: ...vanced Operation Commands get_lcd_brightness Returns the brightness level of the front panel display Syntax get_lcd_brightness Parameters None Example get_lcd_brightness LCD_BRIGHTNESS 60 Related Commands set_lcd_brightness ...

Страница 163: ...MAC address of the matrix Syntax get_mac_addr Parameters None Example get_mac_addr MAC ADDRESS IS 00 1C 91 04 90 03 Related Commands get_gateway get_http_port get_ip_address get_ip_mode get_ipconfig get_netmask set_gateway set_http_port set_ip_address set_ip_mode set_netmask ...

Страница 164: ... current subnet mask of the matrix Syntax get_netmask Parameters None Example get_netmask NETMASK 255 255 255 0 Related Commands get_gateway get_http_port get_ip_address get_ip_mode get_ipconfig get_mac_addr set_gateway set_http_port set_ip_address set_ip_mode set_netmask ...

Страница 165: ...e specified output The value returned is one of the following Value Description 0 Follow input 1 Always encode Syntax get_output_hdcp output Parameters output Type CHARACTER The identifier of the HDMI output A H to query Example get_output_hdcp c OUTPUT_HDCP C 1 Related Commands set_output_hdcp ...

Страница 166: ...tion Commands get_power Returns the current power state of the matrix The value returned is one of the following Value Description 0 Power off 1 Power on Syntax get_power Parameters None Example get_power POWER 1 Related Commands power ...

Страница 167: ...s get_preset_name Returns the name of the specified preset Syntax get_preset_name preset Parameters preset Type INTEGER The identifier of the preset name 1 16 to query Example get_preset_name 5 PRESET_NAME 5 Kitchen Related Commands set_preset_name ...

Страница 168: ...wing Value Description 0 Remote UDP access disabled 1 Remote UDP access enabled Syntax get_remote_udp_access Parameters None Example get_remote_udp_access REMOTE_UDP_ACCESS 0 Related Commands get_remote_udp_ip get_remote_udp_port get_udp_access get_udp_port set_remote_udp_access set_remote_udp_ip set_remote_udp_port set_udp_access set_udp_port ...

Страница 169: ...DP IP address Syntax get_remote_udp_ip Parameters None Example get_remote_udp_access REMOTE_UDP_IP 192 168 1 255 Related Commands get_remote_udp_access get_remote_udp_port get_udp_access get_udp_port set_remote_udp_access set_remote_udp_ip set_remote_udp_port set_udp_access set_udp_port ...

Страница 170: ...e UDP listening port Syntax get_remote_udp_port Parameters None Example get_remote_udp_port REMOTE_UDP_PORT 50008 Related Commands get_remote_udp_access get_remote_udp_ip get_udp_access get_udp_port set_remote_udp_access set_remote_udp_ip set_remote_udp_port set_udp_access set_udp_port ...

Страница 171: ...access state Use the set_telnet_access command to enable or disable Telnet access Syntax get_telnet_access Parameters None Example get_telnet_access TELNET_ACCESS 1 Related Commands get_telnet_port get_telnet_welcome set_telnet_access set_telnet_port set_telnet_welcome use_telnet_login ...

Страница 172: ...et_telnet_port Returns the Telnet listening port Syntax get_telnet_port Parameters None Example get_telnet_port TELNET_PORT 23 Related Commands get_telnet_access get_telnet_welcome set_telnet_access set_telnet_port set_telnet_welcome use_telnet_login ...

Страница 173: ...e message Use the set_telnet_welcome to create a custom welcome message Syntax get_telnet_welcome Parameters None Example get_telnet_welcome TELNET WELCOME SCREEN IS ENABLED Related Commands get_telnet_access get_telnet_port set_telnet_access set_telnet_port set_telnet_welcome use_telnet_login ...

Страница 174: ... The value returned is one of the following Value Description 0 UDP access disabled 1 UDP access enabled Syntax get_udp_access Parameters None Example get_udp_access UDP_ACCESS 0 Related Commands get_remote_udp_access get_remote_udp_ip get_remote_udp_port get_udp_port set_remote_udp_access set_remote_udp_ip set_remote_udp_port set_udp_access set_udp_port ...

Страница 175: ...ocal UDP listening port Syntax get_udp_port Parameters None Example get_udp_port UDP_PORT 50007 Related Commands get_remote_udp_access get_remote_udp_ip get_remote_udp_port get_udp_access set_remote_udp_access set_remote_udp_ip set_remote_udp_port set_udp_access set_udp_port ...

Страница 176: ...help Parameters None Example help Presets P SET_PRESET_NAME GET_PRESET_NAME Setup SET_IO_NAME GET_IO_NAME SEND_HPD SET_INPUT_HDCP GET_INPUT_HDCP SET_OUTPUT_HDCP GET_OUTPUT_HDCP MANAGE EDID SET_EDID_MODE GET_EDID_MODE SET_EDID_LOCK SYSTEM SETTINGS SET_FEEDBACK SHOW_FIRMWARE_VERSION SET_LCD_BRIGHTNESS GET_LCD_BRIGHTNESS SET_IR_CHANNEL GET_IR_CHANNEL FACTORY_RESET REBOOT ...

Страница 177: ...lt in web interface of the matrix Note that if the matrix is locked settings can still be changed using the command set Syntax lock_matrix state Parameters state Type INTEGER Accepts a number from the table below specifying the desired state state Description 0 Unlocks the matrix 1 Locks the matrix Example lock_matrix 1 LOCK_MATRIX 1 ...

Страница 178: ...Powers the unit ON or OFF Syntax power state Parameters state Type INTEGER Accepts a number from the table below specifying the desired state state Description 0 Power OFF the matrix 1 Power ON the matrix Example power 1 POWER 1 Related Commands get_power ...

Страница 179: ...page 167 Page Title Advanced Operation Commands reboot Reboots the matrix Syntax reboot Parameters None Example reboot UNIT WILL REBOOT SHORTLY Related Commands factory_reset ...

Страница 180: ...ommands send_hpd Sends an HPD Hot Plug Detect pulse to the specified input Syntax send_hpd input Parameters input Type INTEGER The identifier of the HDMI input 1 8 where the HPD pulse will be sent Example send_hpd 1 HPD SENT Related Commands ...

Страница 181: ...ets the matrix identifier string Syntax set_device_desc name Parameters name Type STRING The device description This value cannot exceed 30 characters in length Example set_device_desc matrix202 DEVICE DESCRIPTION IS SET TO matrix202 Related Commands get_device_desc ...

Страница 182: ...e table below specifying the desired state state Description 0 Disables Discovery mode 1 Enables Discovery mode If set to disabled then the Syner G Software Suite will be unable to detect the matrix on a network It is recommended that this feature is enabled until the matrix has been configured for use on a network Example set_discovery 0 DISCOVERY 0 Related Commands get_discovery get_discovery_mo...

Страница 183: ...ing the desired state mode Description 0 Read only mode 1 Read write mode When set to read only mode the IP settings for the matrix will be displayed within the Gefen Syner G Software Suite but cannot be changed In order to both display and allow changes to the IP settings within Gefen Syner G set this feature to read write mode Example set_discovery_mode 0 DISCOVERY MODE 0 Related Commands get_di...

Страница 184: ...formation Syntax set_edid_copy inout input input Parameters inout Type INTEGER or CHARACTER This parameter can accept either the identifier of an HDMI input 1 8 or an HDMI output A H Only a single input or output can be specified at a time input Type INTEGER This parameter must be the identifier of an HDMI input 1 8 Multiple inputs can be specified Example set_edid_copy a 1 EDID_COPY a 1 set_edid_...

Страница 185: ...edid_mode command Syntax set_edid_lock input state Parameters input Type INTEGER This parameter must be the identifier of an HDMI input 1 8 state Type INTEGER Accepts a number from the table below specifying the desired state state Description 0 Unlock the EDID 1 Lock the EDID Example set_edid_lock 1 0 SET_EDID_LOCK 1 0 Related Commands get_edid_lock get_edid_mode set_edid_copy set_edid_mode ...

Страница 186: ...input 1 8 mode Type INTEGER Accepts a number from the table below corresponding to the desired EDID mode Description 0 Internal 720p 2Ch 1 Internal 720p Multichannel 2 Internal 1080p 2Ch 3 Internal 1080p Multichannel 4 Internal UHD 4K 2Ch 5 Internal UHD 4K Multichannel 6 External downstream sink 7 Custom Example set_edid_mode 1 0 EDID_MODE 1 0 Related Commands get_edid_lock get_edid_mode set_edid_...

Страница 187: ... or disables unsolicited RS 232 feedback Syntax set_feedback state Parameters state Type INTEGER Accepts a number from the table below specifying the desired state state Description 0 Disable RS 232 feedback 1 Enable RS 232 feedback Example set_feedback 1 SET_FEEDBACK 1 ...

Страница 188: ... by the DHCP server The matrix must be rebooted after executing this command Syntax set_gateway addr Parameters addr Type IP ADDRESS The desired gateway address of the matrix This address must be entered in dot decimal notation Example set_gateway 10 5 64 1 GATEWAY 10 5 64 1 REBOOT TO APPLY SETTINGS Related Commands get_gateway get_http_port get_ip_address get_ip_mode get_ipconfig get_mac_addr get...

Страница 189: ...t_distance output mode Parameters output Type CHARACTER The identifier of the HDMI output A H to use mode Type INTEGER Accepts a number from the table below specifying the HDBaseT mode mode Description 0 Normal mode 1 Long reach mode Example set_hdbt_distance a 0 HDBT_DISTANCE A 0 Related Commands get_hdbt_distance get_hdbt_ir set_hdbt_ir ...

Страница 190: ...ts a number from the table below specifying the desired adjustment tofrom Description 0 IR signal from the Receiver unit 1 IR signal to the Receiver unit signal Type INTEGER Accepts a number from the table below specifying the carrier signal setting signal Description 0 Strip carrier signal 1 Leave carrier signal intact 2 Insert carrier signal Example set_hdbt_ir a 0 2 HDBT_IR A 0 2 Related Comman...

Страница 191: ...yntax set_gateway port Parameters port Type INTEGER The desired HTTP listening port for the matrix Example set_gateway 192 168 1 1 GATEWAY 192 168 1 1 Related Commands get_gateway get_http_port get_ip_address get_ip_mode get_ipconfig get_mac_addr get_netmask set_gateway set_ip_address set_ip_mode set_netmask ...

Страница 192: ...pe INTEGER Accepts the number of an HDMI input 1 8 mode Type INTEGER Accepts a number from the table below corresponding to the desired HDCP mode mode Description 0 Reject HDCP content 1 Allow HDCP version 2 2 and below 2 Allow HDCP version 1 4 and below Example set_input_hdcp 1 INPUT_HDCP 1 0 Related Commands get_input_hdcp get_output_hdcp set_output_hdcp ...

Страница 193: ... of an HDMI input 1 8 or the identifier or an HDMI output A H Only one input or output can be specified at one time name Type STRING The desired name of the specified input output The length of the string cannot exceed 30 characters Strings greater than 30 characters in length will be rejected Example set_io_name 1 Bluray IO_NAME 1 Bluray set_io_name d BIG_screen IO_NAME D BIG_screen Related Comma...

Страница 194: ...dress addr Parameters addr Type IP ADDRESS The desired IP address of the matrix This address must be entered in dot decimal notation Example set_ip_address 10 5 64 81 IP_ADDRESS 10 5 64 81 REBOOT TO APPLY SETTINGS Related Commands get_gateway get_http_port get_ip_address get_ip_mode get_ipconfig get_mac_addr get_netmask set_gateway set_http_port set_ip_mode set_netmask ...

Страница 195: ..._mode mode Parameters mode Type INTEGER Accepts a number from the table below corresponding to the desired IP mode mode Description 0 Static 1 DHCP 2 Auto Example set_ip_mode 1 IP MODE 1 REBOOT TO APPLY SETTINGS Related Commands get_gateway get_http_port get_ip_address get_ip_mode get_ipconfig get_mac_addr get_netmask set_gateway set_http_port set_ip_address set_netmask ...

Страница 196: ...matrix both the matrix and the IR remote control must be set to the same IR channel Syntax set_ir_channel irch Parameters irch Type INTEGER Accepts a number from the table below corresponding to the desired IR channel irch Description 1 IR channel 1 2 IR channel 2 3 IR channel 3 4 IR channel 4 Example set_ir_channel 2 IR_CHANNEL 2 Related Commands get_ir_channel ...

Страница 197: ...el of the matrix Syntax set_lcd_brightness level Parameters level Type INTEGER Accepts a number within the range of 0 100 The value of 100 represents the brightest setting of the display Example set_lcd_brightness 75 LCD_BRIGHTNESS 75 Related Commands get_lcd_brightness Advanced Operation Commands ...

Страница 198: ...DDRESS The desired subnet mask of the matrix This address must be entered in dot decimal notation Example set_netmask 255 255 255 0 NETMASK 255 255 255 0 REBOOT TO APPLY SETTINGS Related Commands get_gateway get_http_port get_ip_address get_ip_mode get_ipconfig get_mac_addr get_netmask set_gateway set_http_port set_ip_address set_ip_mode Advanced Operation Commands ...

Страница 199: ...Type CHARACTER Accepts the identifier of an HDMI output A H mode Type INTEGER Accepts a number from table below corresponding to the desired HDCP mode mode Description 0 Follow Input 1 Always Encode Example set_output_hdcp a 0 OUTPUT_HDCP A 0 Related Commands get_input_hdcp get_output_hdcp set_input_hdcp Advanced Operation Commands ...

Страница 200: ...t Type INTEGER Accepts the identifier of a Preset 1 16 name Type STRING The name of the preset The name must not exceed 12 characters in length No special characters e g etc are allowed Spaces are permitted Example set_preset_name 1 LivingRoom PRESET_NAME 1 LivingRoom Related Commands get_preset_name Advanced Operation Commands ...

Страница 201: ... table below corresponding to the desired state state Description 0 Disable remote UDP access 1 Enable remote UDP access Example set_remote_udp_access 0 REMOTE_UDP_ACCESS 0 Related Commands get_remote_udp_access get_remote_udp_ip get_remote_udp_port get_udp_access get_udp_port set_remote_udp_ip set_remote_udp_port set_udp_access set_udp_port Advanced Operation Commands ...

Страница 202: ...Type IP ADDRESS The desired remote UDP IP address of the matrix The address must be entered in dot decimal notation Example set_remote_udp_ip 192 168 1 251 REMOTE_UDP_IP 192 168 1 251 Related Commands get_remote_udp_access get_remote_udp_ip get_remote_udp_port get_udp_access get_udp_port set_remote_udp_access set_remote_udp_port set_udp_access set_udp_port ...

Страница 203: ..._remote_udp_port port Parameters port Type INTEGER The desired remote UDP port 0 65535 of the matrix Example set_remote_udp_port 50008 REMOTE_UDP_PORT 50008 Related Commands get_remote_udp_access get_remote_udp_ip get_remote_udp_port get_udp_access get_udp_port set_remote_udp_access set_remote_udp_ip set_udp_access set_udp_port ...

Страница 204: ...s feature allows the matrix to be visually identified on the network and is useful when multiple matrix units are being used The default setting is disabled Syntax set_showme state Parameters state Type INTEGER Accepts a number from the table below corresponding to the desired state state Description 0 Disable Show Me 1 Enable Show Me Example set_showme 1 SET_SHOWME 1 Related Commands get_discover...

Страница 205: ... state Parameters state Type INTEGER Accepts a number from the table below corresponding to the desired state state Description 0 Disable Telnet access 1 Enable Telnet access Example set_telnet_access 1 TELNET_ACCESS 1 Related Commands get_telnet_access get_telnet_port get_telnet_welcome set_telnet_port set_telnet_welcome use_telnet_login ...

Страница 206: ...n the matrix Syntax set_telnet_port port Parameters port Type INTEGER The desired remote Telnet listening port 0 65535 of the matrix Example set_telnet_port 23 TELNET_PORT 23 Related Commands get_telnet_access get_telnet_port get_telnet_welcome set_telnet_access set_telnet_welcome use_telnet_login ...

Страница 207: ...arameters state Type INTEGER Accepts a number from table below corresponding to the desired state state Description 0 Disable welcome message 1 Enable welcome message Example set_telnet_welcome 1 TELNET WELCOME SCREEN IS ENABLED Related Commands get_telnet_access get_telnet_port get_telnet_welcome set_telnet_access set_telnet_port use_telnet_login ...

Страница 208: ...EGER Accepts a number from table below corresponding to the desired state state Description 0 Disable UDP access 1 Enable UDP access Example set_udp_access 0 UDP_ACCESS 0 Related Commands get_remote_udp_access get_remote_udp_ip get_remote_udp_port get_udp_access get_udp_port set_remote_udp_access set_remote_udp_ip set_remote_udp_port set_udp_port ...

Страница 209: ...ort port Parameters port Type INTEGER The desired UDP listening port 0 65535 of the matrix Example set_udp_port 50007 UDP_PORT 50007 Related Commands get_remote_udp_access get_remote_udp_ip get_remote_udp_port get_udp_access get_udp_port set_remote_udp_access set_remote_udp_ip set_remote_udp_port set_udp_access ...

Страница 210: ...ow_firmware_version Returns the firmware version of the matrix The returned value will depend upon the version of firmware that is currently installed Syntax show_firmware_version Parameters None Example show_firmware_version FIRWMARE VERSION IS V0 2B ...

Страница 211: ...elnet_login state Parameters state Type INTEGER Accepts a number from table below corresponding to the desired state state Description 0 Disable Telnet login 1 Enable Telnet login Example use_telnet_login 0 USE_TELNET_LOGIN 0 Related Commands get_telnet_access get_telnet_port get_telnet_welcome set_telnet_access set_telnet_port set_telnet_welcome ...

Страница 212: ... Syntax ir input output output Parameters input Type INTEGER The desired input 1 8 on the matrix To have the IR routing follow the input routing set this parameter to 0 output Type CHARACTER The desired output A H receiving the IR data from the source s remote control To specify the Local Output set this parameter to Z Example ir 2 a b d IR 2 A B D ...

Страница 213: ... output s Syntax m state output output Parameters state Type INTEGER Accepts a number from the table below corresponding to the desired state state Description 0 Disable masking 1 Enable masking output Type CHARACTER The identifier of an HDMI output A H Example m 1 a b M 1 A B Related Commands r ...

Страница 214: ...e 202 Page Title page 202 Advanced Operation Commands p Recalls the specified routing preset Syntax p preset Parameters preset Type INTEGER The number of a preset 1 16 Example p 10 P 10 Related Commands r ...

Страница 215: ...f an HDMI input 1 8 This parameter also accepts a string argument of OFF The OFF argument is not case sensitive If OFF is specified then no input is selected To turn on an input that is marked as OFF use an HDMI input 1 8 as the argument output Type CHARACTER The identifier or an HDMI output A H More than one output may be specified Examples r 1 A R 1 A R OFF c R OFF C r 1 c R 1 C Related Commands...

Страница 216: ...This page left intentionally blank ...

Страница 217: ...page 205 8x9 Matrix for HDMI w HDCP 2 2 HDBaseT POH 4 Appendix ...

Страница 218: ...olor Description 1 Orange White TD Transmit Data positive differential signal 2 Orange TD Transmit Data negative differential signal 3 Green White RD Receive Data positive differential signal 4 Blue Unused 5 Blue White Unused 6 Green RD Receive Data negative differential signal 7 Brown White Unused 8 Brown White Unused 1 2 3 4 5 6 7 8 Information Shielded CAT 5e or better cabling is recommended ...

Страница 219: ...emote UDP IP Address 192 168 1 255 Remote UDP Port 50008 Administrator Password default Admin Operator Password default Operator Enable Discovery Gefen Syner G Enabled Find Your Device Gefen Syner G Hide Me Discover Read Only Gefen Syner G Read Write Product Description Gefen Syner G GEF UHD 89 HBT2 Description Setting Output Names Output A Output H Output Z Local Out A V Input Names Input 1 Input...

Страница 220: ...C Input 4 Output D Input 5 Output E Input 6 Output F Input 7 Output G Input 8 Output H Input 1 Output Z Local Out Preset Names Preset 1 Preset 16 Matrix Lock Disabled IR Routing Input 1 Output A Input 2 Output B Input 3 Output C Input 4 Output D Input 5 Output E Input 6 Output F Input 7 Output G Input 8 Output H ...

Страница 221: ...3 1440x576i 50Hz 16 9 1440x576p 50Hz 4 3 1440x576p 50Hz 16 9 Audio data block Linear PCM Max channels 2 Supported sample rates kHz 48 44 1 32 Supported sample sized bits 24 20 16 720p Multichannel audio Video data block 640x480p 60Hz 4 3 720x480p 60Hz 4 3 720x480p 60Hz 4 3 1280x720p 60Hz native 1440x480i 60Hz 4 3 720x576p 50Hz 4 3 720x576p 50Hz 16 9 1280x720p 50Hz 16 9 1440x576i 50Hz 4 3 Audio dat...

Страница 222: ...6p 50Hz 16 9 1280x720p 50Hz 16 9 1920x1080i 50Hz 16 9 1440x576i 50Hz 4 3 1440x576i 50Hz 16 9 1440x576p 50Hz 4 3 1440x576p 50Hz 16 9 1920x1080p 50Hz 16 9 1920x1080p 24Hz 16 9 1920x1080p 25Hz 16 9 1920x1080p 30Hz 16 9 1920x1080i 50Hz 16 9 1280x720p 24Hz 16 9 1280x720p 25Hz 16 9 1280x720p 30Hz 16 9 1920x1080p 60Hz 16 9 Audio data block Linear PCM Max channels 2 Supported sample rates kHz 48 44 1 32 S...

Страница 223: ...6 9 1920x1080p 25Hz 16 9 1920x1080p 30Hz 16 9 1920x1080i 50Hz 16 9 1280x720p 24Hz 16 9 1280x720p 25Hz 16 9 1280x720p 30Hz 16 9 1920x1080p 60Hz 16 9 Audio data block Linear PCM Max channels 2 Supported sample rates kHz 192 176 4 96 88 2 48 44 1 32 Supported sample sizes bits 24 20 16 Linear PCM Max channels 8 Supported sample rates kHz 48 44 1 32 Supported sample sizes bits 24 20 16 DTS Max channel...

Страница 224: ... 9 1920x1080p 24Hz 16 9 1920x1080p 25Hz 16 9 1920x1080p 30Hz 16 9 3840x2160p 24Hz 16 9 3840x2160p 25Hz 16 9 3840x2160p 30Hz 16 9 3840x2160p 50Hz 16 9 3840x2160p 60Hz 16 9 4096x2160p 24Hz 256 135 4096x2160p 25Hz 256 135 4096x2160p 30Hz 256 135 4096x2160p 50Hz 256 135 4096x2160p 60Hz 256 135 Audio data block Linear PCM Max channels 2 Supported sample rates kHz 192 176 4 96 88 2 48 44 1 32 Supported ...

Страница 225: ...35 4096x2160p 30Hz 256 135 4096x2160p 50Hz 256 135 4096x2160p 60Hz 256 135 Audio data block Linear PCM Max channels 2 Supported sample rates kHz 48 44 1 32 Supported sample sizes bits 24 20 16 Linear PCM Max channels 8 Supported sample rates kHz 96 48 44 1 Supported sample sizes bits 24 20 16 AC 3 Max channels 6 Supported sample rates kHz 48 Maximum bit rate 640 kHz Enhanced AC 3 Max channels 8 Su...

Страница 226: ...r 1 x front panel Front panel display 1 x OLED 2 rows 20 chars row Power button 1 x tact type bi color blue orange backlight Control buttons 7 x tact type blue backlight Power Suppply 1 x 100V to 240V AC Dimensions excluding rack ears and connectors W x H x D 17 25 x 3 5 x 15 75 440mm x 89mm x 400mm Unit weight 22 lbs 10 0 kg Connectors Controls and Indicators Receiver Unit HDMI Out 1 x Type A 19 ...

Страница 227: ...lock 300 MHz Power Consumption 175 W Operating temperature 32 to 122 ºF 0 to 50 ºC Operating humidity 5 to 90 RH non condensing Storage temperature 4 to 140 ºF 20 to 60 ºC Storage humidity 5 to 95 RH non condensing MTBF 50000 hours Specifications ...

Страница 228: ...4 get_preset_name 155 get_remote_udp_access 156 get_remote_udp_ip 157 get_remote_udp_port 158 get_telnet_access 159 get_telnet_port 160 get_telnet_welcome 161 get_udp_access 162 get_udp_port 163 help 164 ir 200 lock_matrix 165 m 201 p 202 power 166 r 203 reboot 167 send_hpd 168 set_device_desc 169 set_discovery 170 set_discovery_mode 171 set_edid_copy 172 set_edid_lock 173 set_edid_mode 174 set_fe...

Страница 229: ...s 113 IR Control IR All In 29 IR All Out 28 IR In 30 IR In Ext 27 IR Out 31 IR routing state 33 IR Remote Control description 7 installing batteries 9 setting the IR channel 10 L LCD brightness 119 Licensing vi Listening Port HTTP 56 TCP 59 UDP 64 Locking the Matrix 38 Login Settings 117 M Masking Outputs 36 Menu System accessing 42 discovery settings 67 HDCP control 46 HPD control 44 IP settings ...

Страница 230: ...s 20 presets 40 status viewing 19 RS 232 controlling the matrix 25 extending 26 feedback 119 S Safety Instructions ii Sender Unit front panel 2 rear panel 3 Settings default 207 Specifications 214 Syner G matrix configuration 14 T Table of Contents ix Technical Support iv Telnet configuration 130 settings 114 Terminal grounding 3 U UDP configuration 130 remote UDP access 116 remote UDP address 116...

Страница 231: ...ettings 118 IP settings 113 TCP Telnet settings 114 web login settings 117 output names 101 output status 100 routing inputs 88 routing status 86 system settings download configuration 120 factory reset 125 firmware update 122 LDC brightness 119 matrix IR channel 124 rebooting the matrix 126 restore configuration 121 RS 232 feedback 119 upload configuration 121 tabs and sub tabs 81 turning off inp...

Страница 232: ...00 545 6900 818 772 9100 fax 818 772 9120 www gefen com support gefen com Stretch it Switch it Split it Gefen s got it 20600 Nordhoff St Chatsworth CA 91311 1 800 545 6900 818 772 9100 fax 818 772 9120 www gefen com support gefen com Preferred ...

Отзывы: