Gefen EXT-HDMI1.3-444 Скачать руководство пользователя страница 24

page | 14

Using the IR Extender

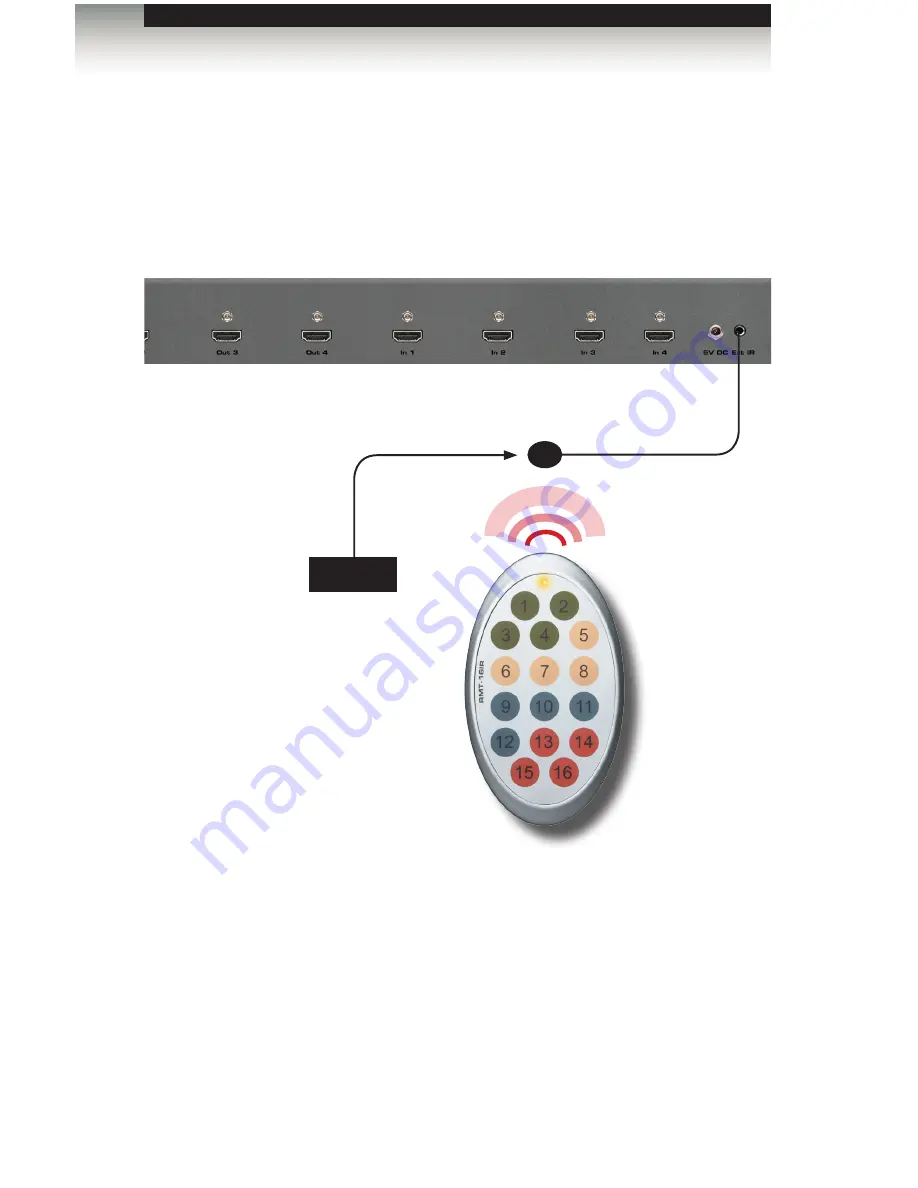
There may be situations where the IR sensor is blocked by a cabinet or other mounting 

device.  In this case, an IR extender (Gefen part no. EXT-RMT-EXTIRN) can be connected 

to the IR port on the matrix.  The sensor on the IR extender behaves exactly like the sensor 

on the front panel of the matrix.  Always point the IR remote control unit at the IR sensor. 

Operating the 4x4 Matrix for HDMI 1.3

Routing Basics

IR extender

IR sensor

Содержание EXT-HDMI1.3-444

Страница 1: ...Release A7 User Manual EXT HDMI1 3 444 Matrix for HDMI 1 3...

Страница 2: ...e obsolete outlet 10 Protect the power cord from being walked on or pinched particularly at plugs convenience receptacles and the point where they exit from the apparatus 11 Only use attachments acces...

Страница 3: ...sale may be required in order to claim warranty 2 Customers outside the US are responsible for shipping charges to and from Gefen 3 Copper cables are limited to a 30 day warranty and cables must be i...

Страница 4: ...s 8 00 AM to 5 00 PM Monday Friday Pacific Time 4x4 Matrix for HDMI 1 3 is a trademark of Gefen LLC Important Notice Gefen LLC reserves the right to make changes in the hardware packaging and any acco...

Страница 5: ...MI 1 3 3D content will be displayed when using with a 3D compatible source and TV The 4x4 Matrix for HDMI 1 3 features an EDID selection that will allow the user to choose from a external EDID from an...

Страница 6: ...VI converter cable or adapter Rack mountable rack ears included HDCP compliant Packing List The 4x4 Matrix for HDMI 1 3 ships with the items listed below If any of these items are not present in the b...

Страница 7: ......

Страница 8: ...x4 Matrix for HDMI 1 3 8 Sample Wiring Diagram 8 02 Operating the 4x4 Matrix for HDMI 1 3 Routing Basics 12 Determining the Current Routing State 12 Using the IR Remote Control Unit 13 Using the IR Ex...

Страница 9: ......

Страница 10: ......

Страница 11: ...01 Getting Started Panel Layout 2 Front 2 Back 3 IR Remote Control Unit 4 Front 4 Back 5 Installing the Battery 6 Setting the IR Channel 6 Installation 8 Connecting the 4x4 Matrix for HDMI 1 3 8 Samp...

Страница 12: ...Power This LED indicator glows bright red when the unit is powered 3 Reset Press this button to reset the 4x4 Matrix for HDMI 1 3 4 Input Output Indicators These blue LED indicators display the state...

Страница 13: ...ternal EDID or external EDID See EDID Management page 15 for more information 3 Out 1 4 Connect up to four HDTV displays to these HDMI outputs 4 In 1 4 Connect up to four Hi Def sources to these input...

Страница 14: ...Press these buttons to switch the desired input source to a specific output Buttons 1 4 are used to select the input for Out 1 buttons 5 8 are used to select the input for Out 2 and so on NOTE If the...

Страница 15: ...R channel of the remote See Setting the IR Channel page 6 for more information 2 Primary battery slot shown without battery Holds the battery for operating the remote Use only 3V CR2032 type batteries...

Страница 16: ...the 4x4 Matrix for HDMI the IR control must be set to the same channel as the matrix 1 Power down the 4x4 Matrix for HDMI 1 3 by disconnecting the power cord 2 Press and hold the Reset button on the...

Страница 17: ...table below The IR channel for IR remote must match the IR channel of the matrix IR Channel 1 2 3 4 DIP Switch Settings 1 2 ON 1 2 ON 1 2 1 2 ON 1 2 ON 6 Once the desired channel has been set power cy...

Страница 18: ...L Connect an IR extender Gefen part no EXT RMT EXTIRN to the IR Ext port on the matrix 5 Connect the included 5V DC locking power supply to the power receptacle on the matrix Do not overtighten the po...

Страница 19: ......

Страница 20: ......

Страница 21: ...ng the 4x4 Matrix for HDMI 1 3 Routing Basics 12 Determining the Current Routing State 12 Using the IR Remote Control Unit 13 Using the IR Extender 14 EDID Management 15 Selecting the EDID Mode 15 Int...

Страница 22: ...ach LED indicator represents an input In 1 In 4 on the matrix The LED indicator for the currently selected input will glow solid blue In the example above we can see that Input 1 is routed to Output 1...

Страница 23: ...2 is routed to Out 2 To illustrate a routing change we will route In 3 to Out 2 1 Point the IR remote at the IR sensor on the top panel of the matrix 2 Since we want to switch to a different input sou...

Страница 24: ...this case an IR extender Gefen part no EXT RMT EXTIRN can be connected to the IR port on the matrix The sensor on the IR extender behaves exactly like the sensor on the front panel of the matrix Alway...

Страница 25: ...EDID from the display sink or the built in internal EDID Selecting the EDID Mode 1 Use a sharp pointed object such as a jeweler s screwdriver to slide the EDID switch to the desired position Set the s...

Страница 26: ...ed by the internal EDID Video Timings Audio Formats 640 x 480p 59 60 4 3 720 x 480p 59 60 4 3 720 x 480p 59 60 16 9 1280 x 720p 59 60 16 9 1920 x 1080i 59 60 16 9 1440 x 480i 59 60 4 3 1920 x 1080p 59...

Страница 27: ...4x4 Matrix for HDMI 1 3 will always attempt to read the EDID from the sink device connected to the Out 1 port and copy it to the In 1 port Out 1 is the default primary output port If a sink device is...

Страница 28: ......

Страница 29: ...Matrix for HDMI 1 3 03 Advanced Operation RS 232 Configuration 20 RS 232 Interface 20 RS 232 Settings 20 Commands 21...

Страница 30: ...Baud rate 19200 Data bits 8 Parity None Stop bits 1 Hardware flow control None DA 15 DE 9 DB 25 DC 37 DD 50 5 6 4 7 3 8 2 9 1 DCD RXD TXD DTR GND DSR RTS CTS R1 DCD RXD TXD DTR GND DSR RTS CTS R1 1 2...

Страница 31: ...ers and associated ASCII codes that are used to control routing on the matrix When sending hex codes do not append a Line Feed 0Ah or Carriage Return 0Dh All commands are case sensitive except where n...

Страница 32: ......

Страница 33: ...Matrix for HDMI 1 3 04 Appendix Specifications 24...

Страница 34: ...Power Indicator 1 x LED red EDID Switch 1 x Slide type Connectors Video Input 4 x HDMI Type A 19 pin female Video Output 4 x HDMI Type A 19 pin female RS 232 1 x DB 9 female IR Extender 1 x 3 5mm mini...

Страница 35: ......

Страница 36: ...t uses UL listed or CE compliant power supplies 20600 Nordhoff St Chatsworth CA 91311 1 800 545 6900 818 772 9100 fax 818 772 9120 www gefen com support gefen com Pb Stretch it Switch it Split it Gefe...

Отзывы: