


page | 71
B
asic Oper
ation
OSD Menu
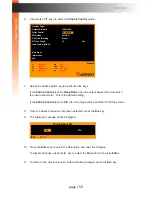
Changing the Source Name
By default, each of the four inputs on the switcher is named as follows: PC01, PC02,
PC03, and PC04. To keep track of your sources, it is recommended to use names that are
unique to each device.
1. Enter the menu system. See
Accessing the Menu System (page 39)
for more
information.
2. Select the desired
Input Name
by using the
▲
or
▼
keys on the computer keyboard.
3. Press the key.
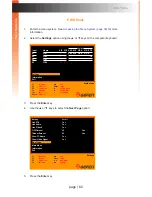
4. The
Input Name
text will be red and the first character in the
Input Name
will be
highlighted in blue.
5. Type the new name of the
Input Name
. The name cannot exceed 12 characters in
length.
6. Press the
Enter
key.
F1
F2
F3
F4
Ins
Home
Main menu
Full view
PIP view
Quad view
PAP view
Edit
Video B
Esc
Enter
A
H
I
Exit
Select
Switch Audio
Switch USB
PIP display
Input
01
02
03
04
AUD USB VID-A VID-B PIP
AUD USB VID-A VID-B
PIP
z
z
X
X
X
X
X
X
Select
Name
VID USB
P C 0 1
PC02
PC03
PC04
Settings
Information
Exit
Ins
Содержание EXT-DVIK-MV-441
Страница 1: ...EXT DVIK MV 441 User Manual 4x1 DVI KVM Multiview Switcher Release A3 Preferred ...
Страница 7: ...This page left intentionally blank ...
Страница 10: ...This page left intentionally blank ...
Страница 11: ...1 Getting Started 4x1 DVI KVM Multiview Switcher ...
Страница 20: ...This page left intentionally blank ...
Страница 21: ...4x1 DVI KVM Multiview Switcher 2 Basic Operation ...
Страница 88: ...This page left intentionally blank ...
Страница 89: ...3 Advanced Operation 4x1 DVI KVM Multiview Switcher ...
Страница 122: ...This page left intentionally blank ...
Страница 123: ...page 113 4 Appendix 4x1 DVI KVM Multiview Switcher ...
Страница 129: ...page 119 Appendix Updating the Firmware 6 Click the Manage a Product button ...
Страница 131: ...page 121 Appendix Updating the Firmware 8 The Update tab will be displayed ...


